ServiceNow
GitGuardian offers an integration with ServiceNow, enabling users to synchronize their GitGuardian incidents with ServiceNow issues. This integration helps streamline incident remediation processes and align them with the Software Development Lifecycle (SDLC).
Benefits
This feature streamlines the process of creating ServiceNow issues from GitGuardian incidents:
- Supports both manual and automatic issue creation upon incident detection.
- Provides customizable templates that utilize GitGuardian variables for tailored issue descriptions.
- Includes an auto-resolve feature that automatically closes GitGuardian incidents when the corresponding ServiceNow issues are resolved.
Integration configuration
To enable GitGuardian to create and manage issues in your ServiceNow instance, you need to set up a dedicated user, create a web service, and finalize the configuration in GitGuardian.
Step A: Create the ServiceNow User
In this section, we create a dedicated user in ServiceNow to authenticate and authorize GitGuardian's access to create and update incidents.
-
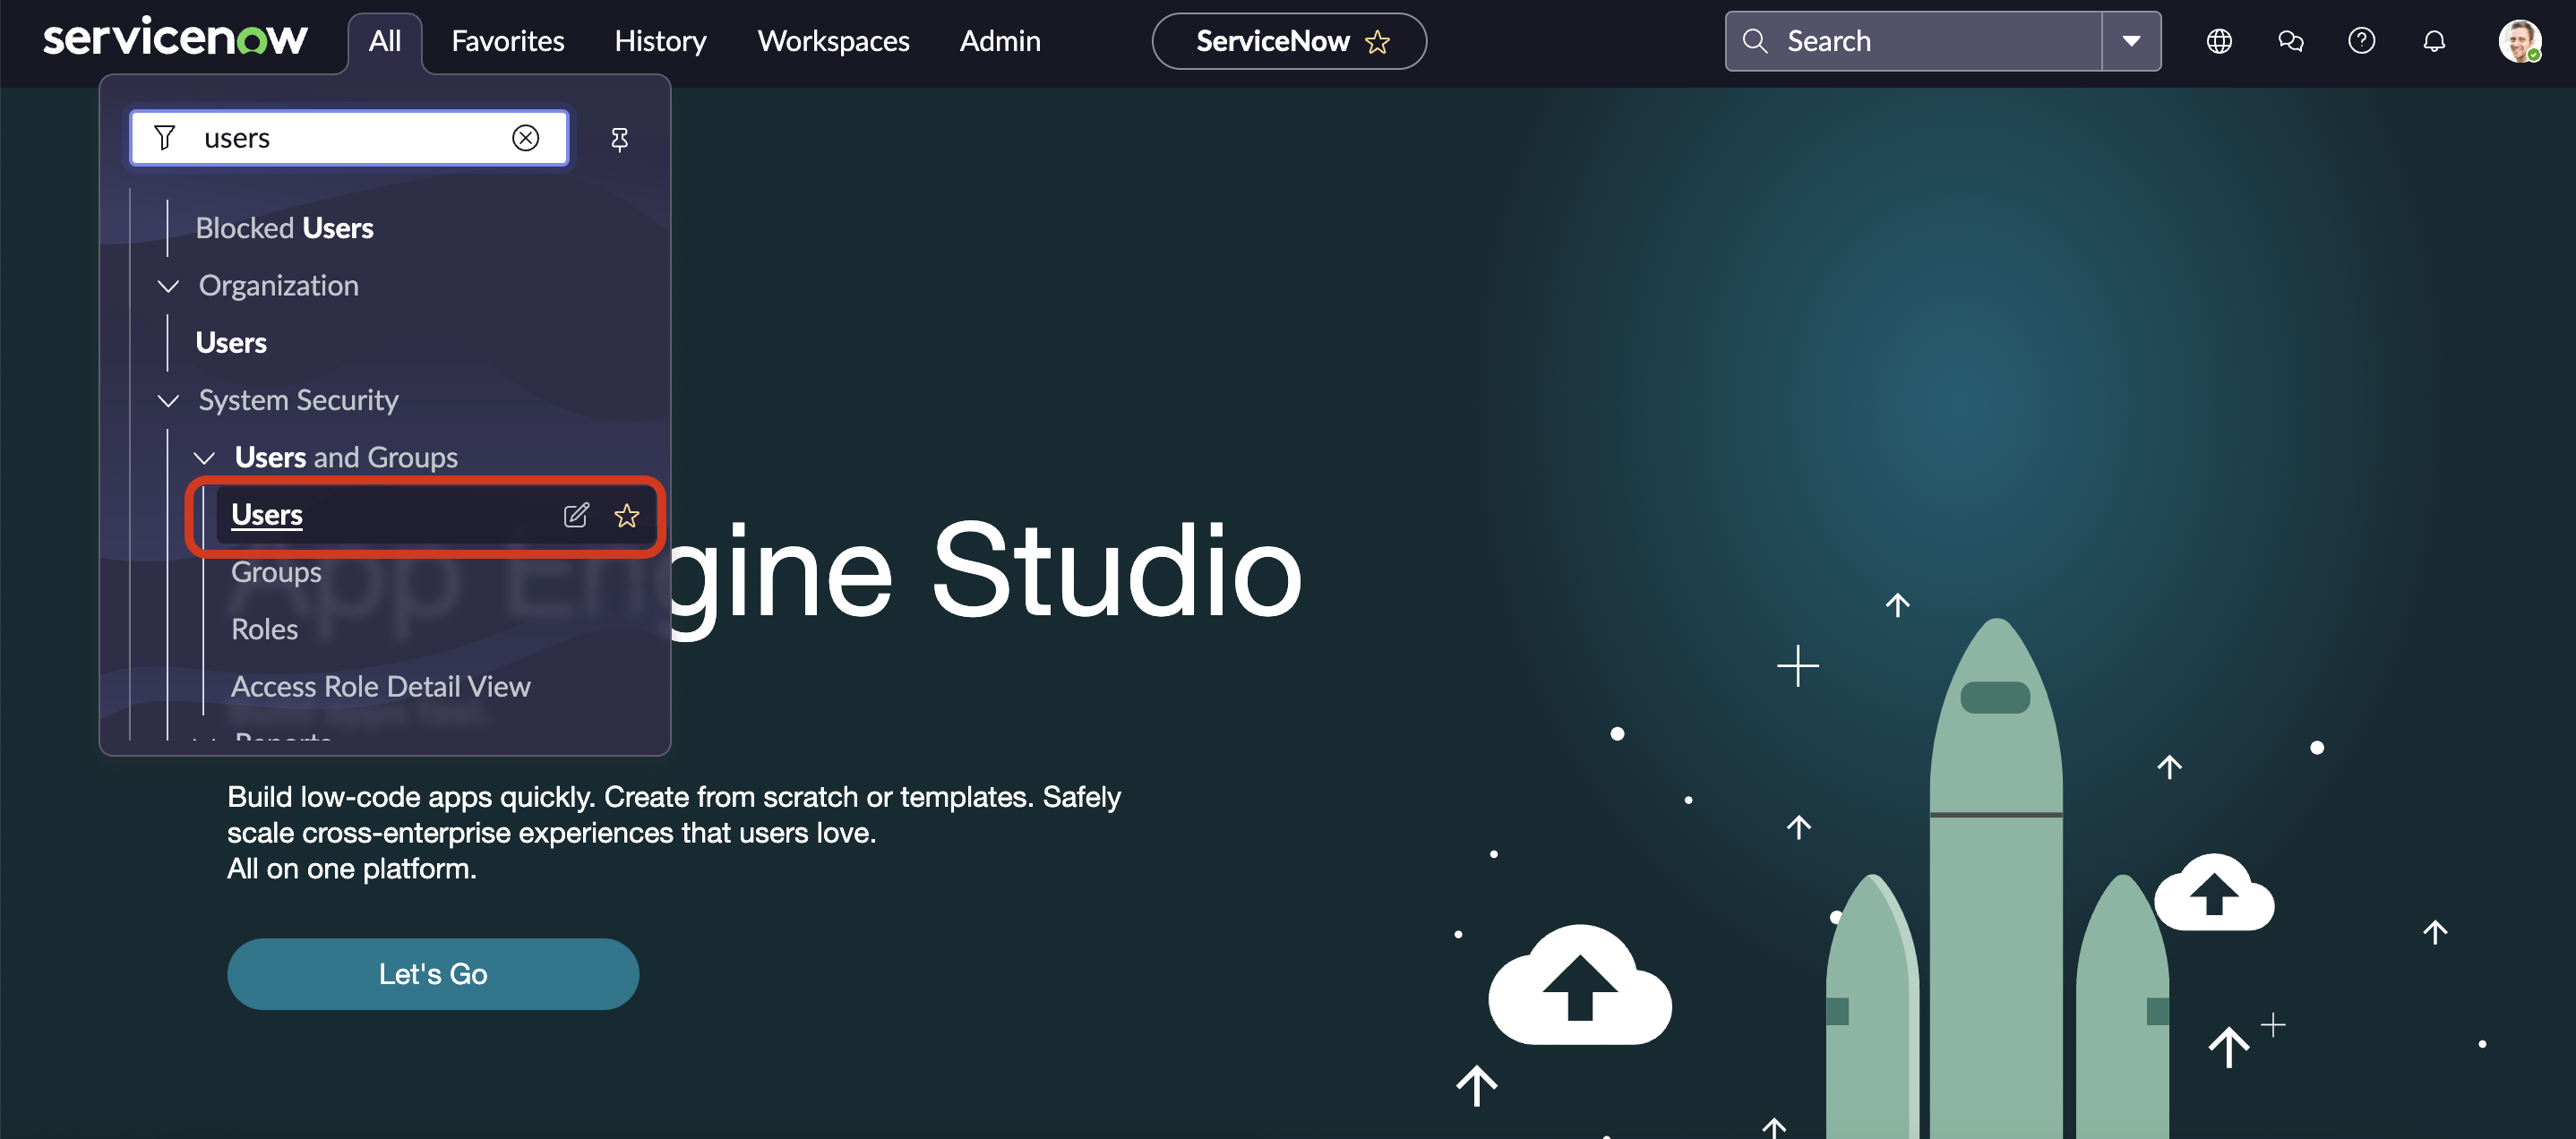
Open ServiceNow: In the web interface of your ServiceNow instance, search for "Users" in the search bar and click on "Users" under System Security > Users and Groups.
-
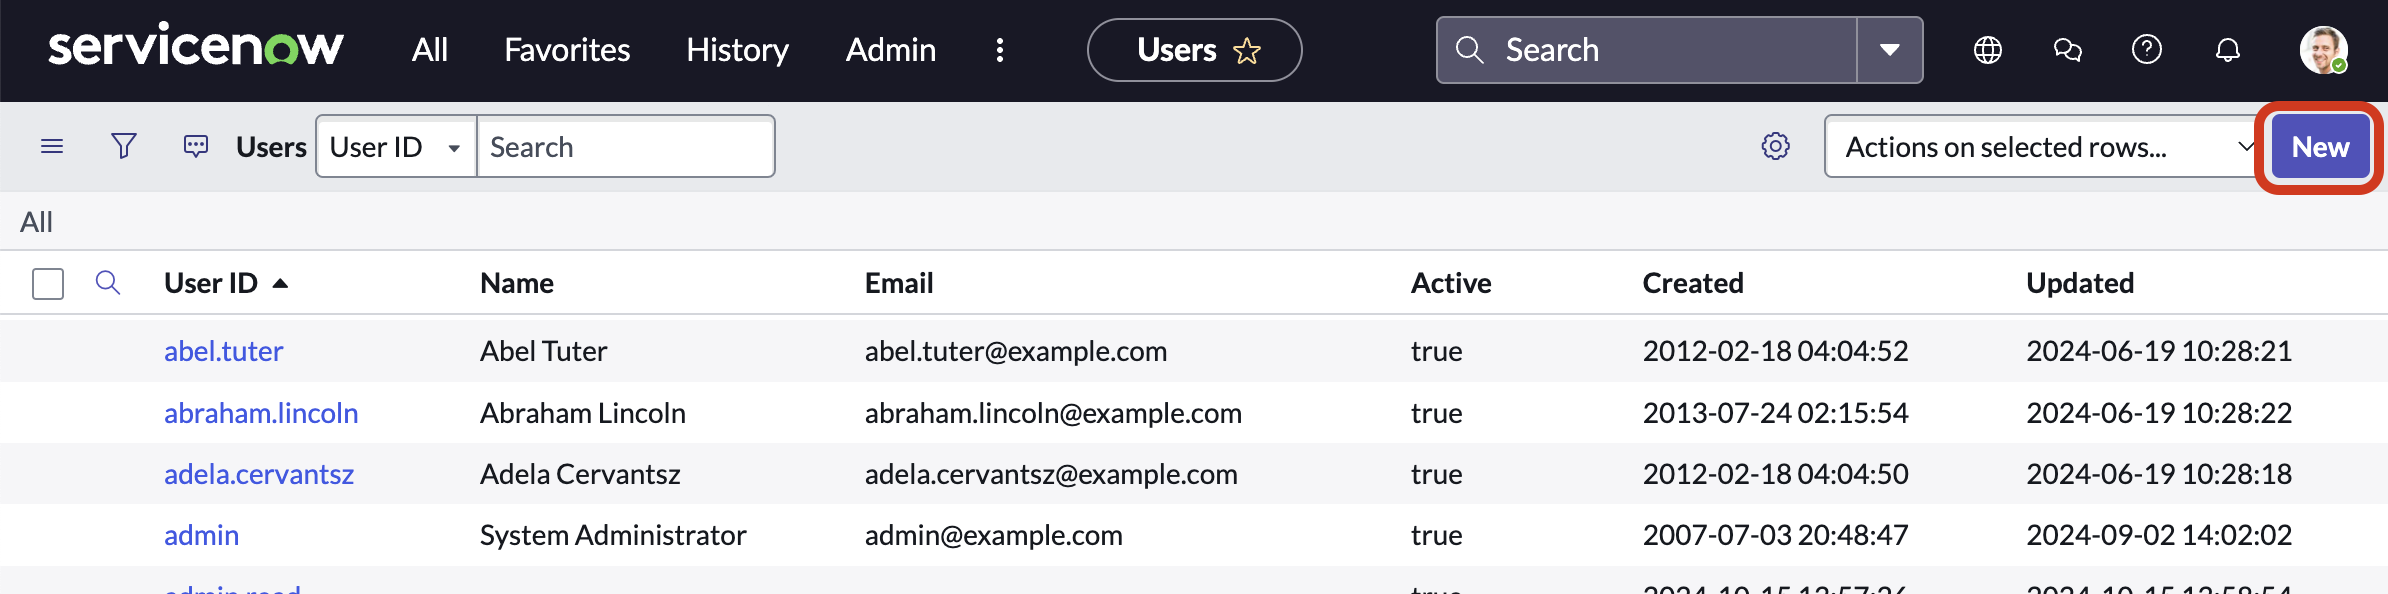
Create new user: Click the "New" button.
-
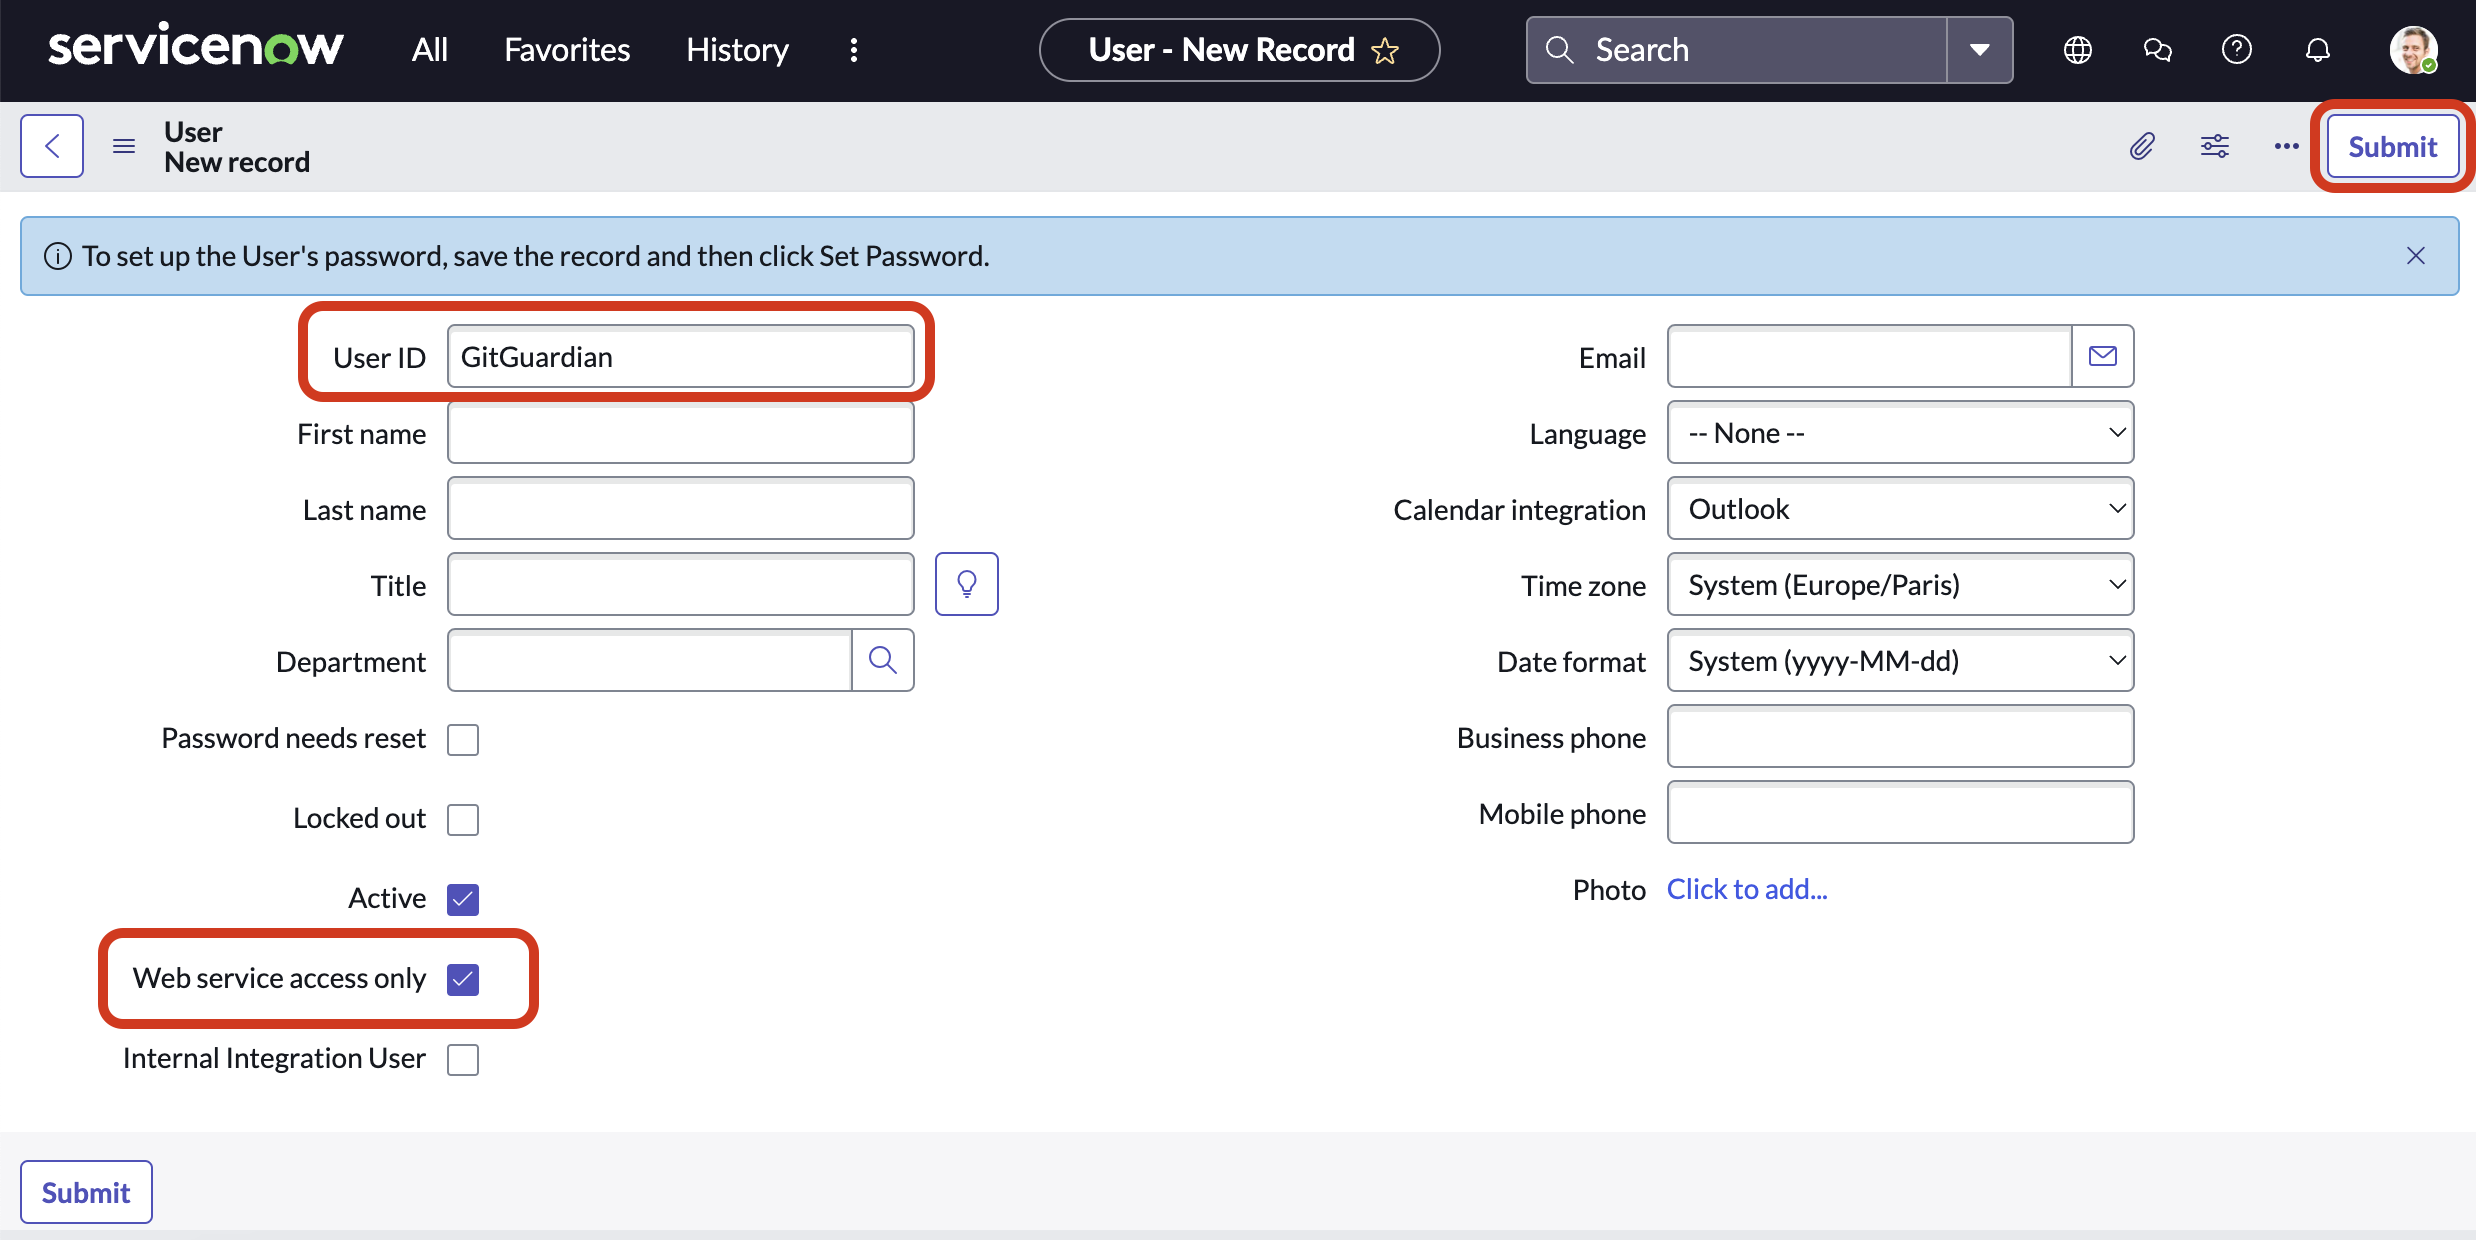
Configure user ID: Enter a username in the "User ID" field and check "Web service access only". Click "Submit".
- Tip: We recommend using a dedicated username for GitGuardian notifications.
- Tip: We recommend using a dedicated username for GitGuardian notifications.
-
Set the password: Click on the newly created user and set a password. Ensure the changes are saved.
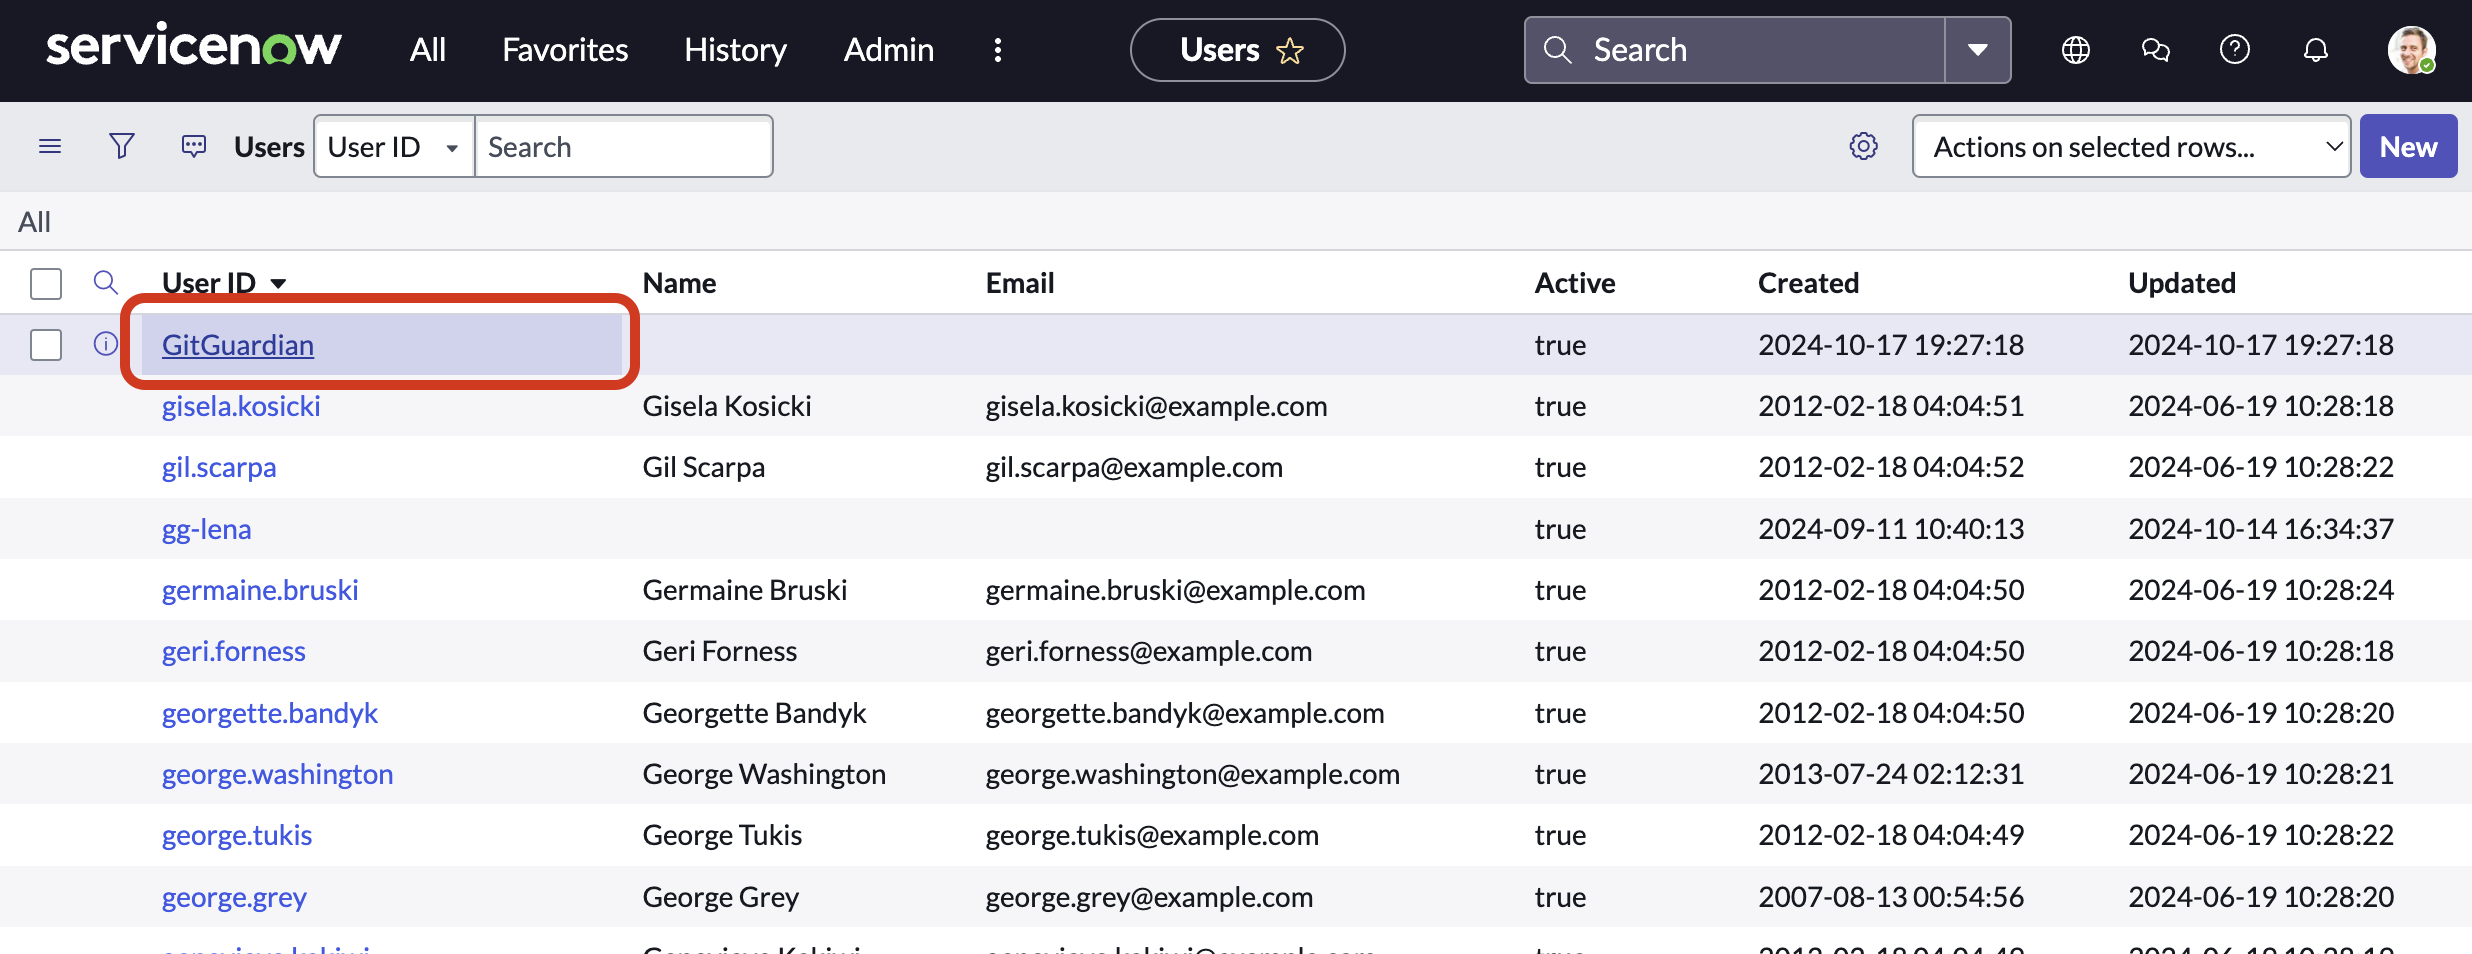
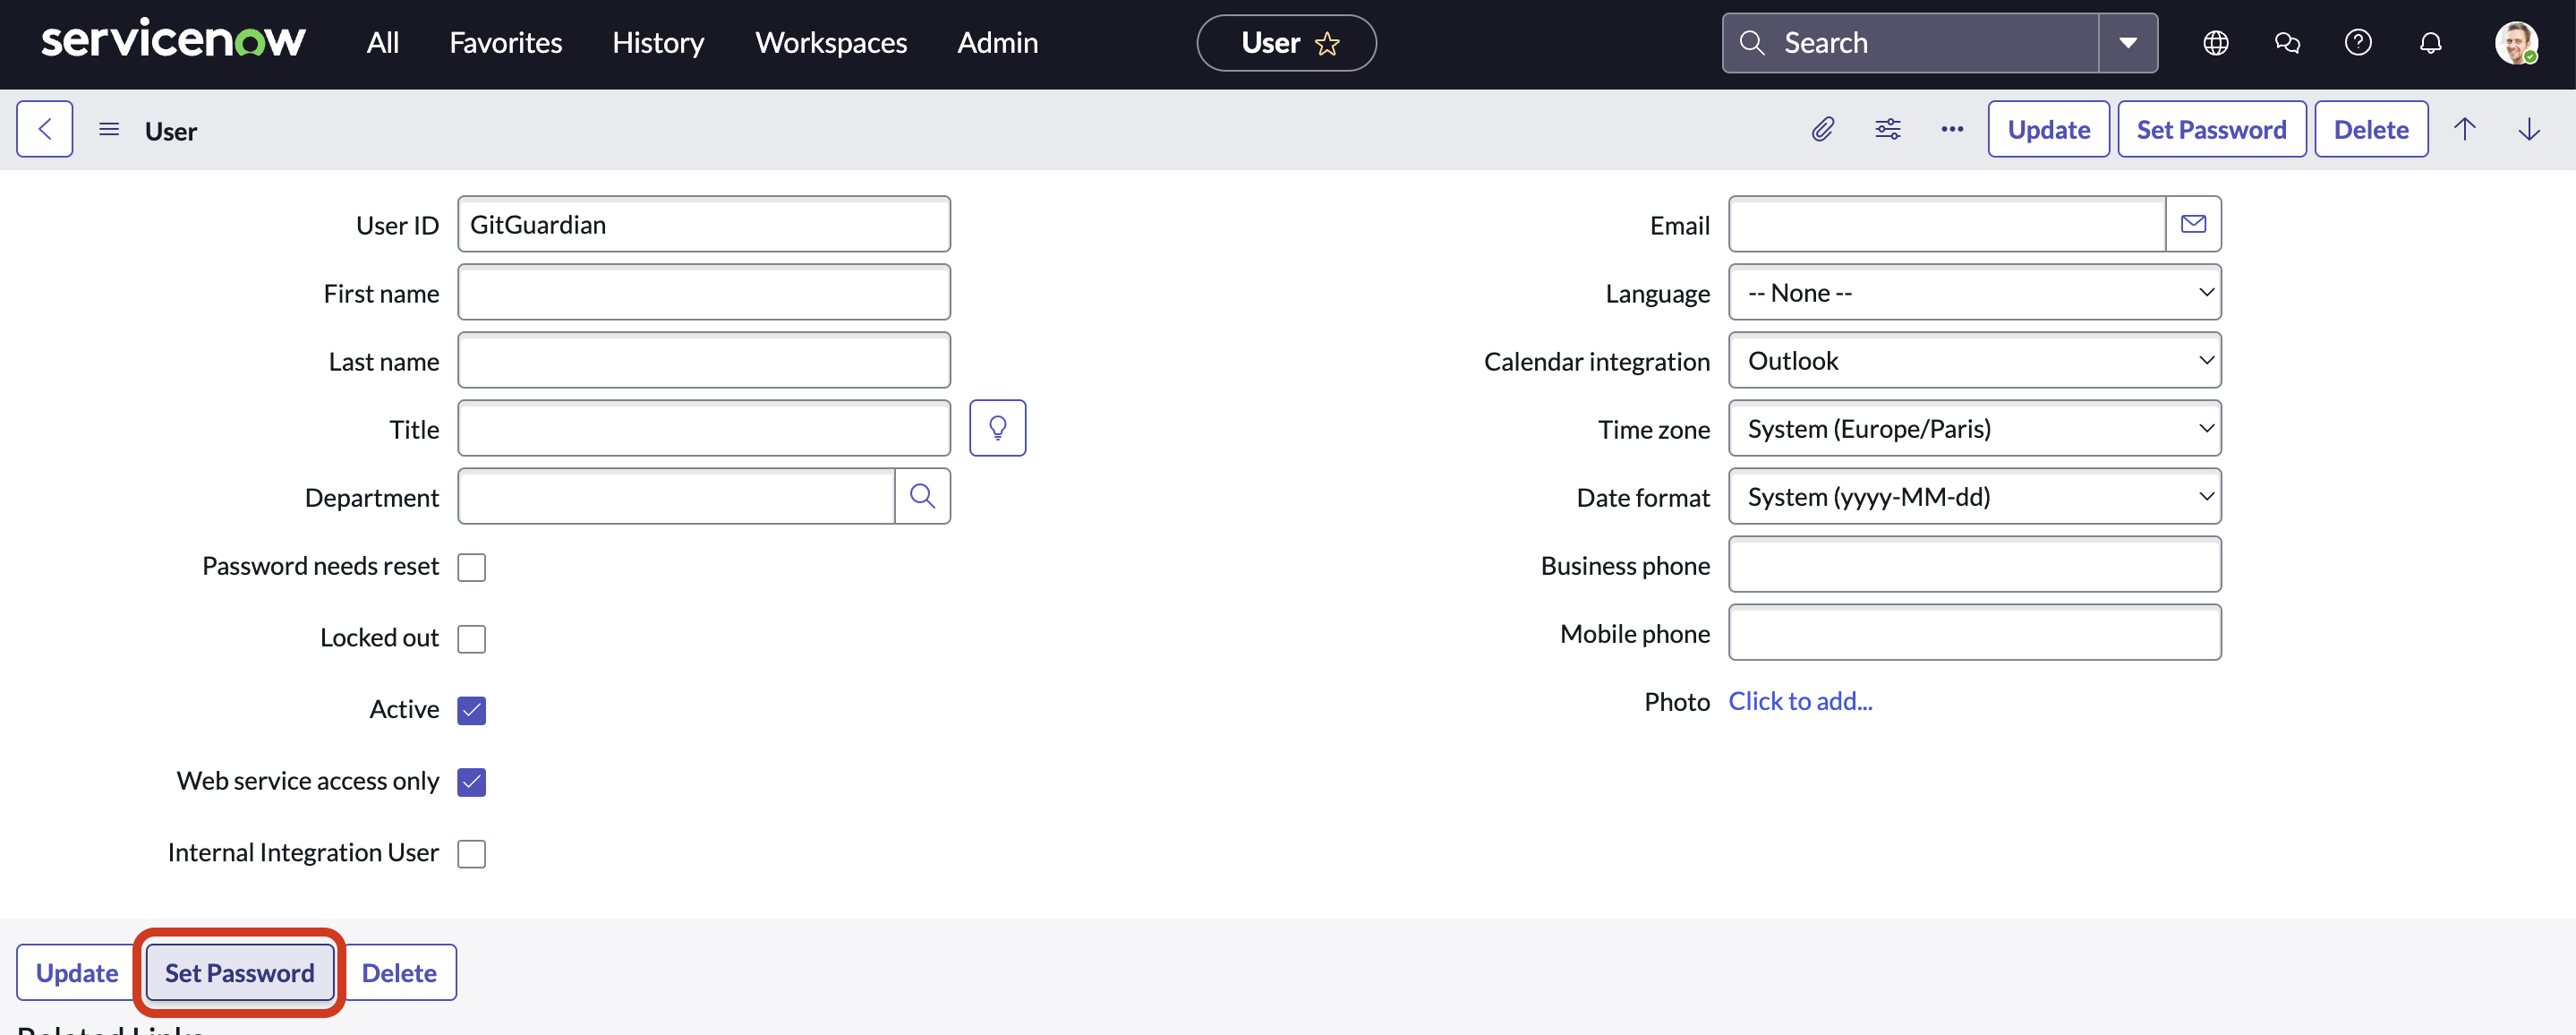 The user ID and password will be later used for configuring the integration in the GitGuardian settings.
 -
Assign roles: Under the "Roles" tab, click "Edit..." and add the roles
import_set_loaderandimport_transformer. Save the changes.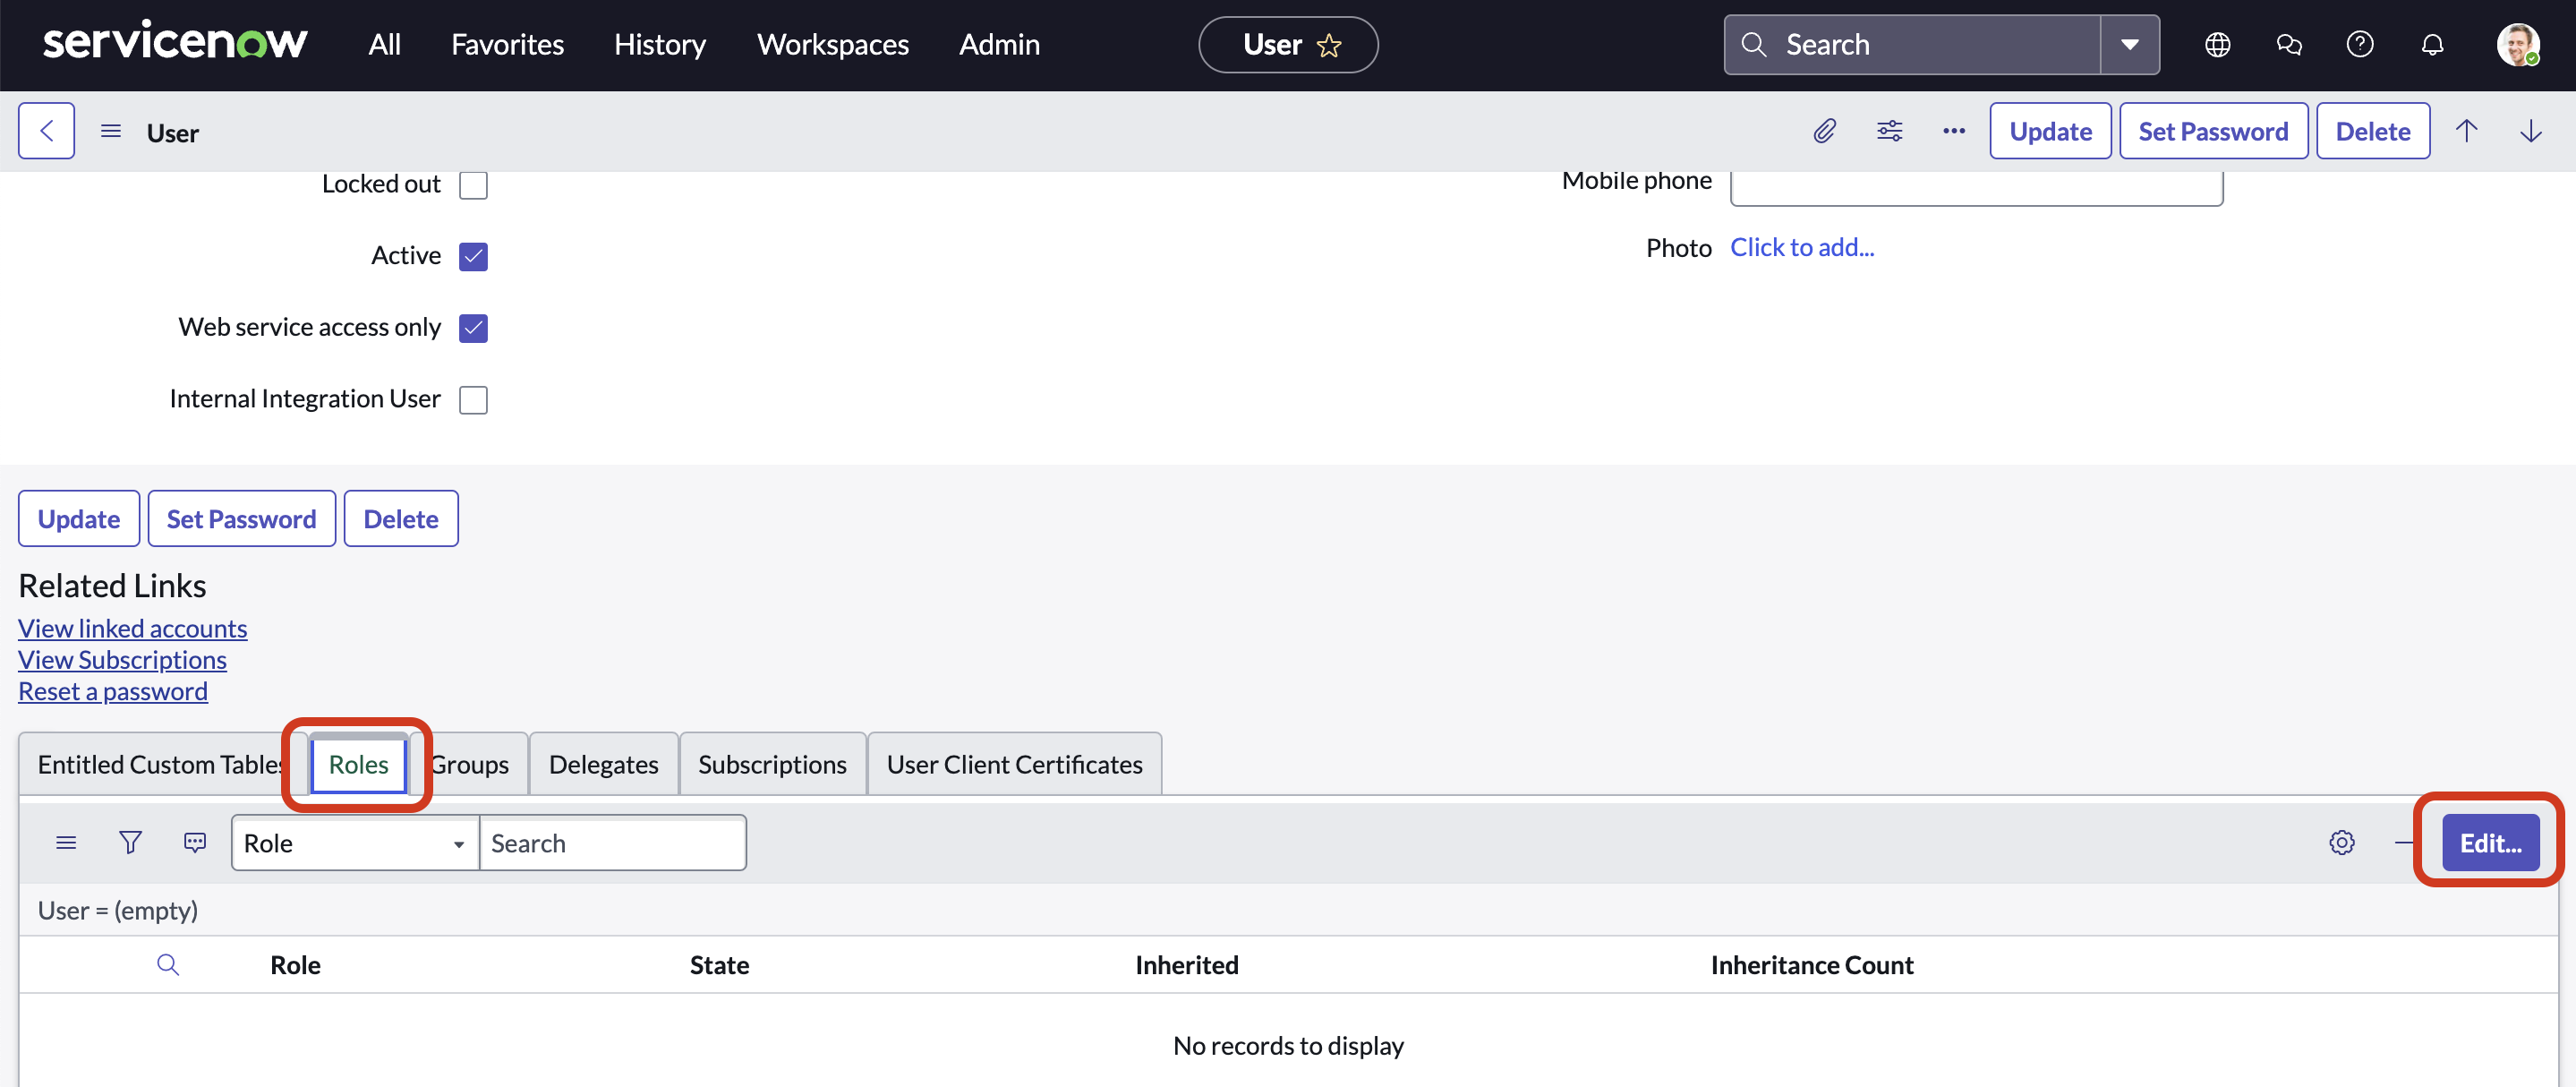
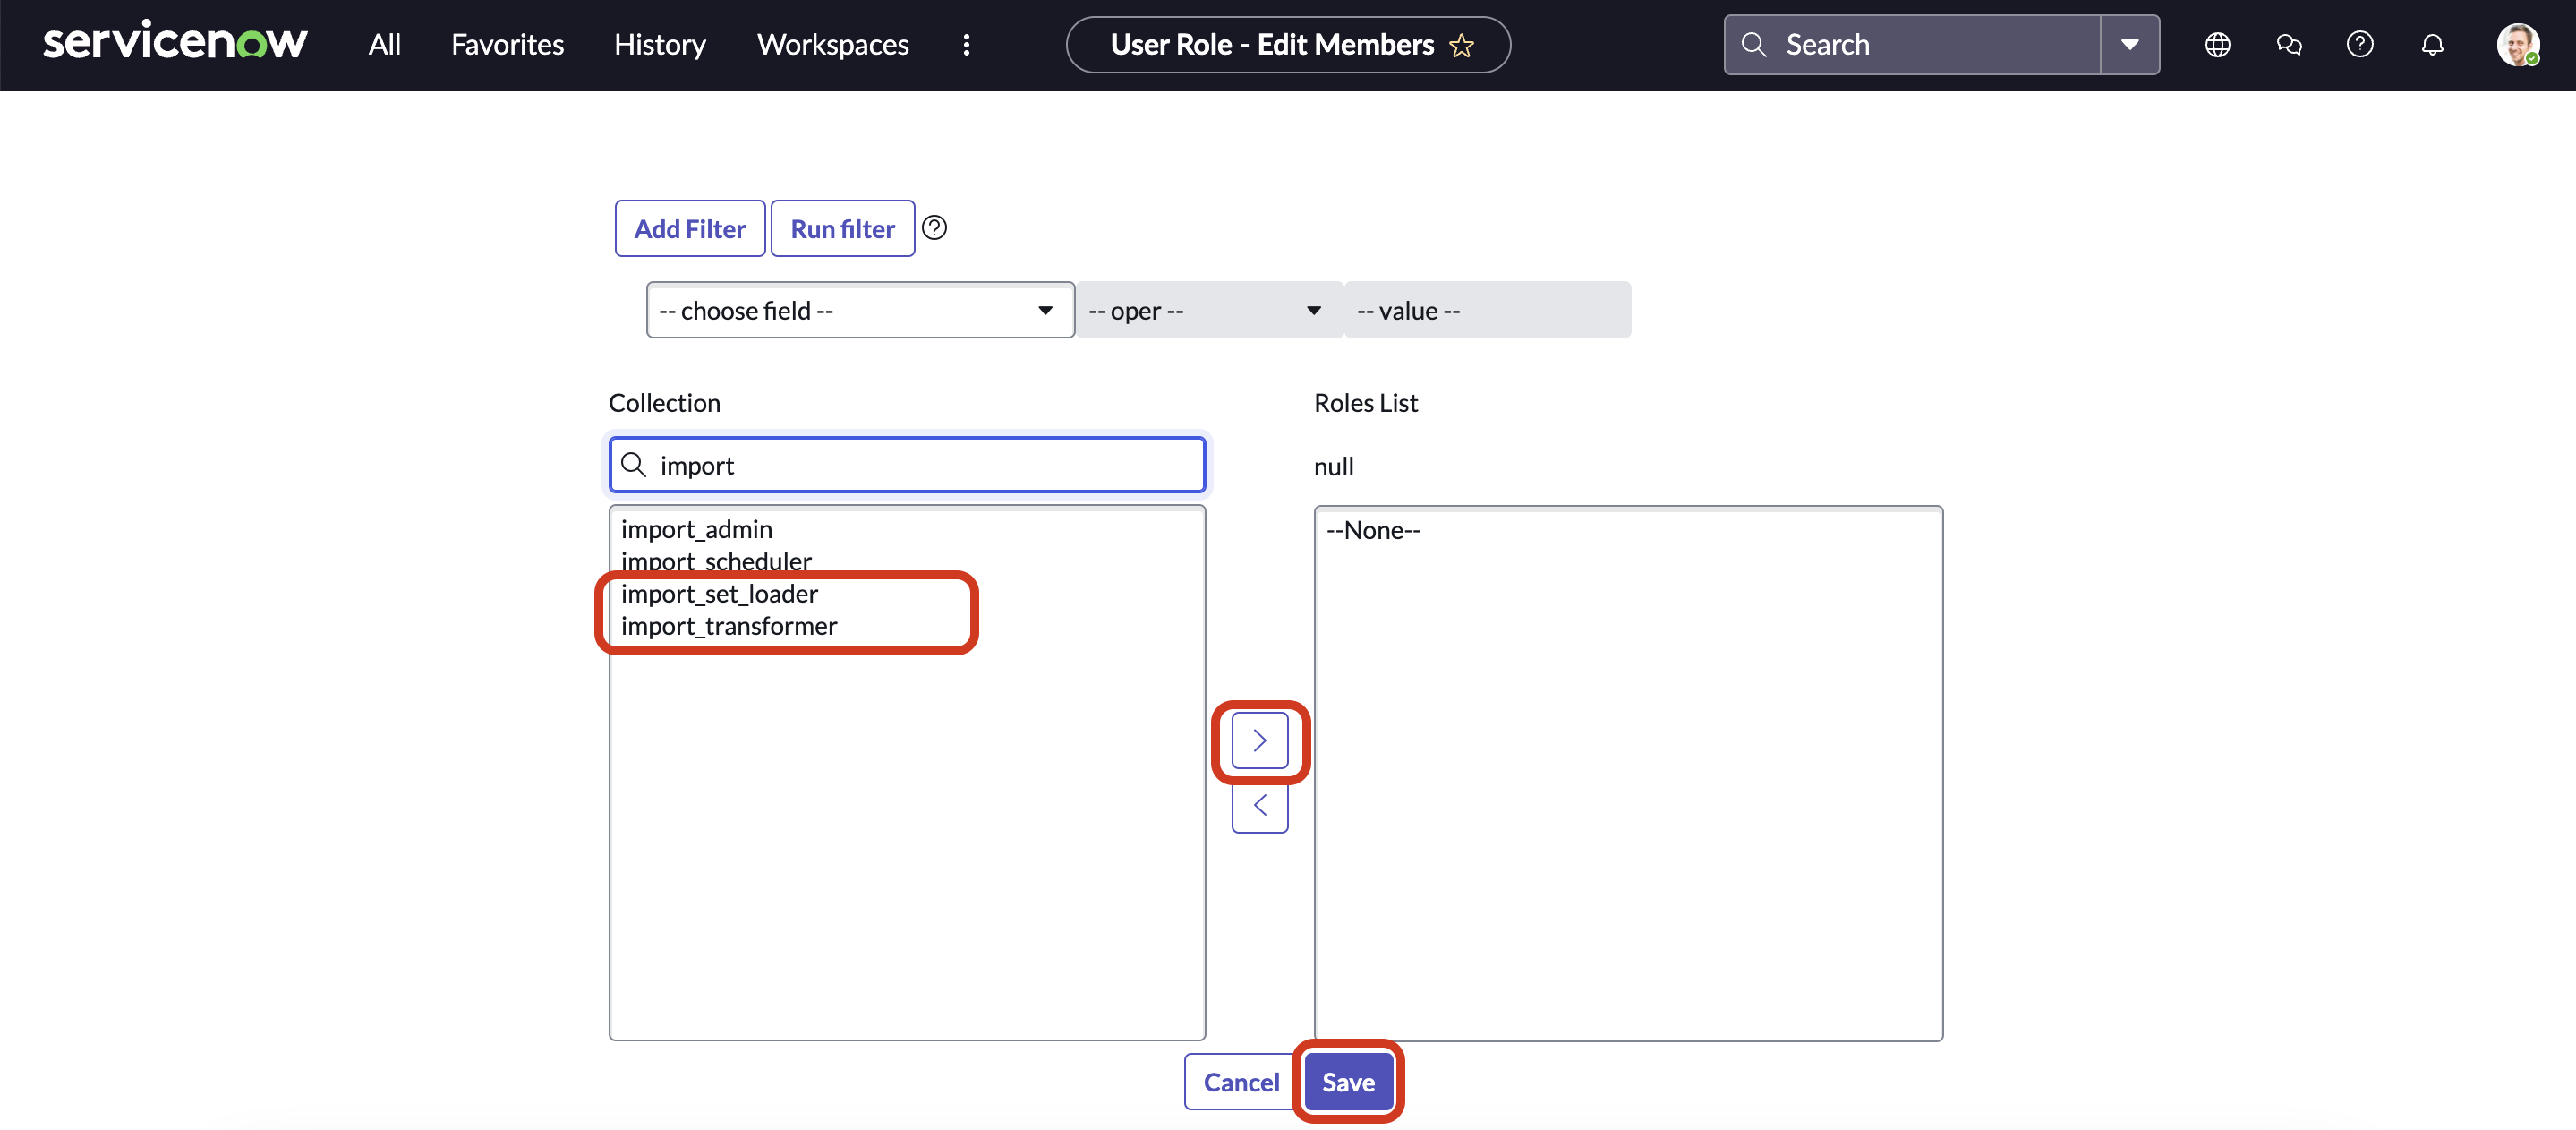
Ensure access to target table: If your target table is restricted by roles, you must assign those roles to the user you're creating.How to check and add required roles
import_set_loader and import_transformer).
Step B: Set up the web service for GitGuardian notifications
In this section, we create and configure a custom web service in ServiceNow to receive incident data from GitGuardian and map it to ServiceNow records.
-
Create the web service:
- In the ServiceNow search bar, search for "Web Services" and select "Create New" under System Web Services > Inbound.
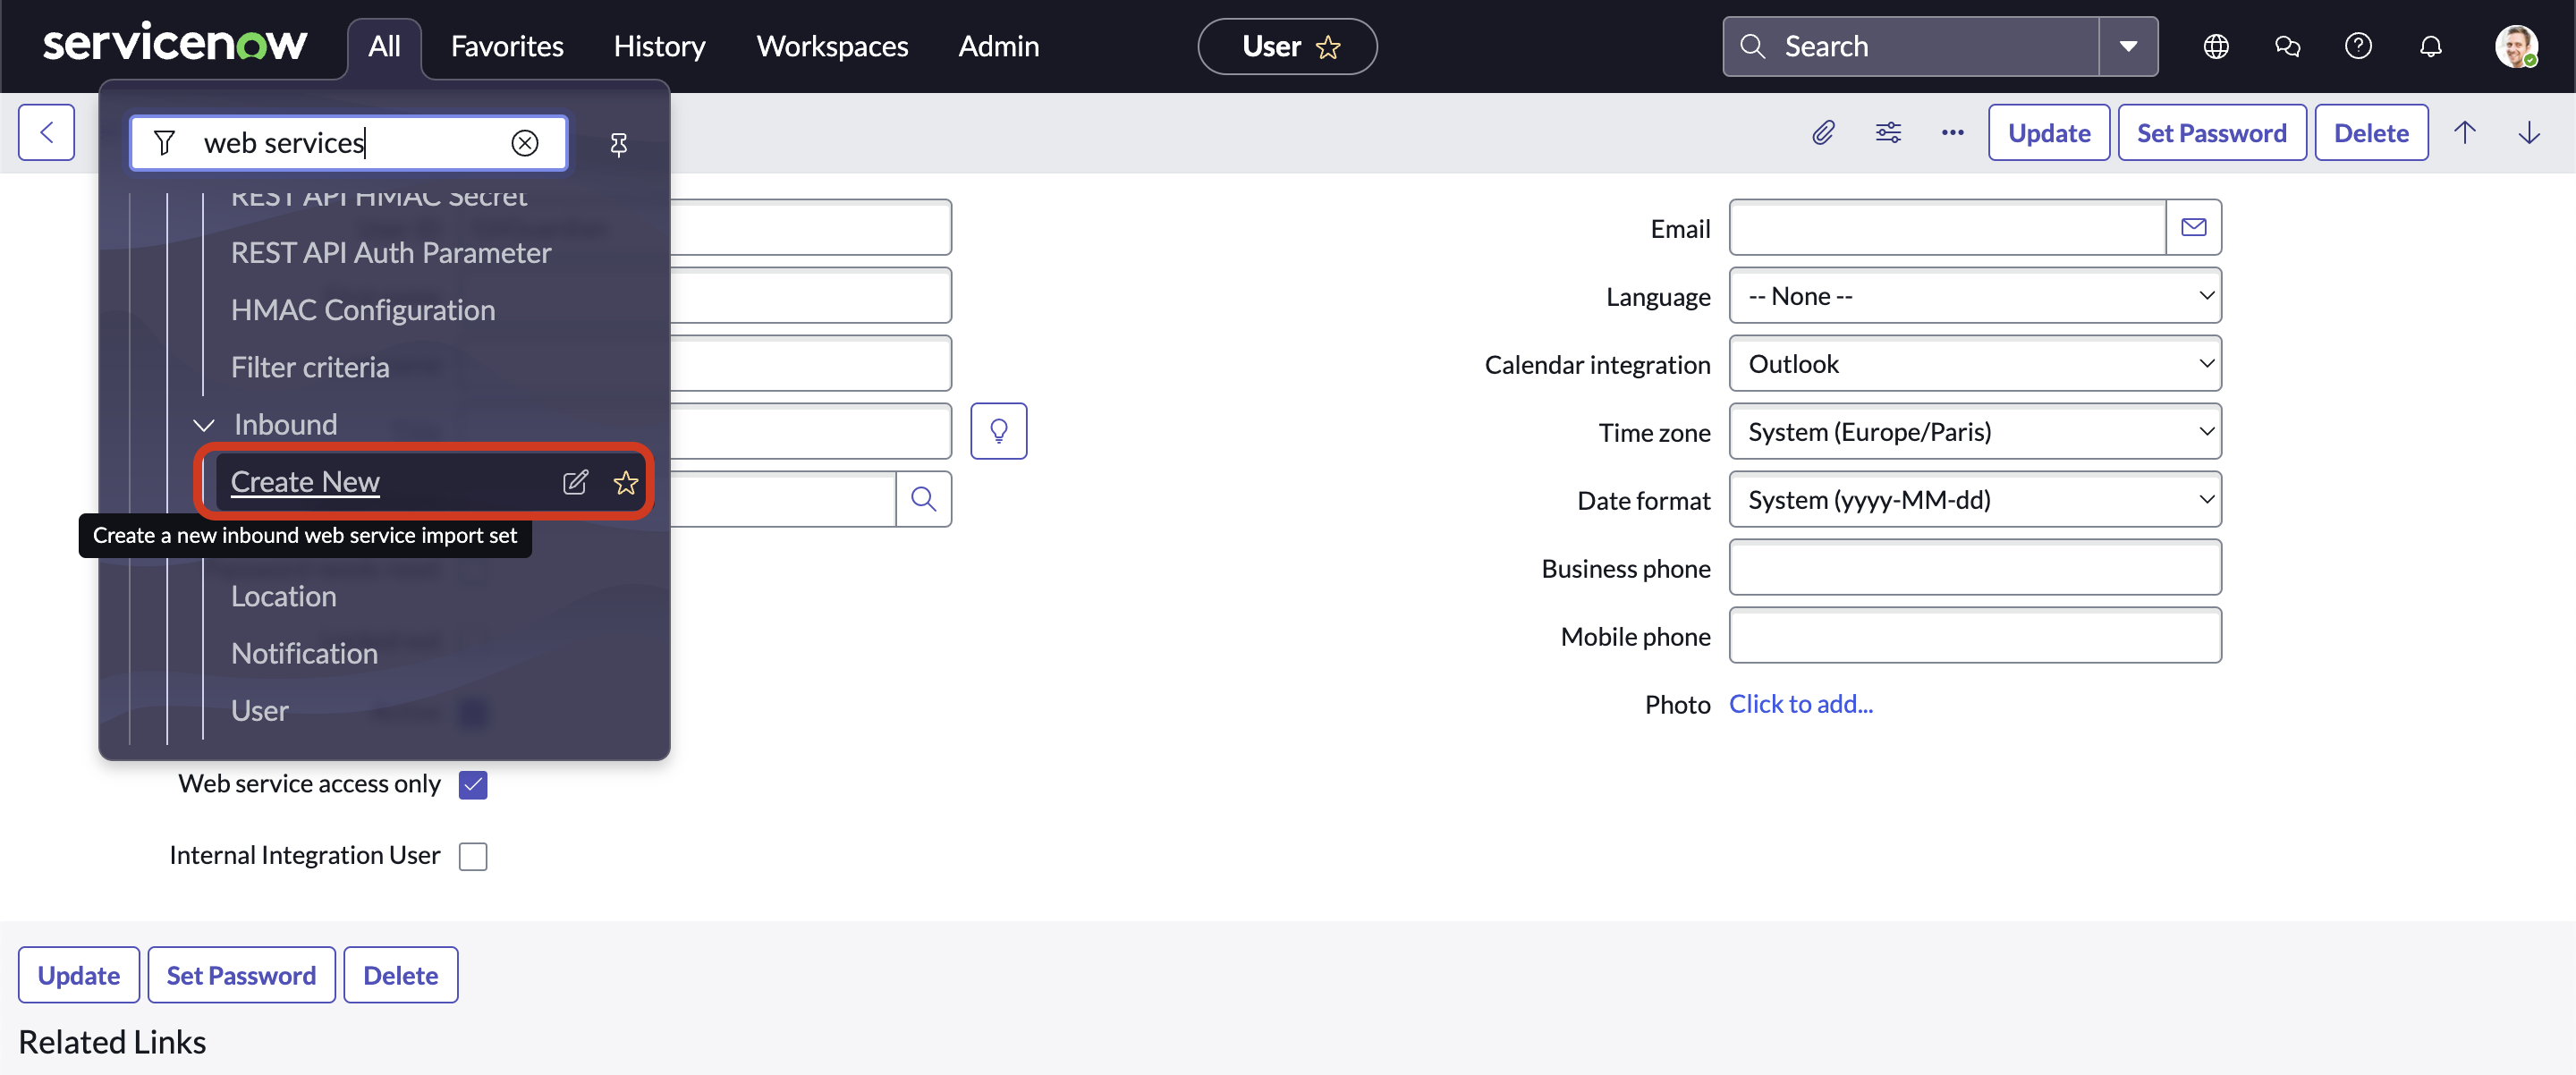
- Label the web service identifying it for GitGuardian notifications.
- Select the target table as "Incident" (or any custom table used for incidents).
- Add seven fields (rows) for the web service, filling out the labels for each. The "Name" and "Length" fields will auto-populate.
- Ensure the length of the
description,comments, andshort descriptionfields is adjusted (to avoid data cropping in ServiceNow tickets).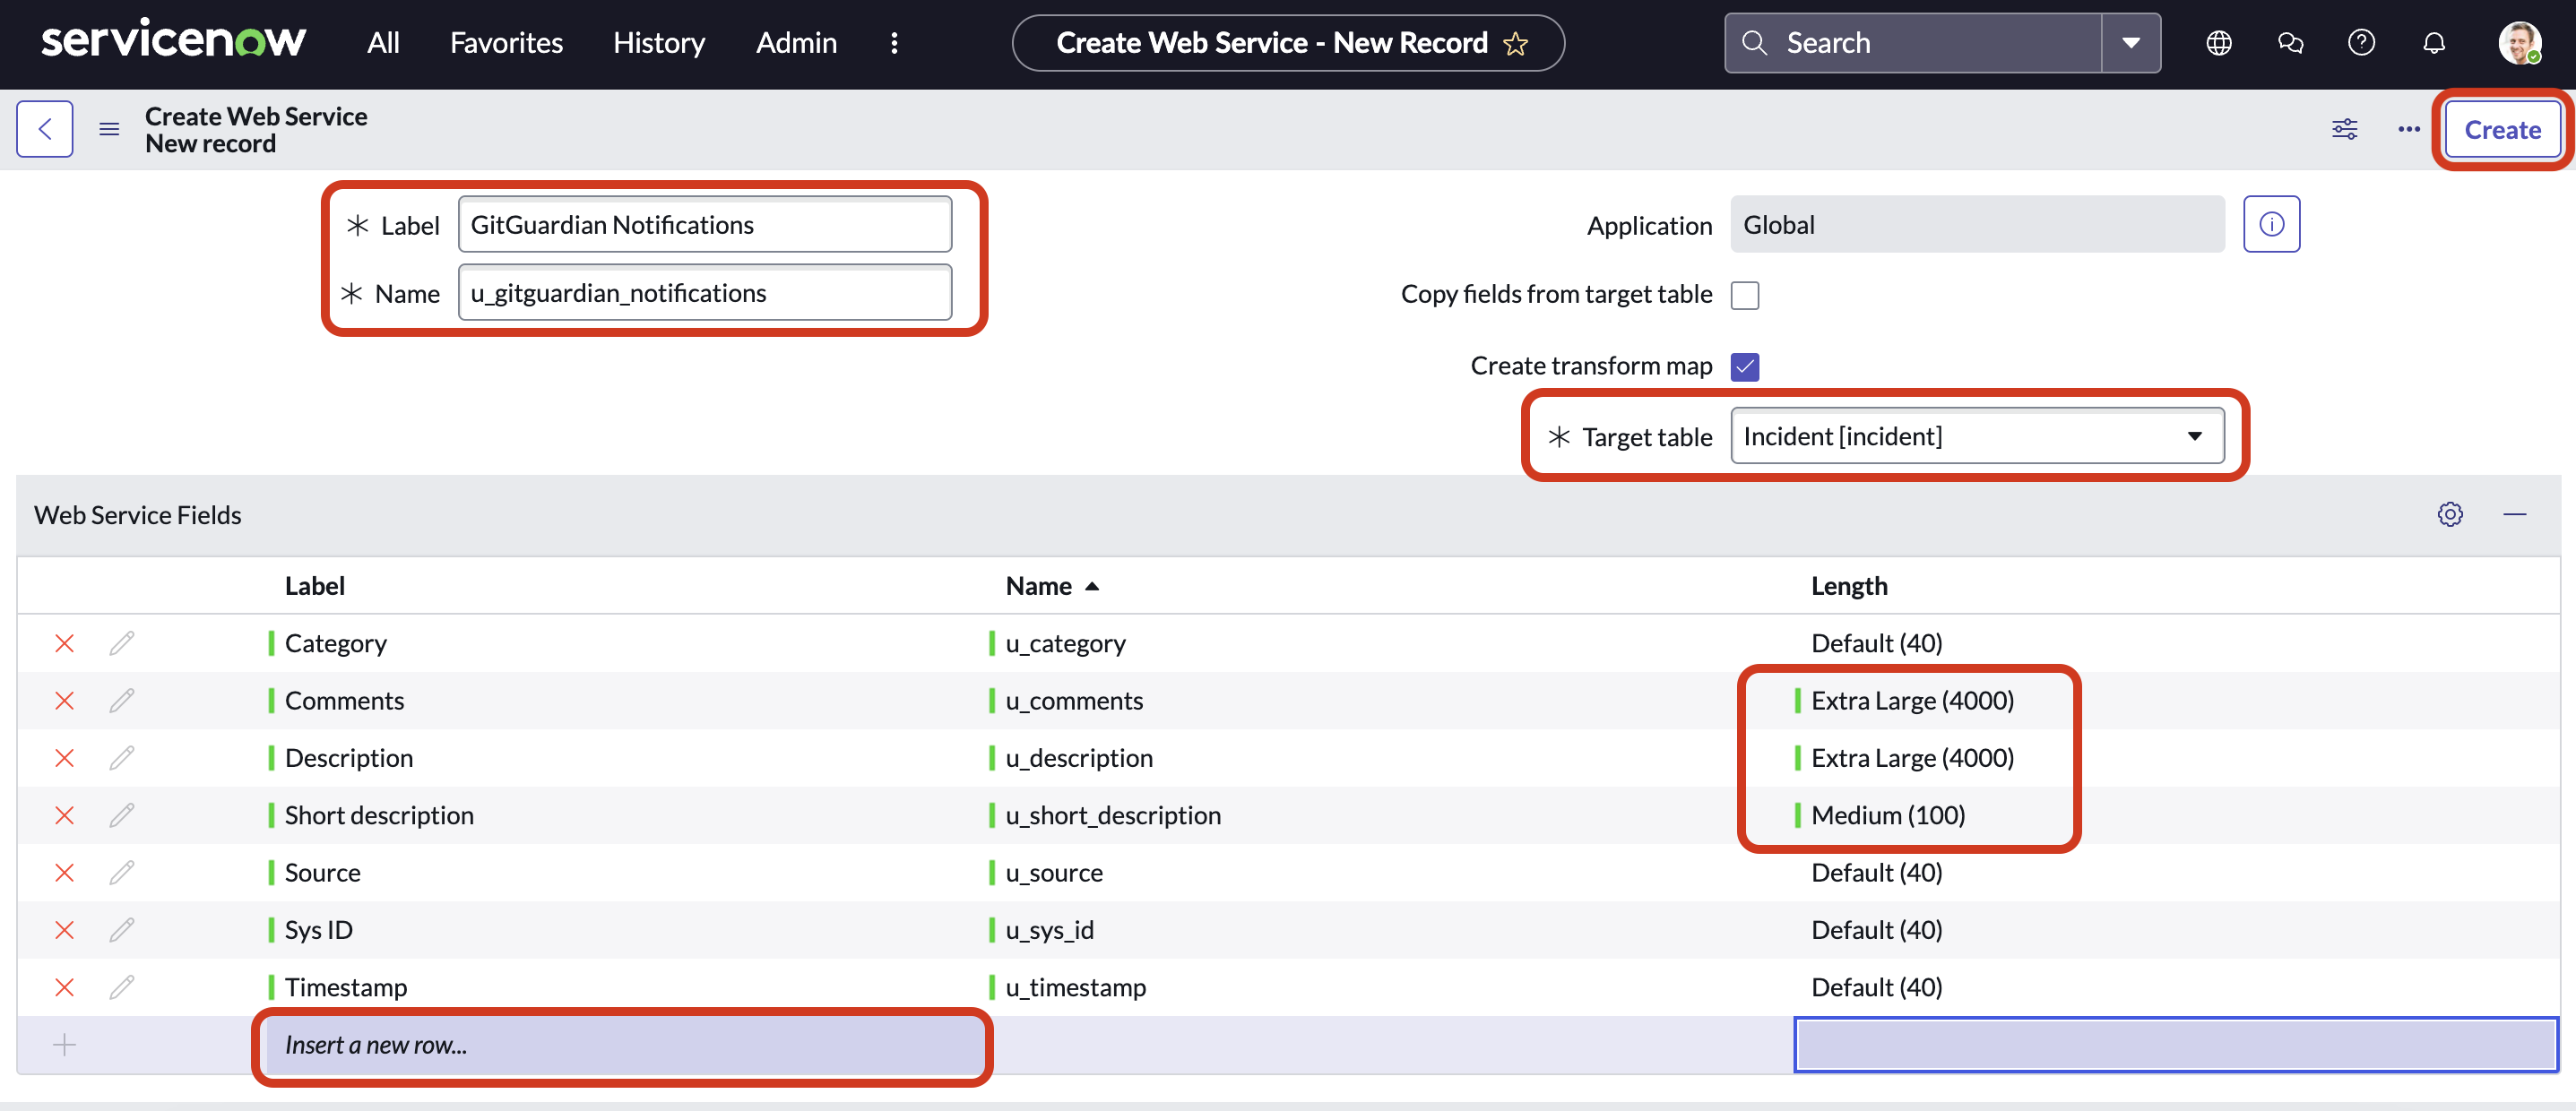
- In the ServiceNow search bar, search for "Web Services" and select "Create New" under System Web Services > Inbound.
-
Finalize the transform map
The Transform Map links fields from the GitGuardian notification to the corresponding fields in your ServiceNow table. Coalesce fields ensure that records are either updated if a match is found or created if no match exists.
- After creating the web service, select Use Coalesce Field for Record Matching to designate the coalesce setting for the appropriate field and click Submit.
- In the "Related Links" section, click Auto Map Matching Fields to automatically map fields from GitGuardian to your ServiceNow table.
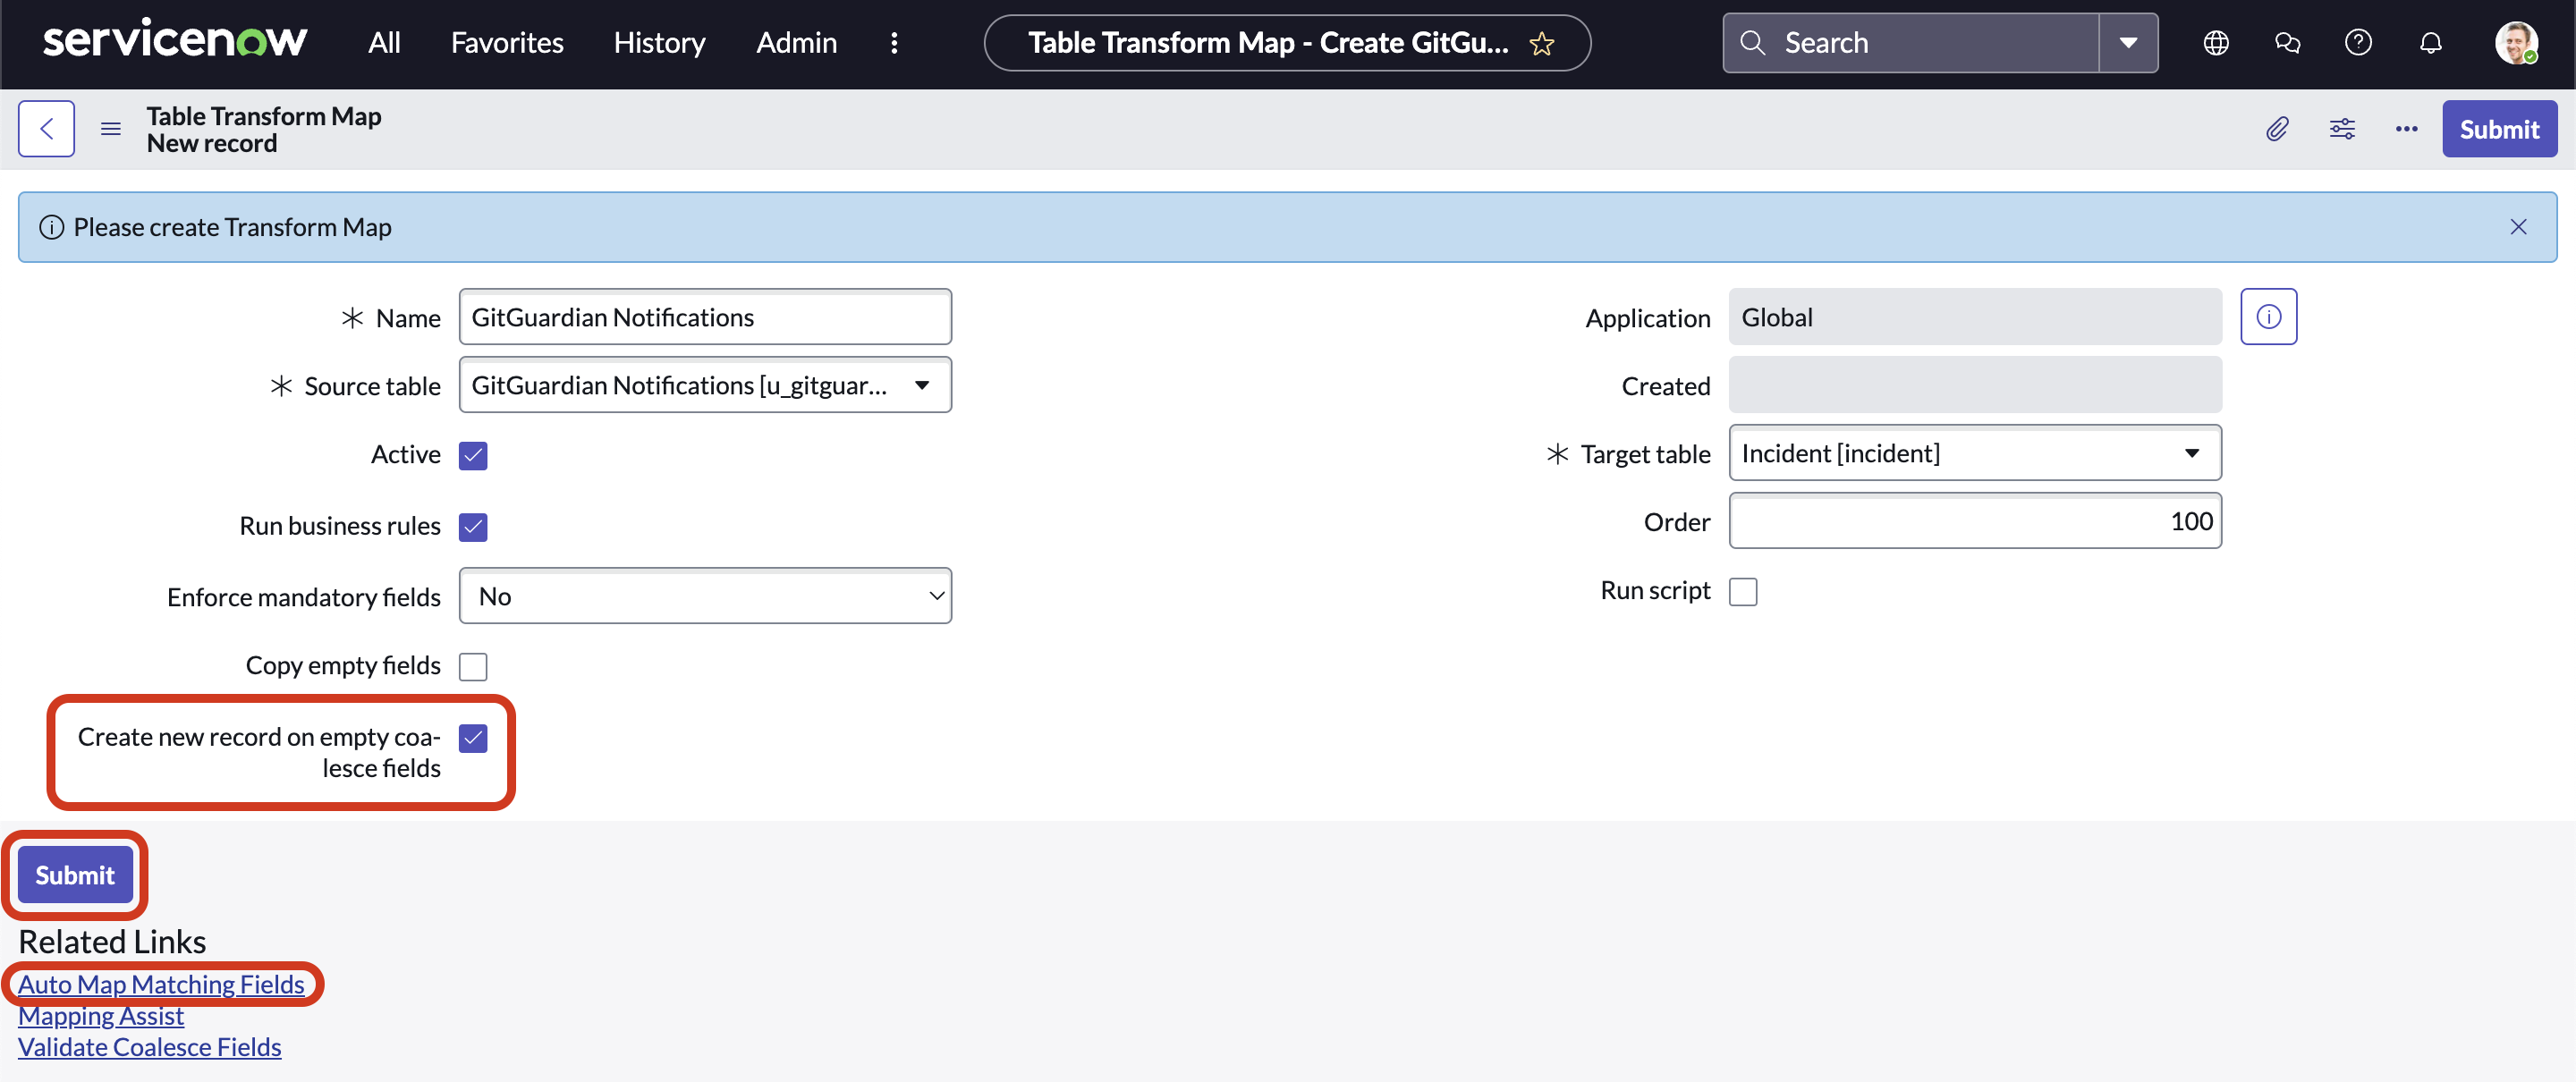
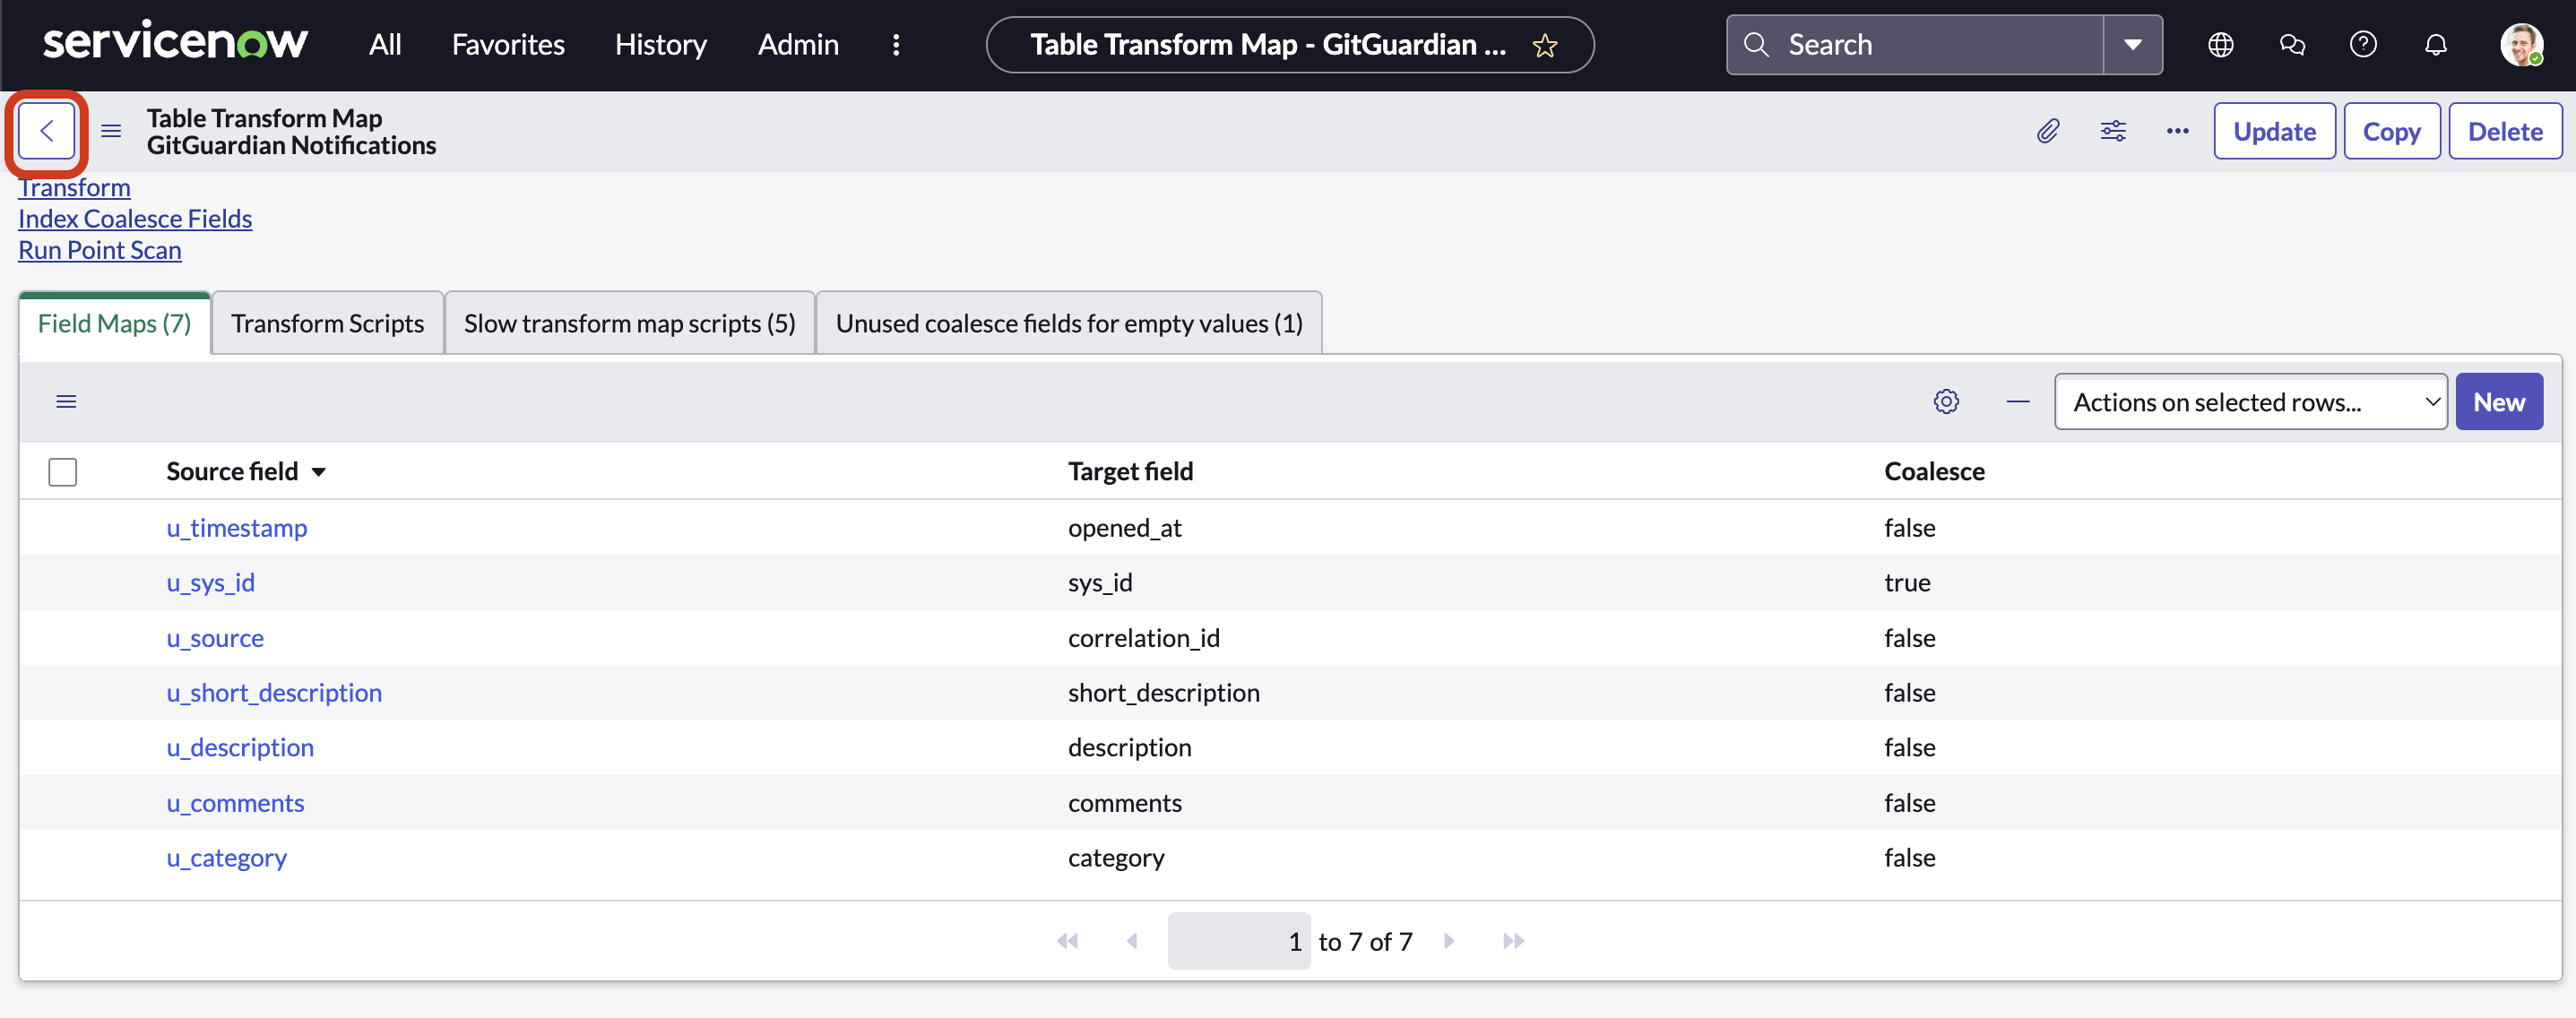
- Review the mapped fields and create any missing correspondences:
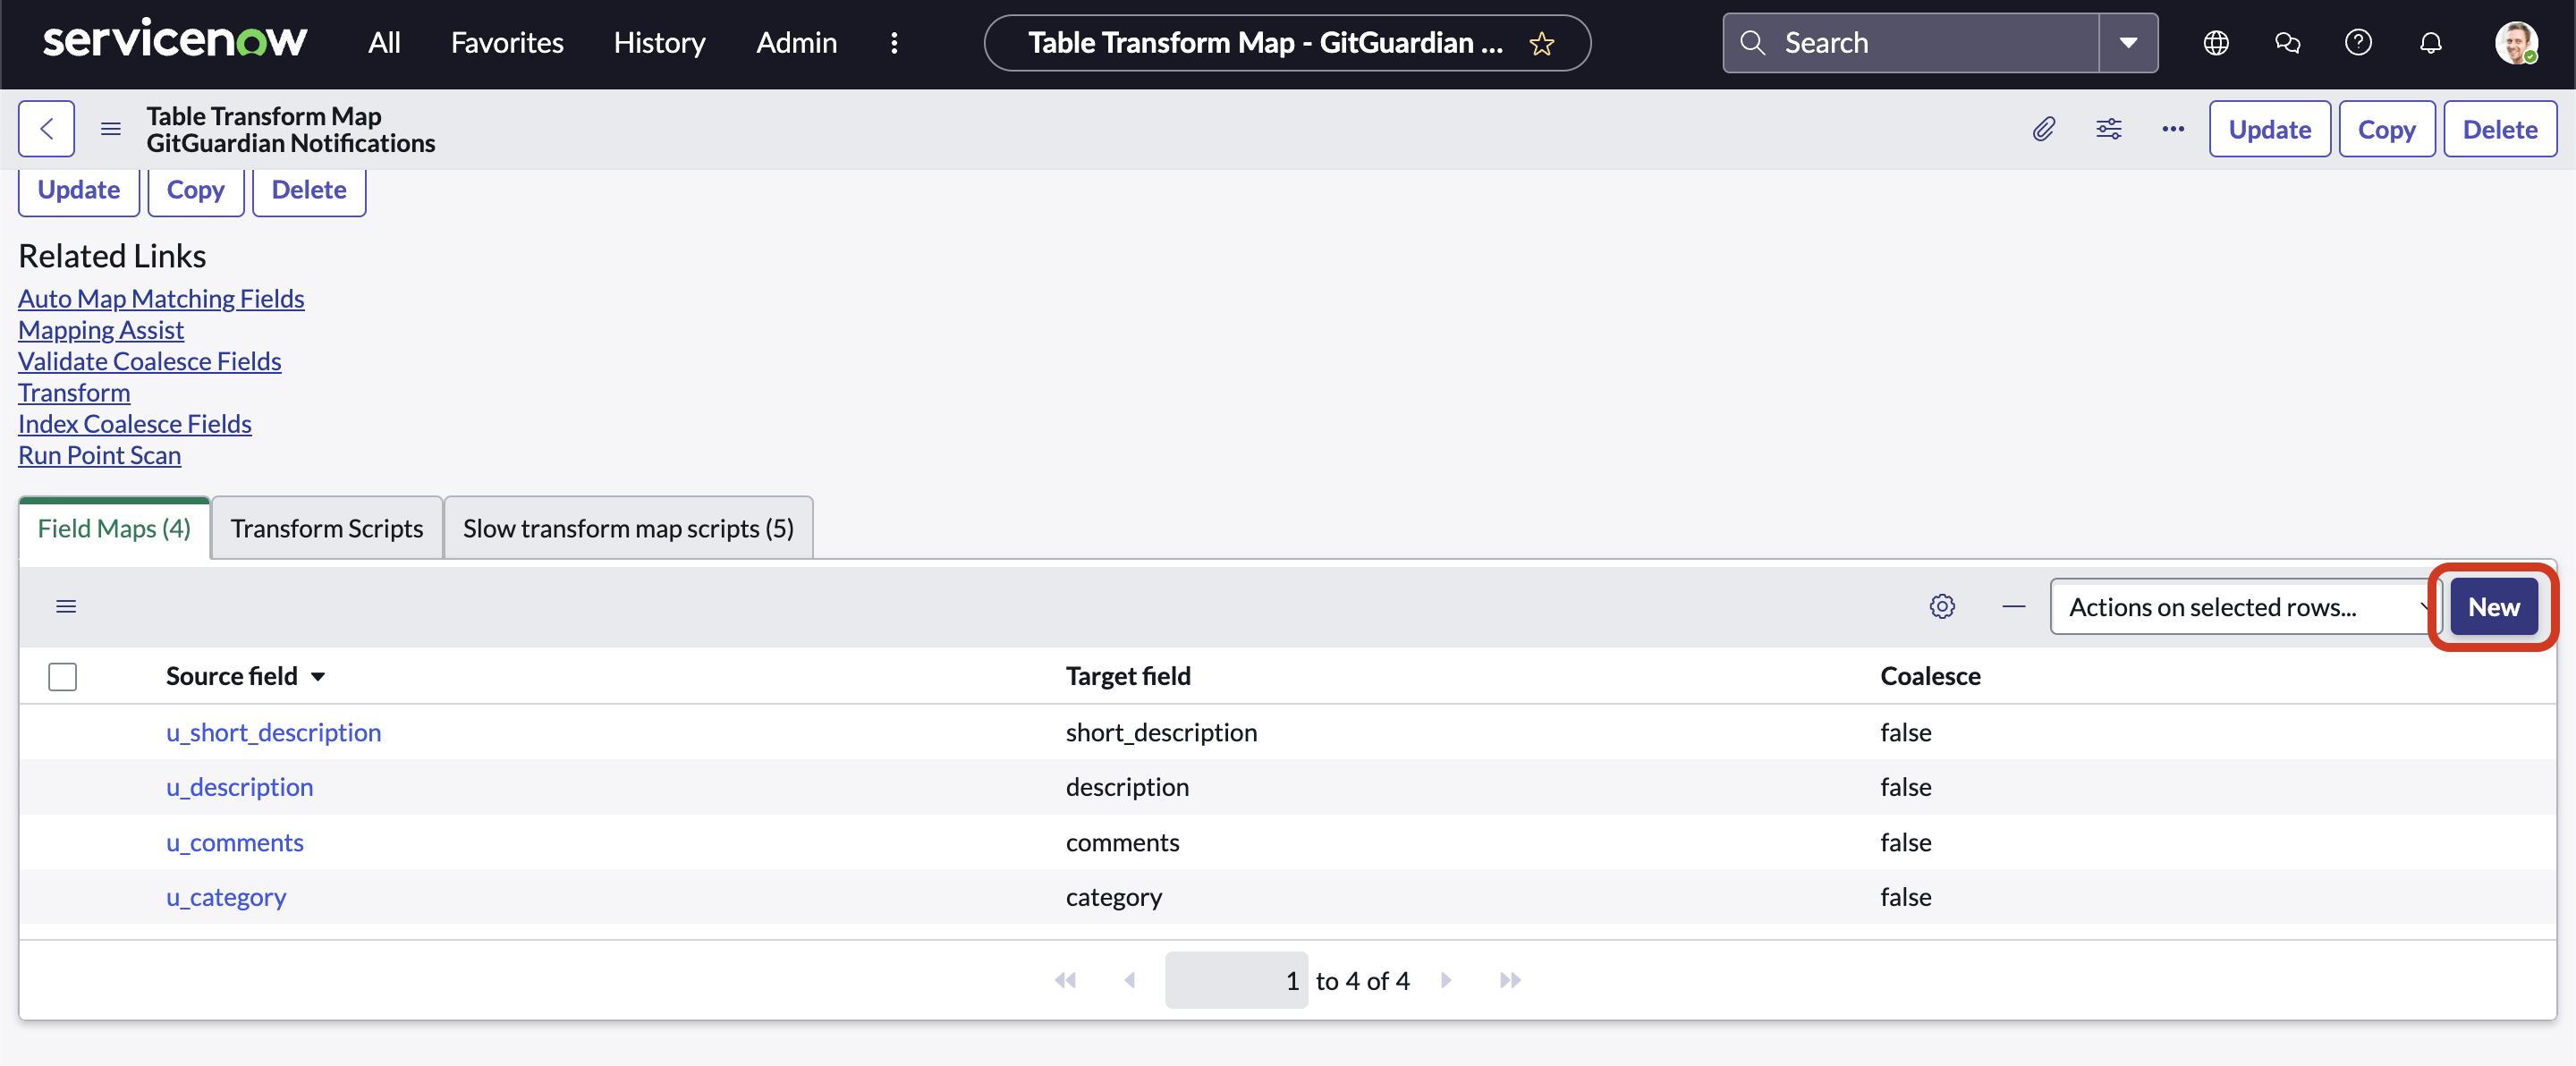
- For the
Sys IDfield, manually map it tou_sys_idand ensure it is set to coalesce. This ensures that updates are applied to existing records.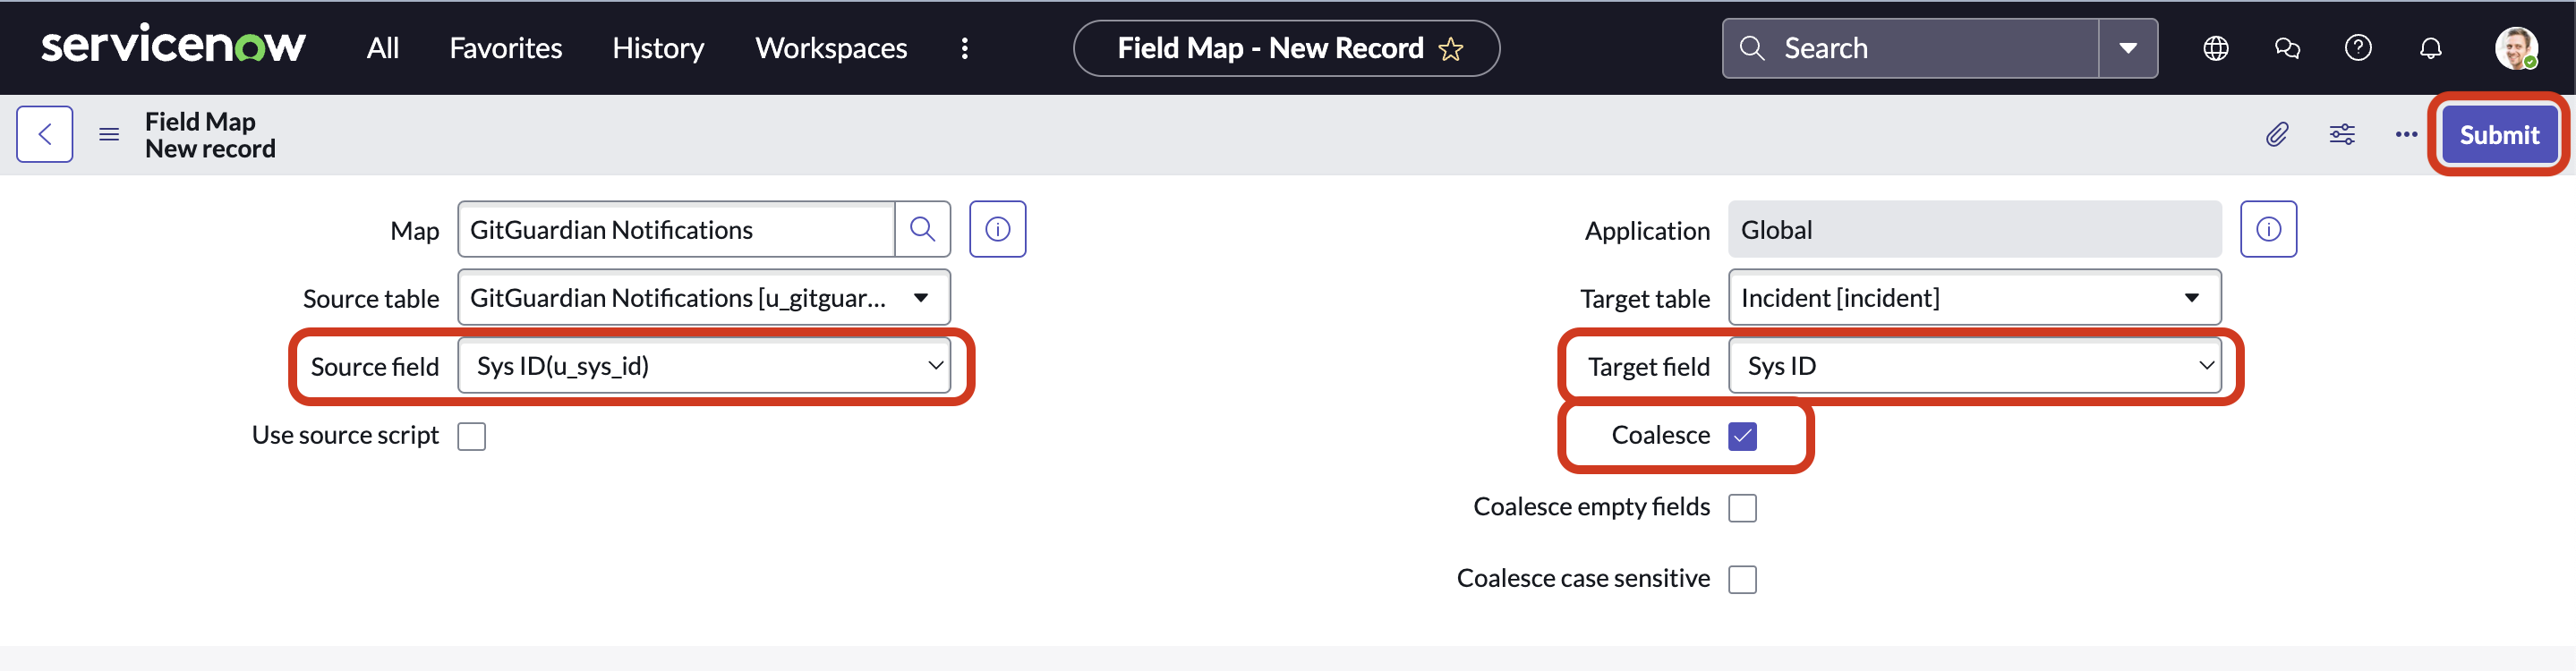
- For the other fields, do not set them to coalesce to avoid unintended overwriting of records.
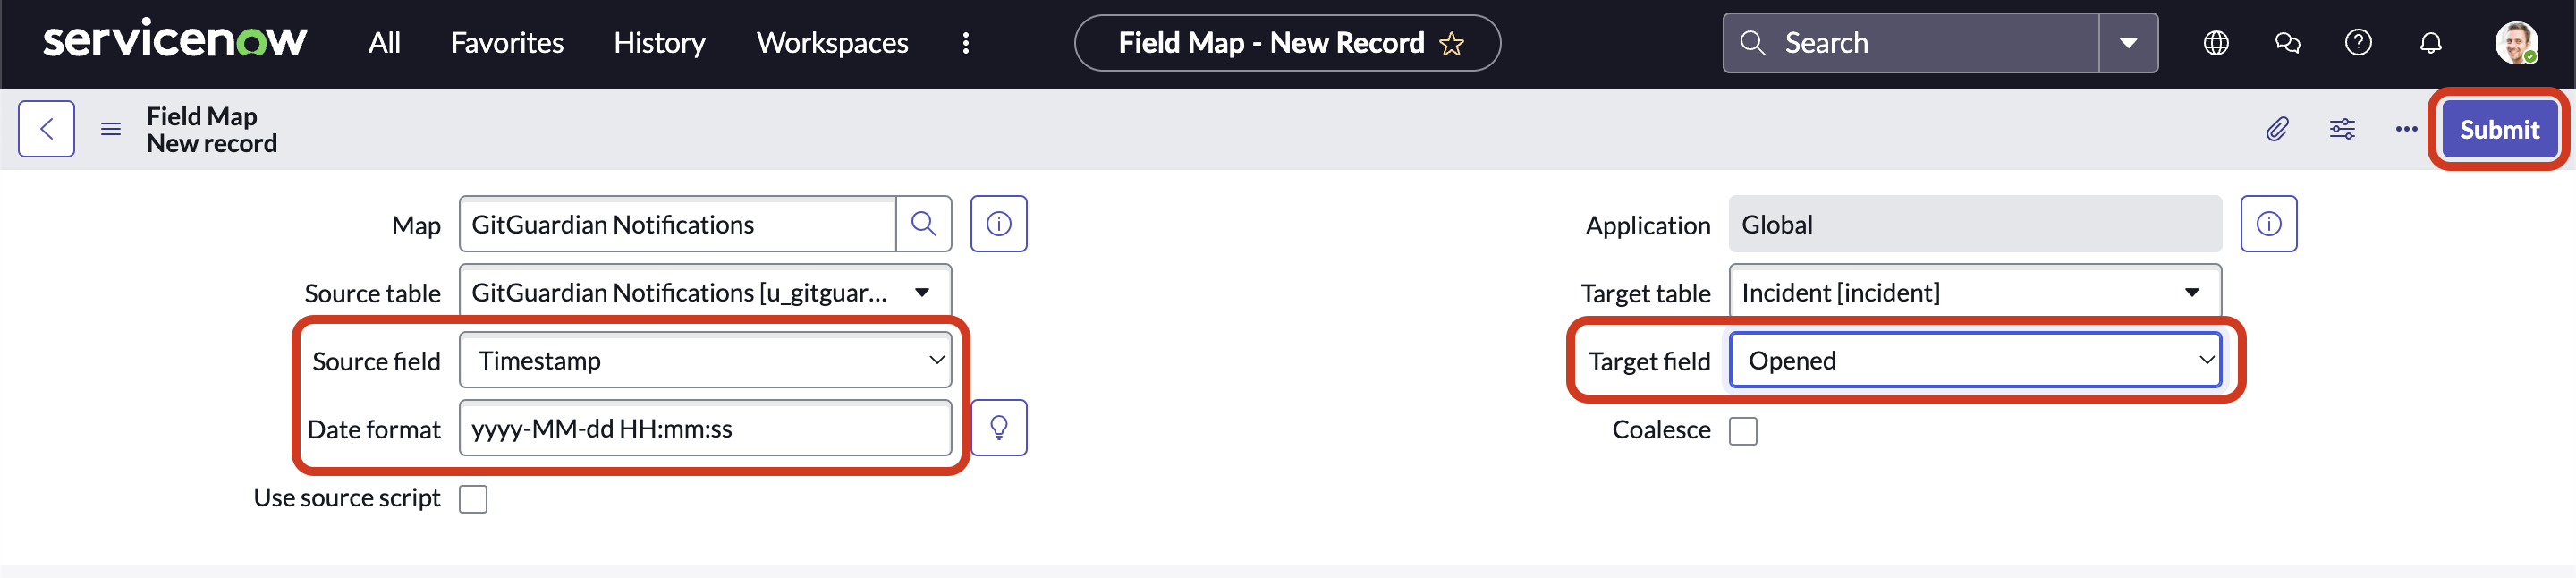

- For the
u_timestampfield, do not change the date format - it must beyyyy-MM-dd HH:mm:ssfor the mapping to work.
- For the
The transform map should look like this:
-
Additional fields for custom tables (Optional):
If you're not using the default Incident table, know that the following fields are accessible and can be mapped for more detailed context on the detected secrets. (These will be empty if the issue is created manually from a GitGuardian incident
u_source_nameu_source_typeu_location_urlu_author_nameu_author_emailu_secret_typeu_occurrence_idu_triggered_on(do not change the format - it should beyyyy-MM-dd HH:mm:ss)
-
Retrieve the web service URL:
- Under the web service's "Related Links," click on Explore REST API.
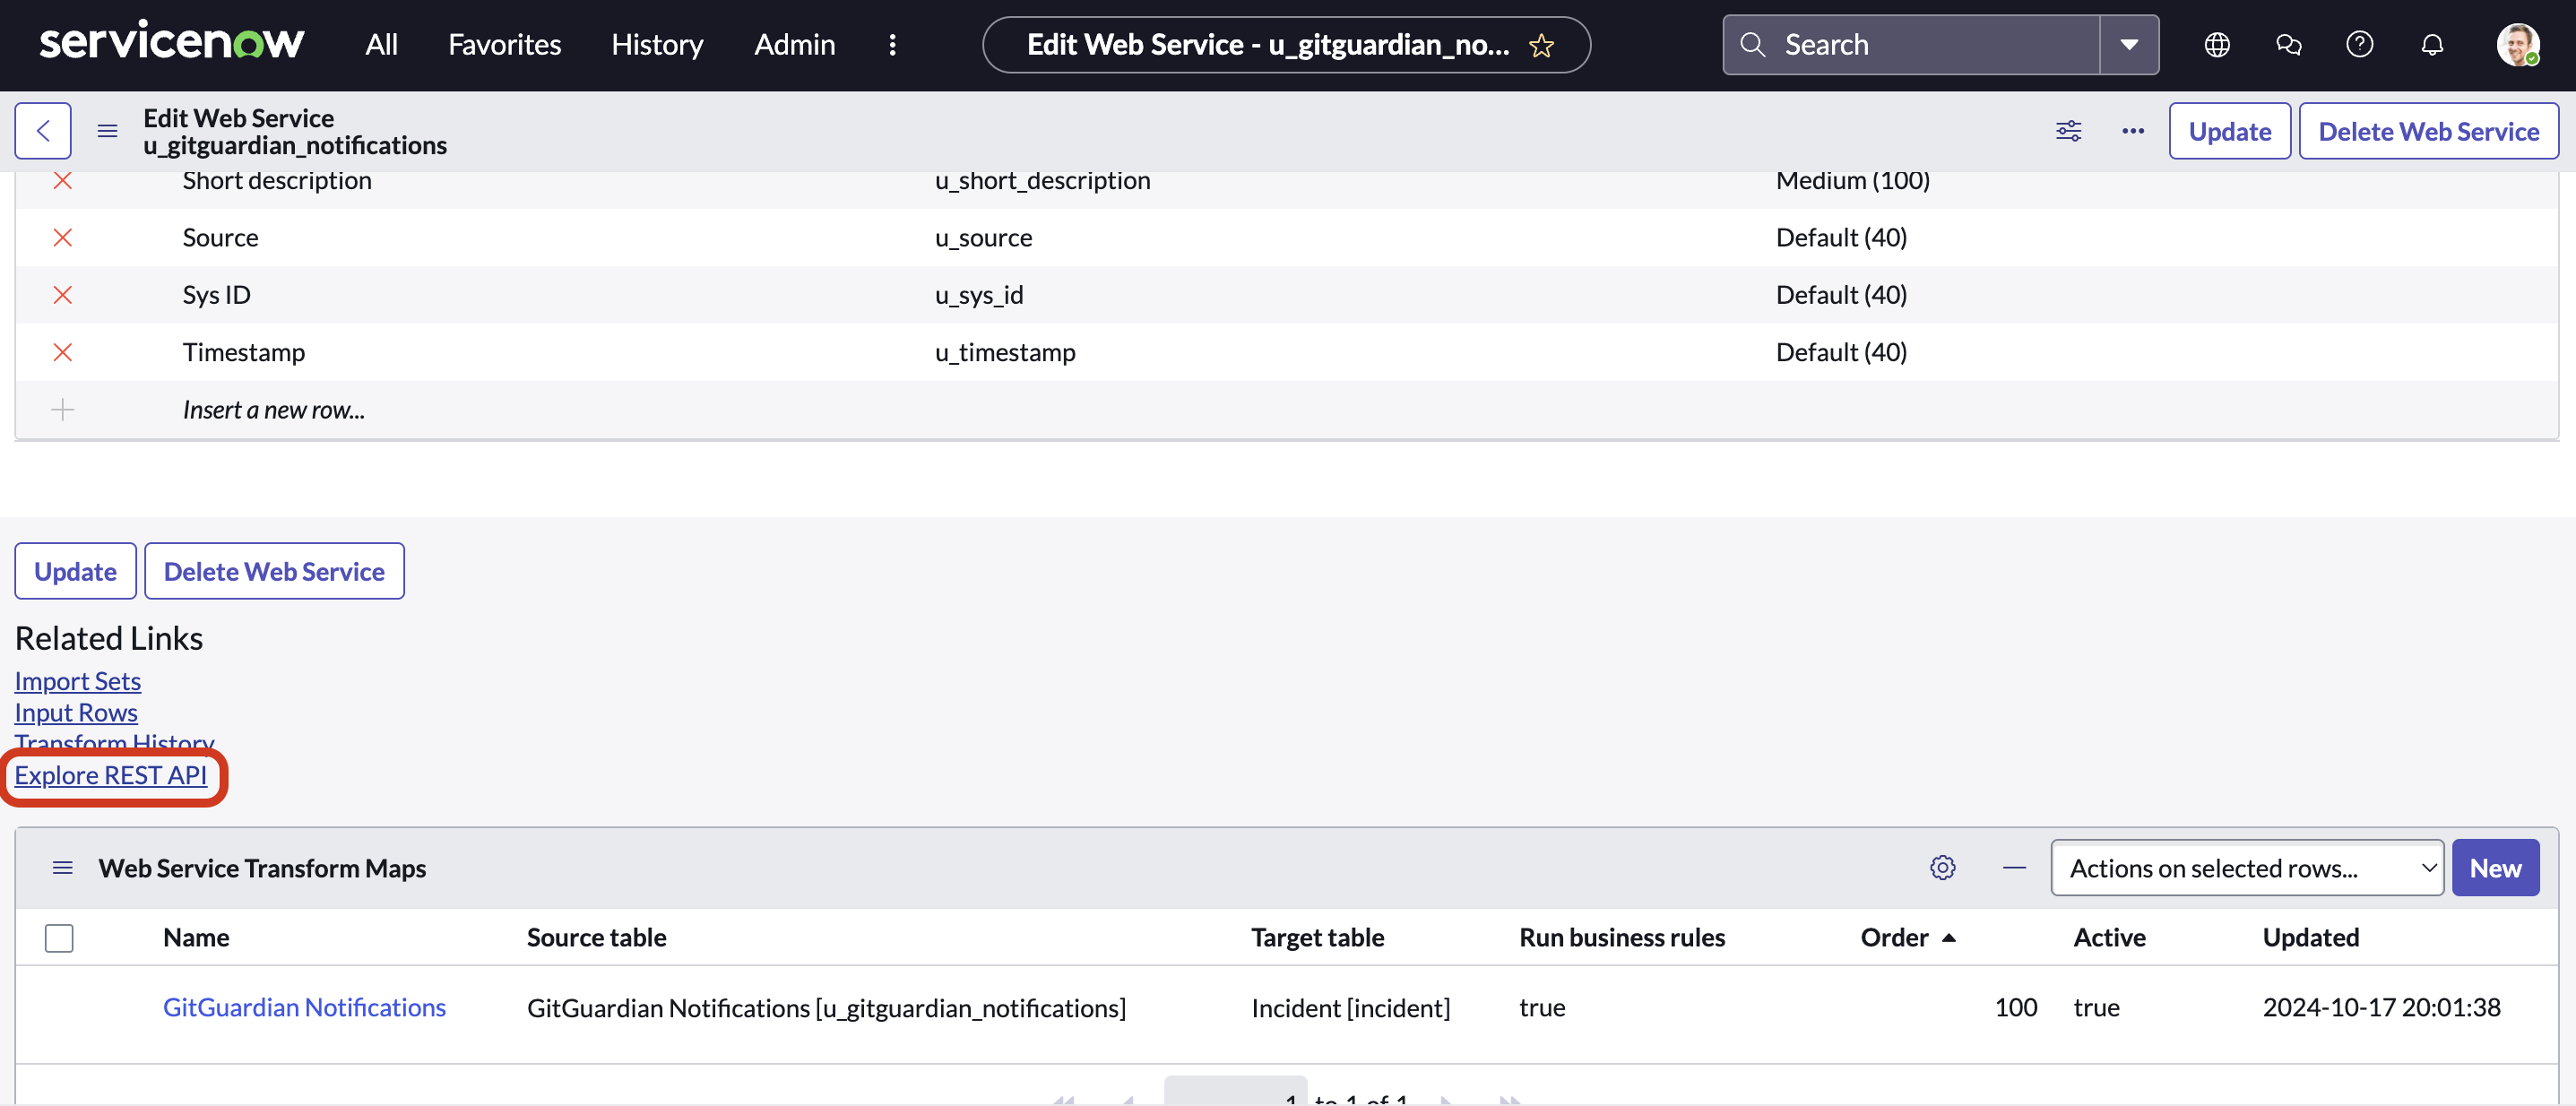
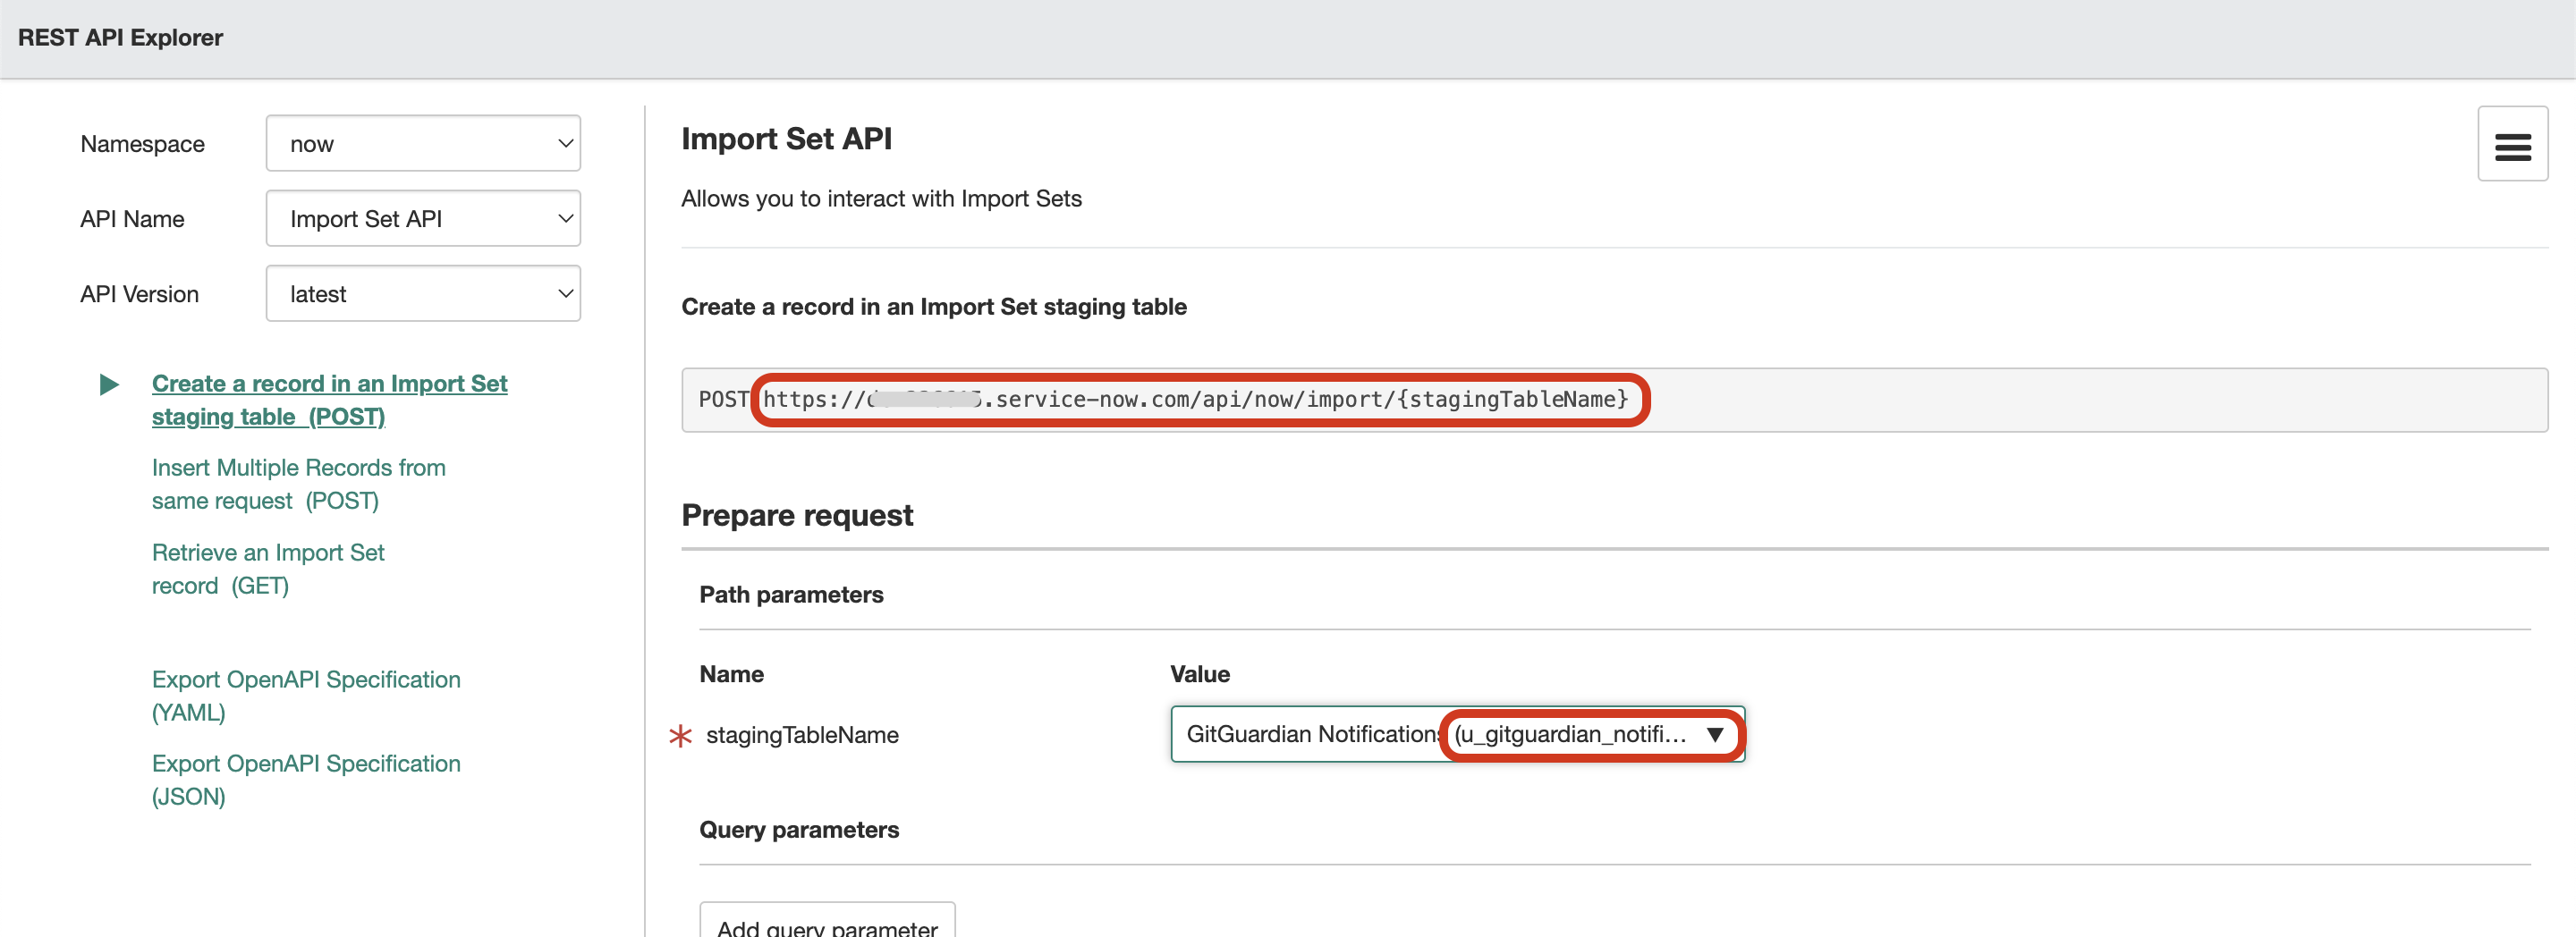
- Copy the link to the API, replacing
{stagingTableName}with the name of your web service.
This URL will be used in GitGuardian's settings.
 info
infoThe URL should follow this format: https://xxxxx.service-now.com/api/now/import/gitguardian_notification (where xxxxx is your ServiceNow instance ID).
- Under the web service's "Related Links," click on Explore REST API.
Step C: Finalize the configuration in GitGuardian
In this section, we finalize the integration in GitGuardian by using the credentials and web service setup created in the previous sections.
In GitGuardian, go to Settings > Integration > Destination > Issue Tracking > ServiceNow, then click Add Integration for the team where you want the integration to apply (choose "All incidents" if it's not team-specific). The configuration is then set up through a four-step wizard.
-
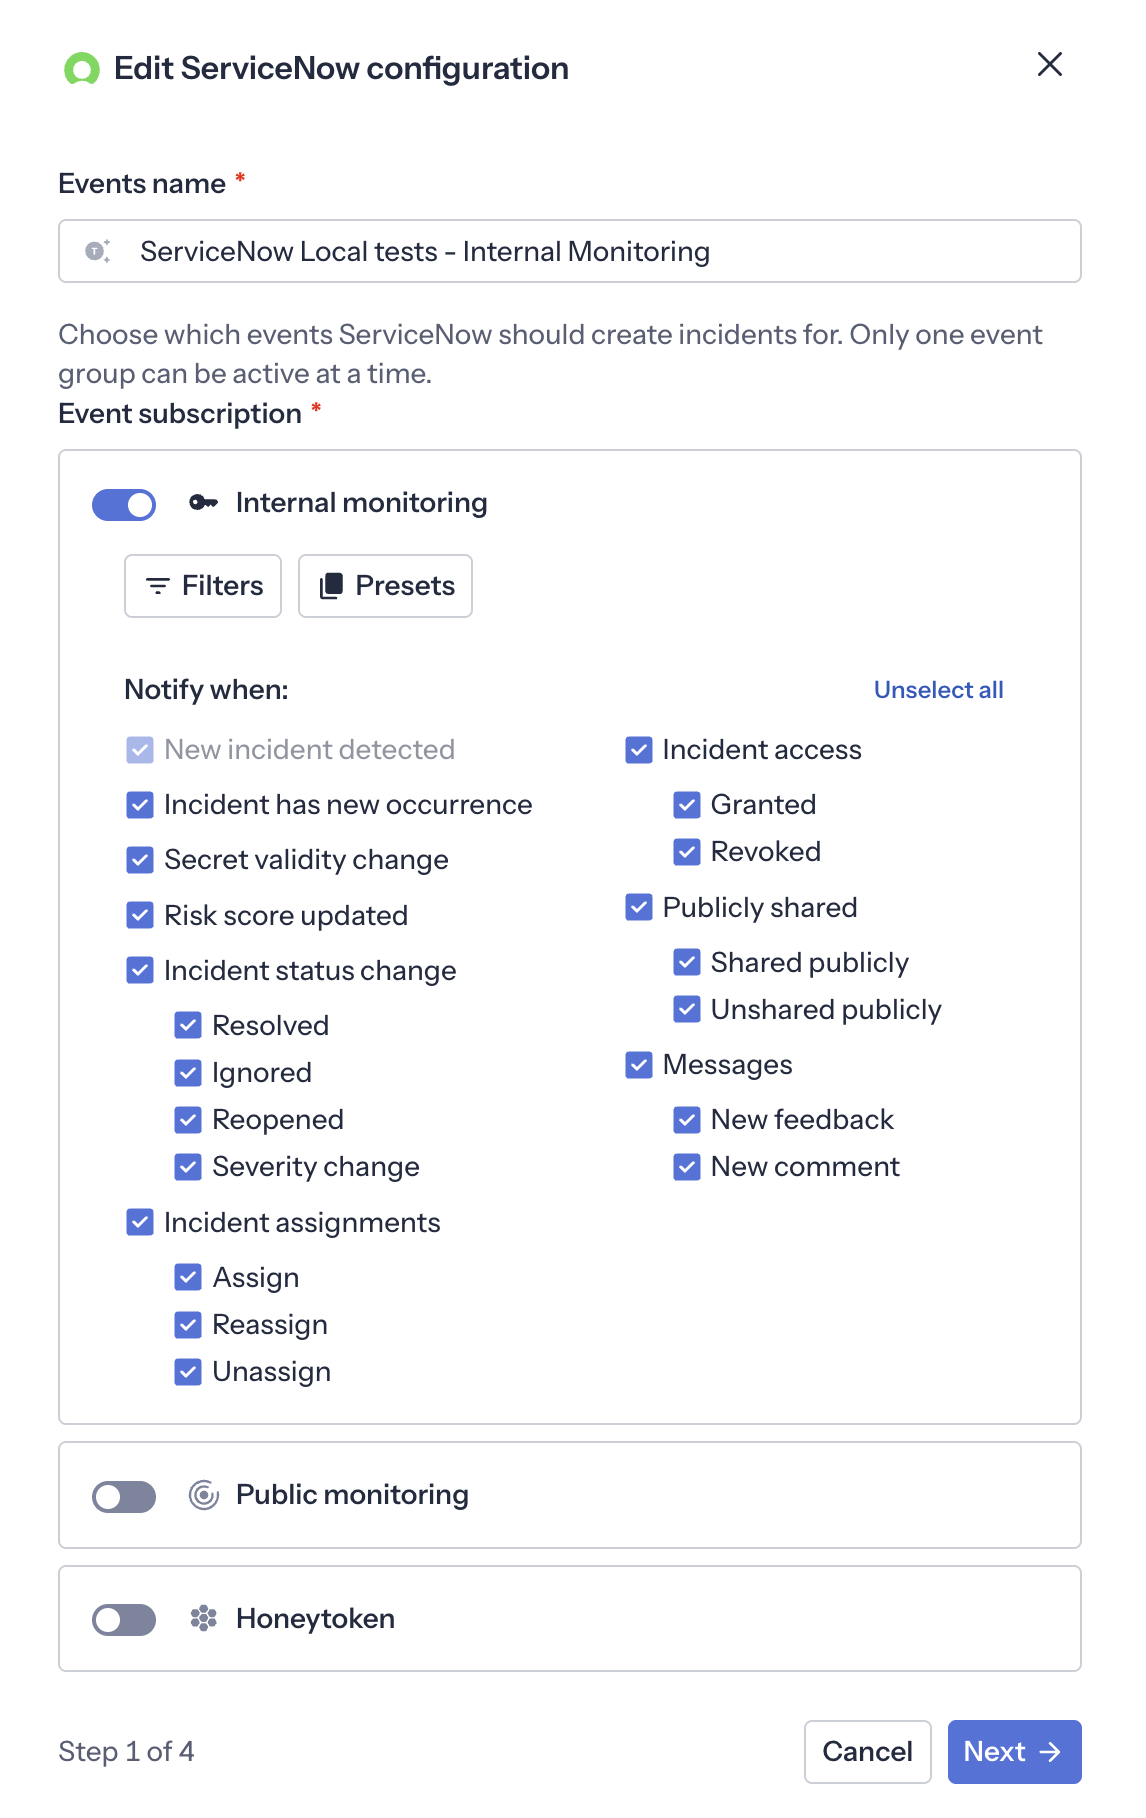
Select the events (Step 1 of 4):
- Give the configuration a name in the Events name field.
- Under Event subscription, choose which events ServiceNow should create incidents for. Toggle the event group you want to monitor: Internal monitoring, Public monitoring, or Honeytoken. Only one event group can be active at a time.
- In the Notify when section, select the specific events that should trigger an incident creation or update in ServiceNow. Use Filters and Presets to refine the selection, or Unselect all to start from scratch. The "New incident detected" event is always selected.
-
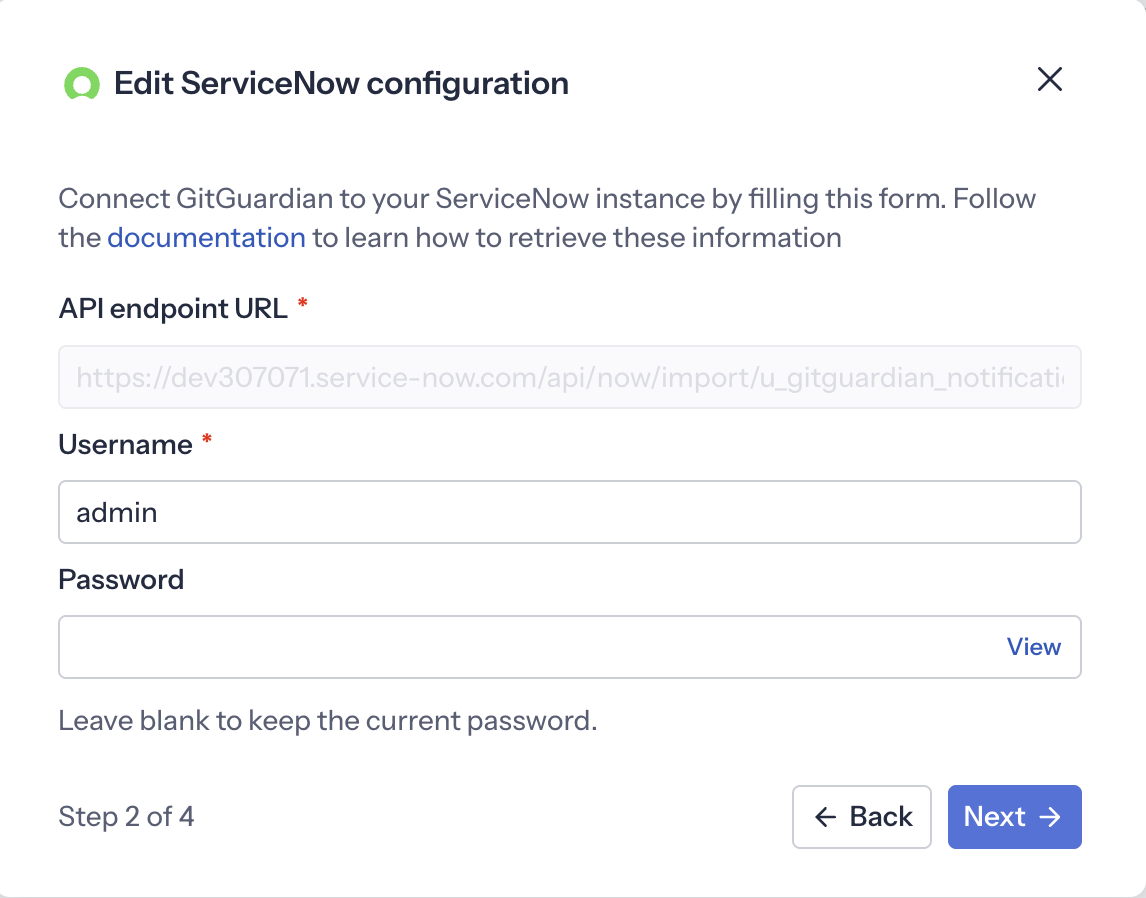
Connect to your ServiceNow instance (Step 2 of 4):
- Use the URL obtained in Step 9 for the API endpoint URL.
- For Username and Password, input the credentials created in Steps 3 and 4. Leave the password blank to keep the current one when editing an existing configuration.
-
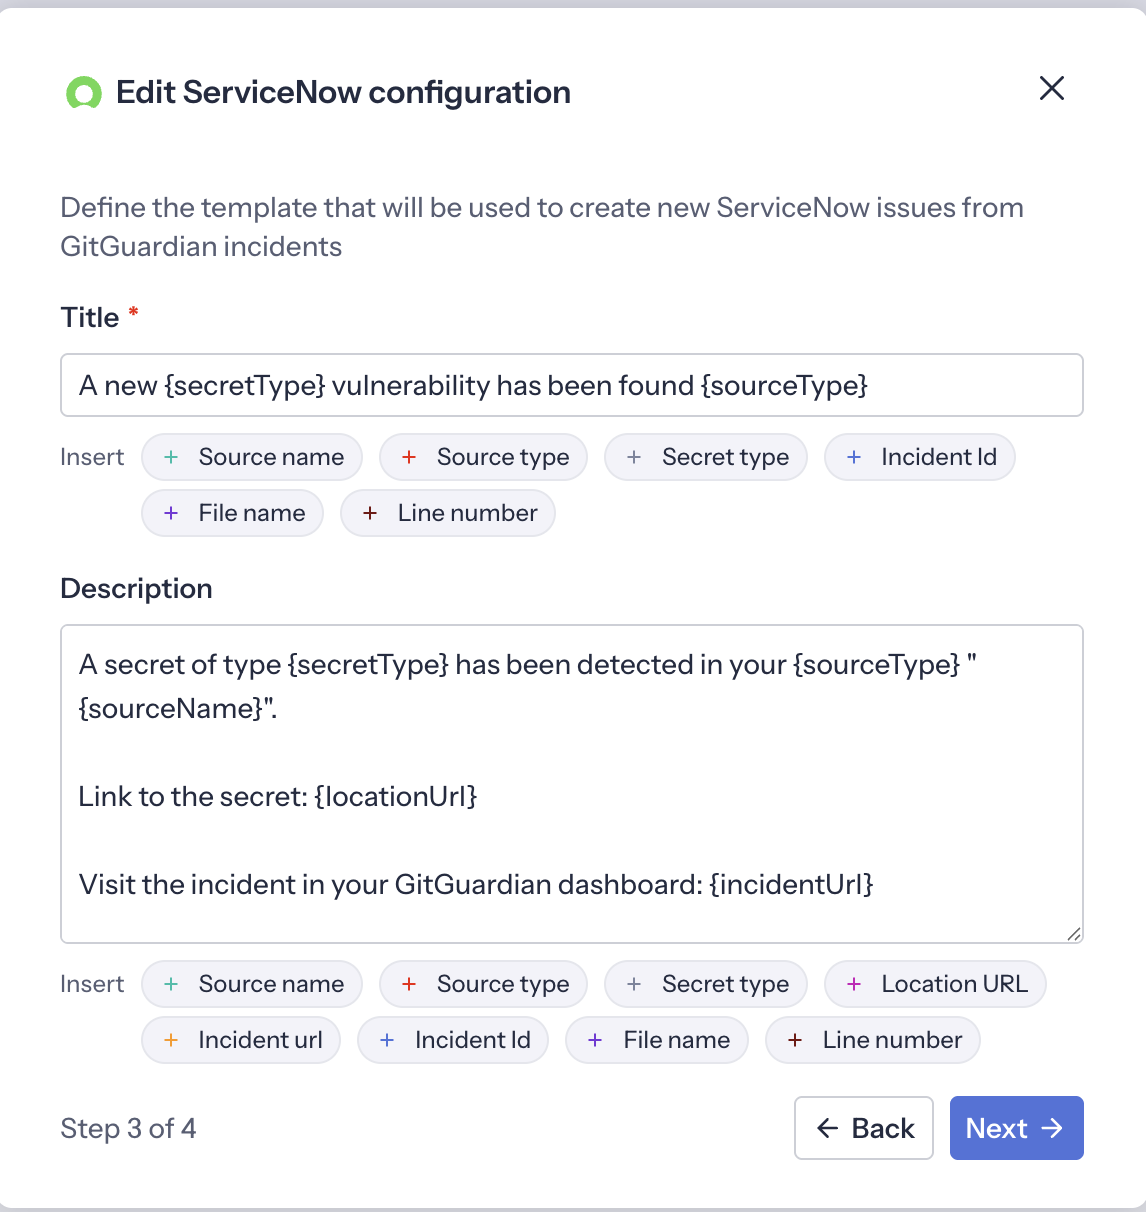
Define issue content (Step 3 of 4):
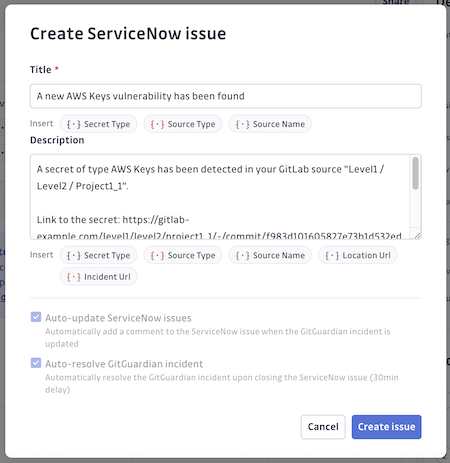
- Customize the content of the ServiceNow issue (title and description), using the available variables.
-
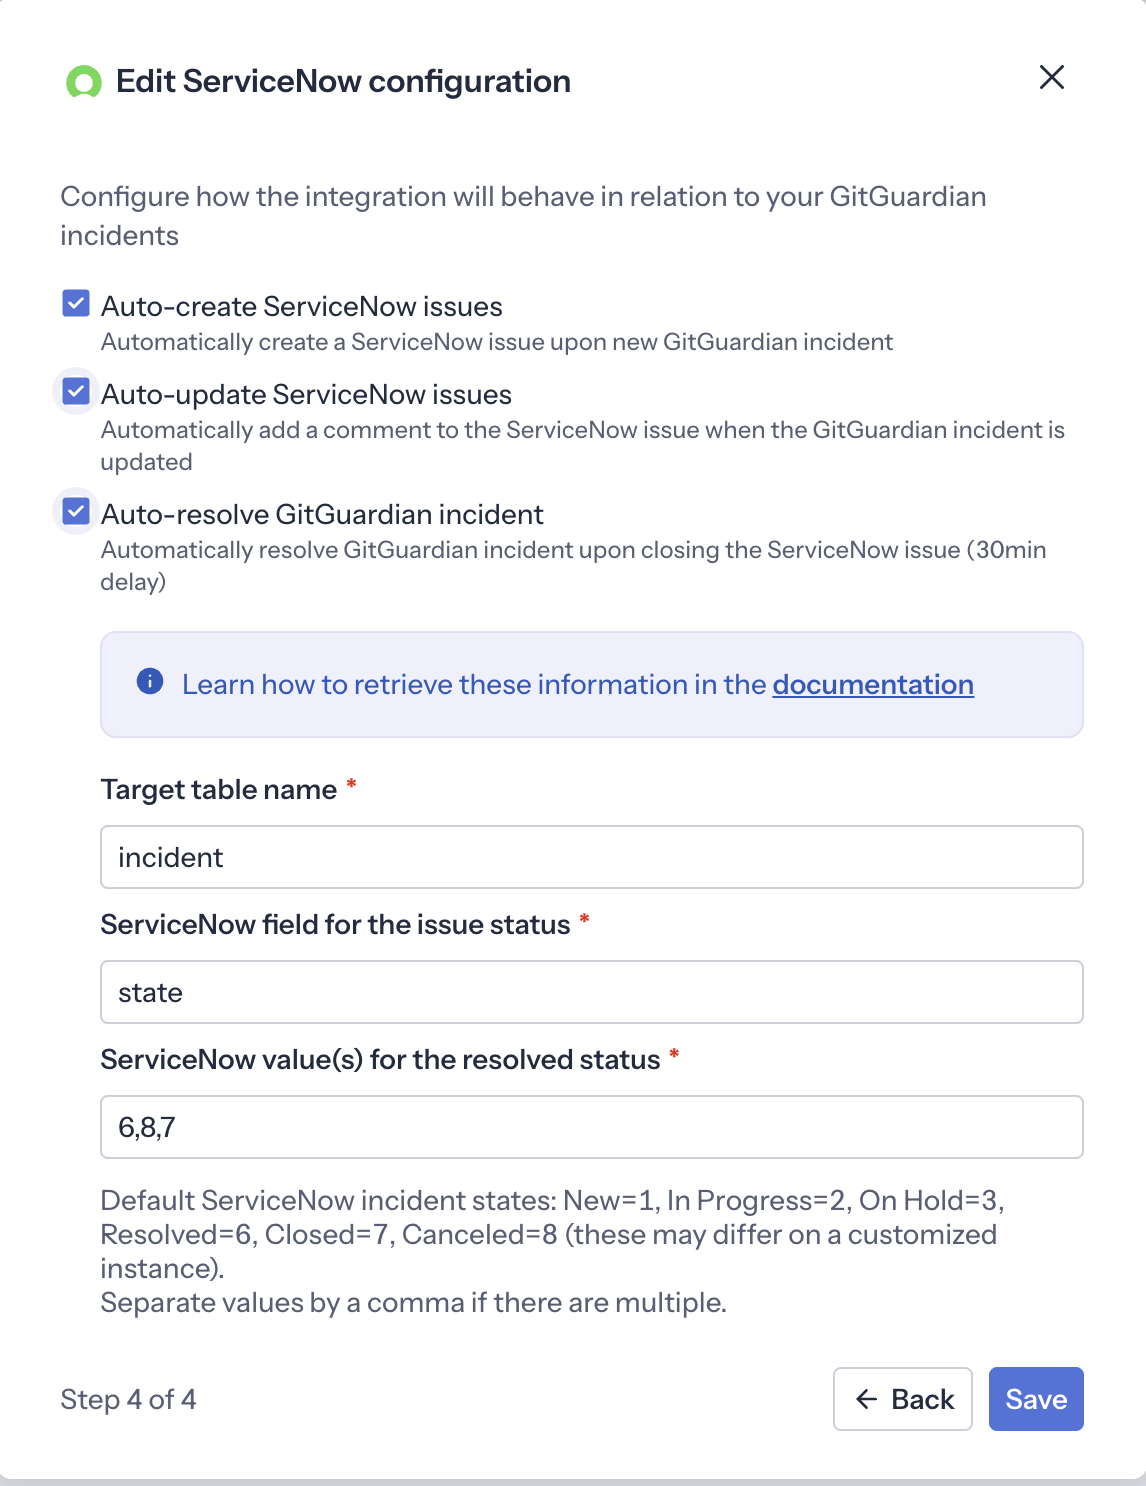
Define automation parameters (Step 4 of 4):
- You can configure the following automation options:
- Auto-create: Automatically creates a ServiceNow issue for each new incident detected in GitGuardian - in the team perimeter. (If left unchecked, it is still possible to create ServiceNow issues from existing GitGuardian incident).
- Auto-update: Sends updates from GitGuardian to the associated ServiceNow issue in the form of comments whenever the GitGuardian incident changes.
- Auto-resolve: When the linked ServiceNow issue is marked as closed, the related GitGuardian incident will be automatically marked as Resolved.
- Click Save to finalize the configuration.
- You can configure the following automation options:
If you've selected the Auto-resolve option, additional fields appear so you can define how the status of a ServiceNow issue triggers the closure of the corresponding GitGuardian incident:
- Target table name: the target table from ServiceNow (the value between brackets from Step 6, for example
incident). - ServiceNow field for the issue status: the name of the field in your ServiceNow table that reflects the issue's status (in the Incident table, this field is typically called
state). - ServiceNow value(s) for the resolved status: the value(s) of the status field that should trigger the closure of the corresponding GitGuardian incident. Separate values with a comma if there are several.
The default ServiceNow incident states are: New=1, In Progress=2, On Hold=3, Resolved=6, Closed=7, Canceled=8 (these may differ on a customized instance). You can retrieve them by going to System Definition > Tables, and exploring the table name, columns, and choices.
Resolving the linked ServiceNow issue triggers the GitGuardian incident closure with a 30-minute delay.
Once the configuration is saved, send a test notification and confirm the creation of an incident in ServiceNow.
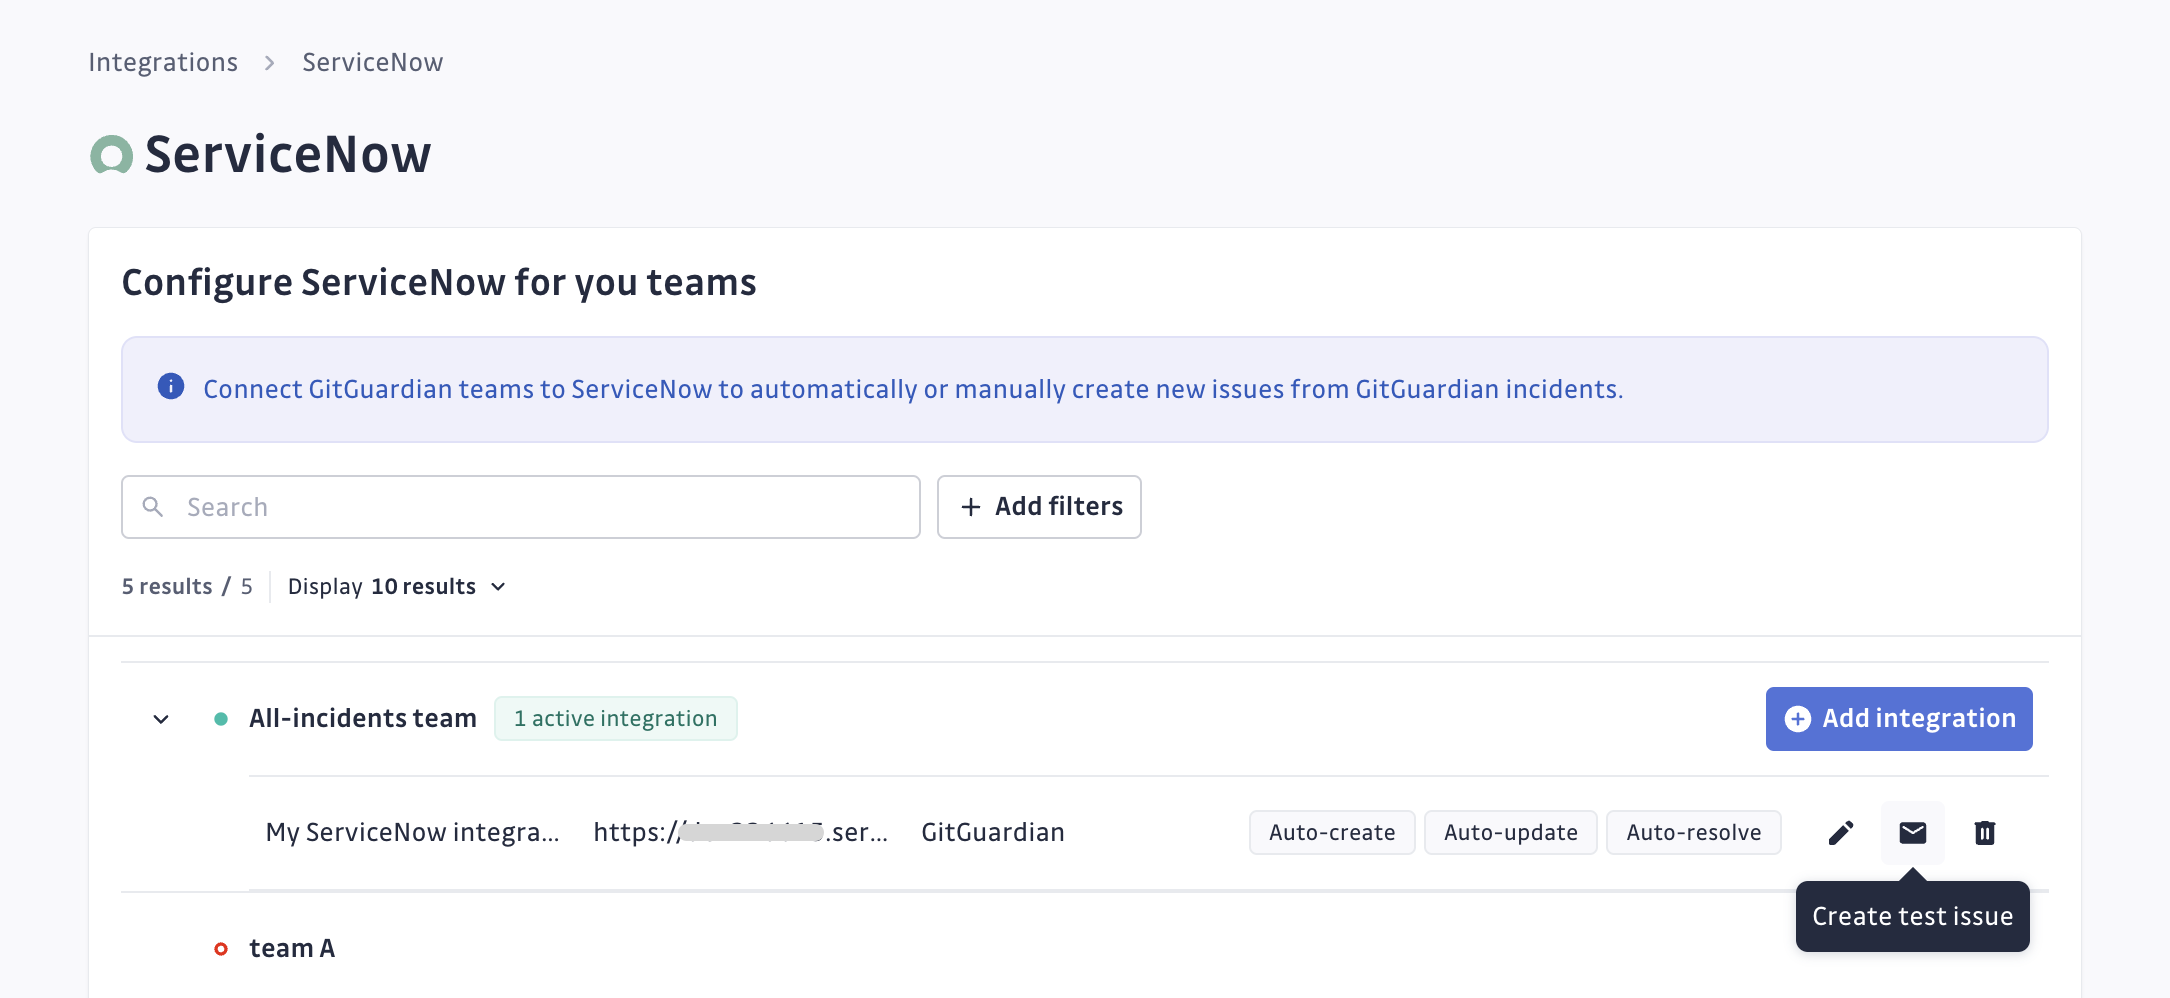
Manual creation of issues from GitGuardian
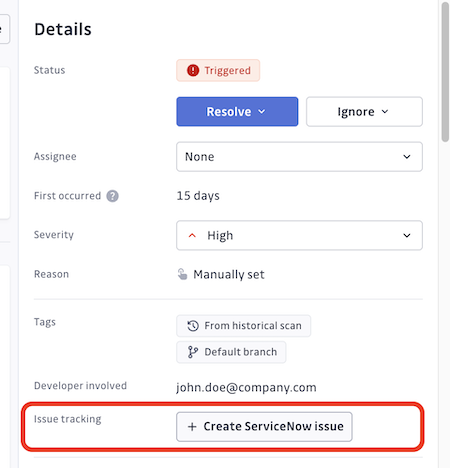
Once a ServiceNow integration is configured, issues can be created from the incident page or incidents list page.
The creation form is initialized from the integration configuration and template. Note that the auto-update and the auto-resolve parameters are inherited from the configuration and cannot be manually updated.
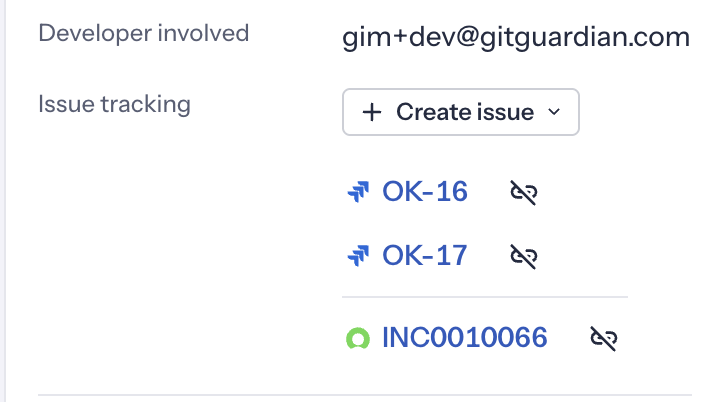
After creation, the ServiceNow issue becomes visible on the incident page for quick access.
Bulk issue creation from the incidents table is not supported.
Unlink a ticket
You can remove the link between a GitGuardian incident and its ServiceNow ticket. This is useful when a ticket was linked by mistake or is no longer relevant to the incident.
-
On the incident page, locate the linked ServiceNow ticket under Issue tracking and click the unlink icon next to it.
-
Confirm by clicking Unlink ticket in the dialog.
Unlinking only removes the association in GitGuardian. The ServiceNow ticket itself is not deleted.

