Upgrade Embedded cluster
Do not roll back or downgrade without consulting our support team first. Certain scenarios may necessitate restoring the database from a pre-upgrade backup due to the complexity of reversing some database migrations.
Preflight checks are critical for a successful installation. The following rules apply:
- ❌ Preflight Check Failures: If preflight checks fail, the upgrade must not continue until the targeted environment meets all requirements. Please reach out to our support team.
- ⚠️ Preflight Check Warnings: If preflight checks return warnings, the installation can proceed, but it is recommended that you address these warnings to comply with our recommendations.
Upgrading to 2026.3
If you are using an Embedded cluster V2 deployment (instances installed in 2025 or after), you must manually delete the replicated PodDisruptionBudget before upgrading to 2026.3:
- Check your current version. This issue only affects instances running 2026.2.0. If you are on an older version, you can upgrade directly to 2026.3.0 without any manual step.
- Connect to the node via SSH and delete the PodDisruptionBudget:
kubectl delete -n kotsadm pdb replicated
- Open the KOTS Admin Console and launch the upgrade to 2026.3.0 from the "Version History" tab.
Upgrading to 2026.1
If you are using an embedded cluster deployment, this release introduces new subcharts for PostgreSQL and Valkey (formerly Redis):
- Valkey (formerly Redis) Upgrade: The migration from Redis to Valkey is seamless and requires no action on your part. Note that the application cache will be reset, without affecting the normal functioning of the application.
- PostgreSQL Upgrade: This operation requires a mandatory manual action before initiating the upgrade.
Due to the way Kubernetes handles StatefulSet objects, the PostgreSQL StatefulSet cannot be upgraded automatically. Follow these steps to perform the migration safely.
Step 1: Back up the database
Before proceeding with the upgrade, you must back up your PostgreSQL database using the migration tool provided in the postgresql-bitnami-migration repository.
-
Download the backup script from the repository.
-
Run the backup script to create a database dump:
./backup.sh --namespace gitguardian --output dump.sql.gz
- Store the backup file (
dump.sql.gz) in a safe location.
Step 2: Delete the PostgreSQL StatefulSet
Ensure the PostgreSQL StatefulSet is present in your namespace:
kubectl get sts -n gitguardian
Delete the StatefulSet before starting the upgrade:
kubectl delete sts postgresql -n gitguardian
Step 3: Run preflight checks and proceed with upgrade
A preflight check during the upgrade will automatically verify that the StatefulSet deletion has been completed. If the preflight check passes, proceed with the upgrade through the KOTS Admin Console.
Step 4: Restore the database
After the upgrade is complete and all pods are running, restore the database using the restore script:
./restore.sh --namespace gitguardian --input dump.sql.gz
Verify that your settings and data have been preserved by checking the GitGuardian dashboard.
For detailed instructions on the backup and restore scripts, refer to the postgresql-bitnami-migration repository.
Upgrading the GitGuardian application
Prior to upgrading, ensure you back up your PostgreSQL database. For detailed instructions, refer to the Backup page.
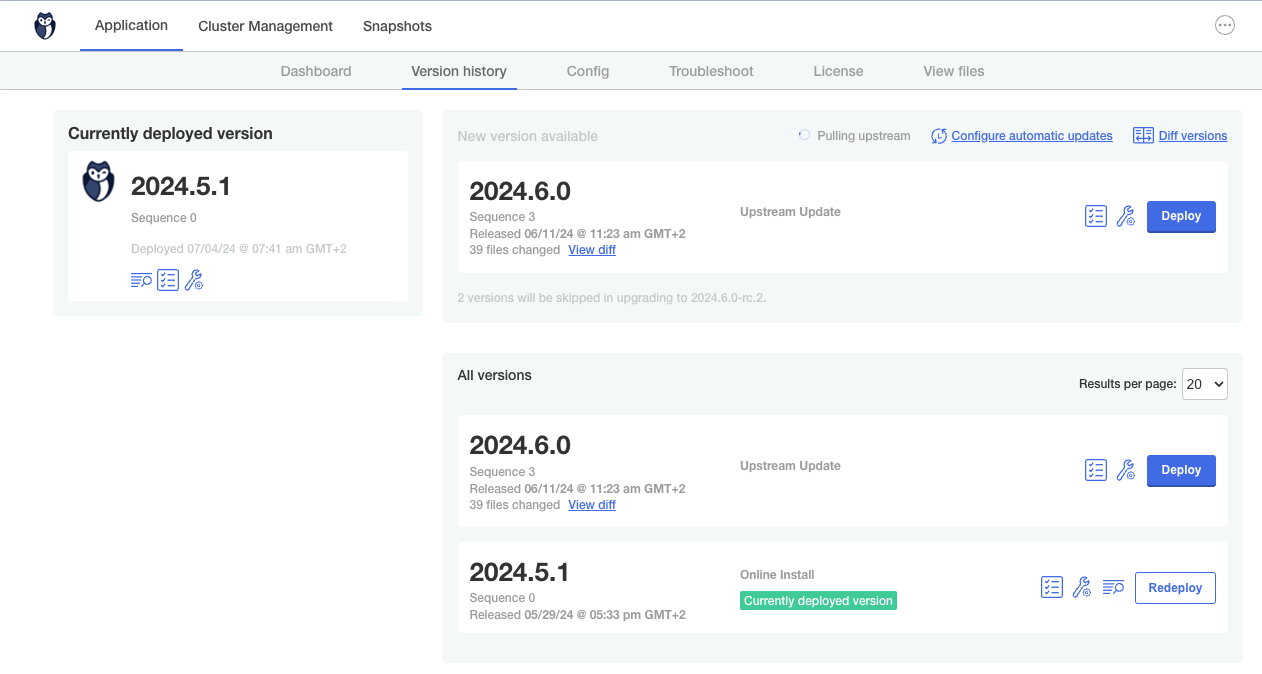
The GitGuardian application can be updated through the KOTS Admin Console in the "Version History" tab. First, you need to check for updates. This can be done manually or automatically. Then, you can deploy a newer version by clicking the "Deploy" button.
On Embedded clusters V2, updating the application through the KOTS Admin Console also upgrades the Kubernetes cluster if needed.
You can find more information on the KOTS documentation.
During upgrades, workers are stopped but new commits are still queued and will be processed after the upgrade. Upgrades do not stop the dashboard, but they introduce a temporary delay in message processing and alerting. We advise running upgrades during a low-traffic period.
Upgrading the GitGuardian application in Airgap
In an air-gapped environment, your cluster has no direct internet access. To upgrade, you download the new air gap bundle on a machine that does have internet access, transfer it to your environment, then make the new version available to the KOTS Admin Console and deploy it.
The exact steps depend on how your instance was installed. Follow the section that matches your deployment.
Embedded cluster (instances installed in 2025 or after)
On an Embedded cluster, you do not need to install or upgrade KOTS separately: KOTS is bundled with the GitGuardian application and is upgraded automatically when you deploy a new version. You only need to make the new air gap bundle available to the Admin Console.
There are two ways to do this. Uploading from the command line is the recommended option: it is faster and lets you download the bundle directly on the node, without re-uploading it through the browser.
Option 1: Upload the new version from the command line (recommended)
-
On a machine with internet access, download the new air gap bundle using the same command you used to install, replacing
your_licensewith your license ID:LICENSE_ID=your_licensecurl -f "https://replicated.app/embedded/gitguardian/stable?airgap=true" -H "Authorization: $LICENSE_ID" -o gitguardian.tgztar -xvzf gitguardian.tgzThis extracts the
gitguardianbinary and thegitguardian.airgapbundle. -
Transfer both the
gitguardianbinary and thegitguardian.airgapbundle to the node where the Embedded cluster is running. -
On the node, from the directory containing both files, upload the bundle to make the new version available in the Admin Console:
sudo ./gitguardian update --airgap-bundle gitguardian.airgap -
Open the KOTS Admin Console, go to the Version History tab, and click Deploy next to the new version.
Option 2: Upload the new version from the Admin Console
-
On a machine with browser access to the Admin Console, download the new air gap bundle using the same command as in Option 1 (step 1).
-
In the Admin Console, go to the Version History tab and click Upload new version, then select the
gitguardian.airgapbundle. -
Once the upload is processed, click Deploy next to the new version.
On Embedded clusters, deploying a new version through the Admin Console also upgrades the Kubernetes cluster and KOTS if needed. No separate KOTS upgrade command is required.
On Embedded cluster legacy (kURL) installations (instances installed in 2024 or before), the upgrade works differently: download the latest air gap package and re-run the same installation command as outlined in the installation guide, then upload the application bundle from the Version History tab of the Admin Console.
Existing cluster (KOTS)
KOTS installation on existing clusters will be deprecated and unsupported after the June 2026 release (version 2026.6.0). Please migrate to the Helm installation.
On an existing cluster, KOTS runs as an application in your cluster and must be upgraded separately from the GitGuardian application.
-
Upgrade the KOTS Admin Console by following the air gap installation instructions: install the latest version of the KOTS plugin on your machine, download the latest KOTS bundle, and upload these images to your registry. Then, instead of running the installation command, upgrade the KOTS application running in the cluster:
kubectl kots admin-console upgrade --namespace <namespace>If needed, specify the Kubernetes namespace with
--namespace(the default namespace is used if not specified). -
Download the latest application bundle from the download portal. Then go to your KOTS Admin Console on the Version History tab, click Upload new version, upload the bundle, and deploy it.
Required versions
KOTS Admin Console will show some versions as "Required".
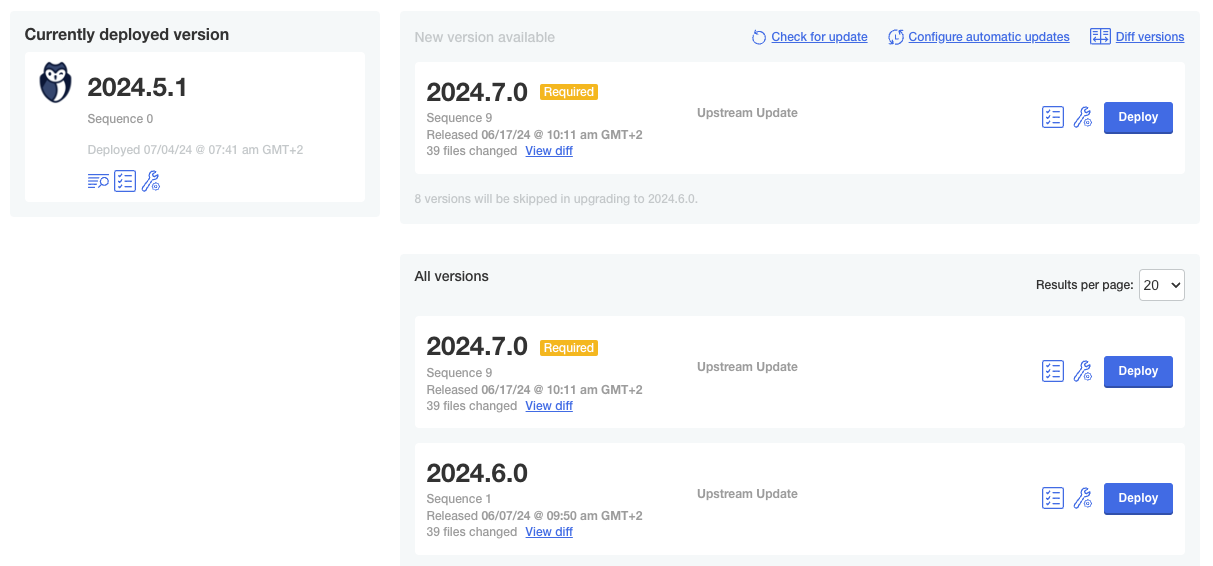
If you have several versions to upgrade, you'll have to upgrade to each required version between your current version and your target version.
After each deployment, you should wait for the application to be fully upgraded. To that extent, you can monitor pods' status and wait for all pods to be live and all jobs to be completed.
watch kubectl get po -n <namespace>
The application is restarted when all pods are in the running status:
Every 2.0s: kubectl get po -n default             gitguardian-example: Thu Jul  4 06:11:24 2024

NAME                                      READY   STATUS      RESTARTS      AGE
beat-677d68bb9f-8f5lp                     1/1     Running     0             23m
kotsadm-56dd9b7866-cv4jc                  1/1     Running     0             30m
kotsadm-rqlite-0                          1/1     Running     0             33m
kurl-proxy-kotsadm-7cdfc47bf4-nr55l       1/1     Running     0             33m
nginx-578786cd47-6ccfh                    1/1     Running     0             23m
nginx-578786cd47-cx899                    1/1     Running     0             23m
post-deploy-f77kq                         0/1     Completed   0             23m
postgresql-0                              1/1     Running     0             29m
pre-deploy-hnpbq                          0/1     Completed   0             28m
redis-master-0                            1/1     Running     0             29m
replicated-76bff7f9bb-zb2lb               1/1     Running     0             23m
webapp-hook-5745c9995-6p7ph               1/1     Running     0             23m
webapp-internal-api-55fdd98d4d-9x25r      1/1     Running     1 (22m ago)   23m
webapp-internal-api-long-b98b68fb-x6q7s   1/1     Running     0             23m
webapp-public-api-7d4b7f8956-2jvf4        1/1     Running     0             23m
worker-email-755dd6db6b-4drhj             1/1     Running     0             23m
worker-email-755dd6db6b-6lrhc             1/1     Running     0             23m
worker-long-tasks-54875654d8-jl57k        1/1     Running     0             23m
worker-long-tasks-54875654d8-mh47g        1/1     Running     0             23m
worker-realtime-ods-7b844db9c6-6rcsl      1/1     Running     0             23m
worker-realtime-ods-7b844db9c6-hb8lq      1/1     Running     0             23m
worker-scanners-55fc98d756-mrqsx          1/1     Running     0             23m
worker-scanners-55fc98d756-rz6xz          1/1     Running     0             23m
worker-worker-85bff7dc8f-6zs98            1/1     Running     0             23m
worker-worker-85bff7dc8f-vd5vx            1/1     Running     0             23m
We have set a 30-day TTL (Time To Live) for pre-deploy and post-deploy jobs to allow for log retrieval if needed. It is recommended not to delete these pods, as they can be useful for troubleshooting.
Upgrading KOTS
Please remember that regular upgrades of KOTS are necessary. GitGuardian releases are thoroughly tested with the latest KOTS release. To ensure full functionality and compatibility, some features may not perform as expected on older versions of KOTS. We strongly recommend staying updated with the most recent releases.
To check the KOTS plugin version, run the following command:
kubectl kots version
If there is an update available, follow the instructions and run this command:
curl https://kots.io/install | bash
For existing cluster, you will need to upgrade the KOTS application running in the cluster:
KOTS installation on existing clusters will be deprecated and unsupported after the June 2026 release (version 2026.6.0). Please migrate to Helm installation.
kubectl kots admin-console upgrade -n <namespace>
For Embedded cluster installations (instances installed in 2025 or after), KOTS is upgraded automatically with the GitGuardian application.
For Embedded cluster legacy (kURL) installations (instances installed in 2024 or before), simply re-run the same installation command as outlined in the installation guide.
⚠️ During the upgrade you will be prompted (possibly more than once) with a Y/N question to drain the node and apply the upgrade. You should respond with Y to continue. Because this step deletes all pods on the node, there will be some brief downtime while the upgrade happens and you should plan accordingly.
🌐 If you are using an HTTP proxy, ensure that you follow the instructions.
For further instructions on upgrading KOTS, refer to the Replicated documentation.
In some cases, the preflight checks may not detect the KOTS admin version change correctly, leading to failures even when using the required minimum KOTS version. To address this issue, follow these steps:
- Navigate to the KOTS Admin Console.
- Go to Config > Advanced Options.
- Adjust the number of email worker replicas (for example, from 2 to 1).
- Deploy your configuration change.
- Click the Check for update link.
- Run the preflight checks again.
- Once the preflight checks are completed, revert the change by restoring the number of email worker replicas to its original value.
Upgrading Kubernetes on Embedded Cluster legacy (kURL) (instances installed in 2024 or before)
To upgrade your Kubernetes version for the embedded cluster, follow these steps:
- Simply re-run the same installation command as outlined in the installation guide.
⚠️ During the upgrade you will be prompted (possibly more than once) with a Y/N question to drain the node and apply the upgrade. You should respond with Y to continue. Because this step deletes all pods on the node, there will be some brief downtime while the upgrade happens and you should plan accordingly.
🌐 If you are using an HTTP proxy, ensure that you follow the instructions.
- To verify the Kubernetes version, execute the following command:
kubectl version

