Bring Your Own Sources
Extend secret detection to any custom data source beyond GitGuardian's native integrations.
Why Use Bring Your Own Sources?
Every organization has unique systems, legacy platforms, and custom tools where secrets can hide beyond standard integrations. Bring Your Own Sources bridges the gap by enabling you to scan CI/CD logs, legacy databases, internal scripts, file shares, and any proprietary system where developers might store or accidentally expose credentials, ensuring comprehensive secret detection across your entire technology stack.
Key benefits:
- Complete coverage: Extend GitGuardian to any system or data source in your environment
- Flexible scanning: Use scripts, automation tools, or manual processes to feed data
- Unified monitoring: Manage custom source incidents alongside native integrations
- API-first approach: Programmatically integrate with existing workflows and toolchains
Capabilities
| Feature | Support | Details |
|---|---|---|
| On-demand Scanning | ✅ | Trigger scans via API or scripts |
| Monitored Perimeter | ✅ | Custom source organization and categorization |
| Team Perimeter | ✅ (Supported) | Team-based access control |
| Presence Check | ❌ | Not applicable for custom data sources |
| File Scanning | ⏳ (Coming Soon) | PDF, Office documents, archives, etc... are not scanned |
What we scan:
- Raw text, logs and code files
- Docker images' layers and, dockerfile and build arguments
Plan requirements: Available for GitGuardian Enterprise plan. Try it for free with a 30-day trial - any detected incidents remain accessible after the trial ends.
Detector coverage: To minimize false positives, Generic High Entropy Secret and Generic Password are disabled. All other detectors are enabled.
Prerequisites:
- Owner or Manager account on your GitGuardian Dashboard
- Business or Enterprise plan for custom source functionality
- Custom scanning implementation using ggshield, scripts, or automation tools
How It Works
With Bring Your Own Sources, connect any data source to GitGuardian in minutes:
- Set up a custom source in the GitGuardian dashboard or via the GitGuardian API.
- Scan your custom sources using ggshield, simple scripts, or an automation tool.
Incidents are automatically created and linked to your custom integration. - Filter, view, and manage incidents from your custom sources just like with native integrations in the GitGuardian dashboard.
Setting Up a Custom Source
Step 1: Create a Custom Integration
- Navigate to Settings > Integrations > Sources in your GitGuardian dashboard.
- From the Secrets scanning tab, in the Custom Sources section, click Add Custom Source.
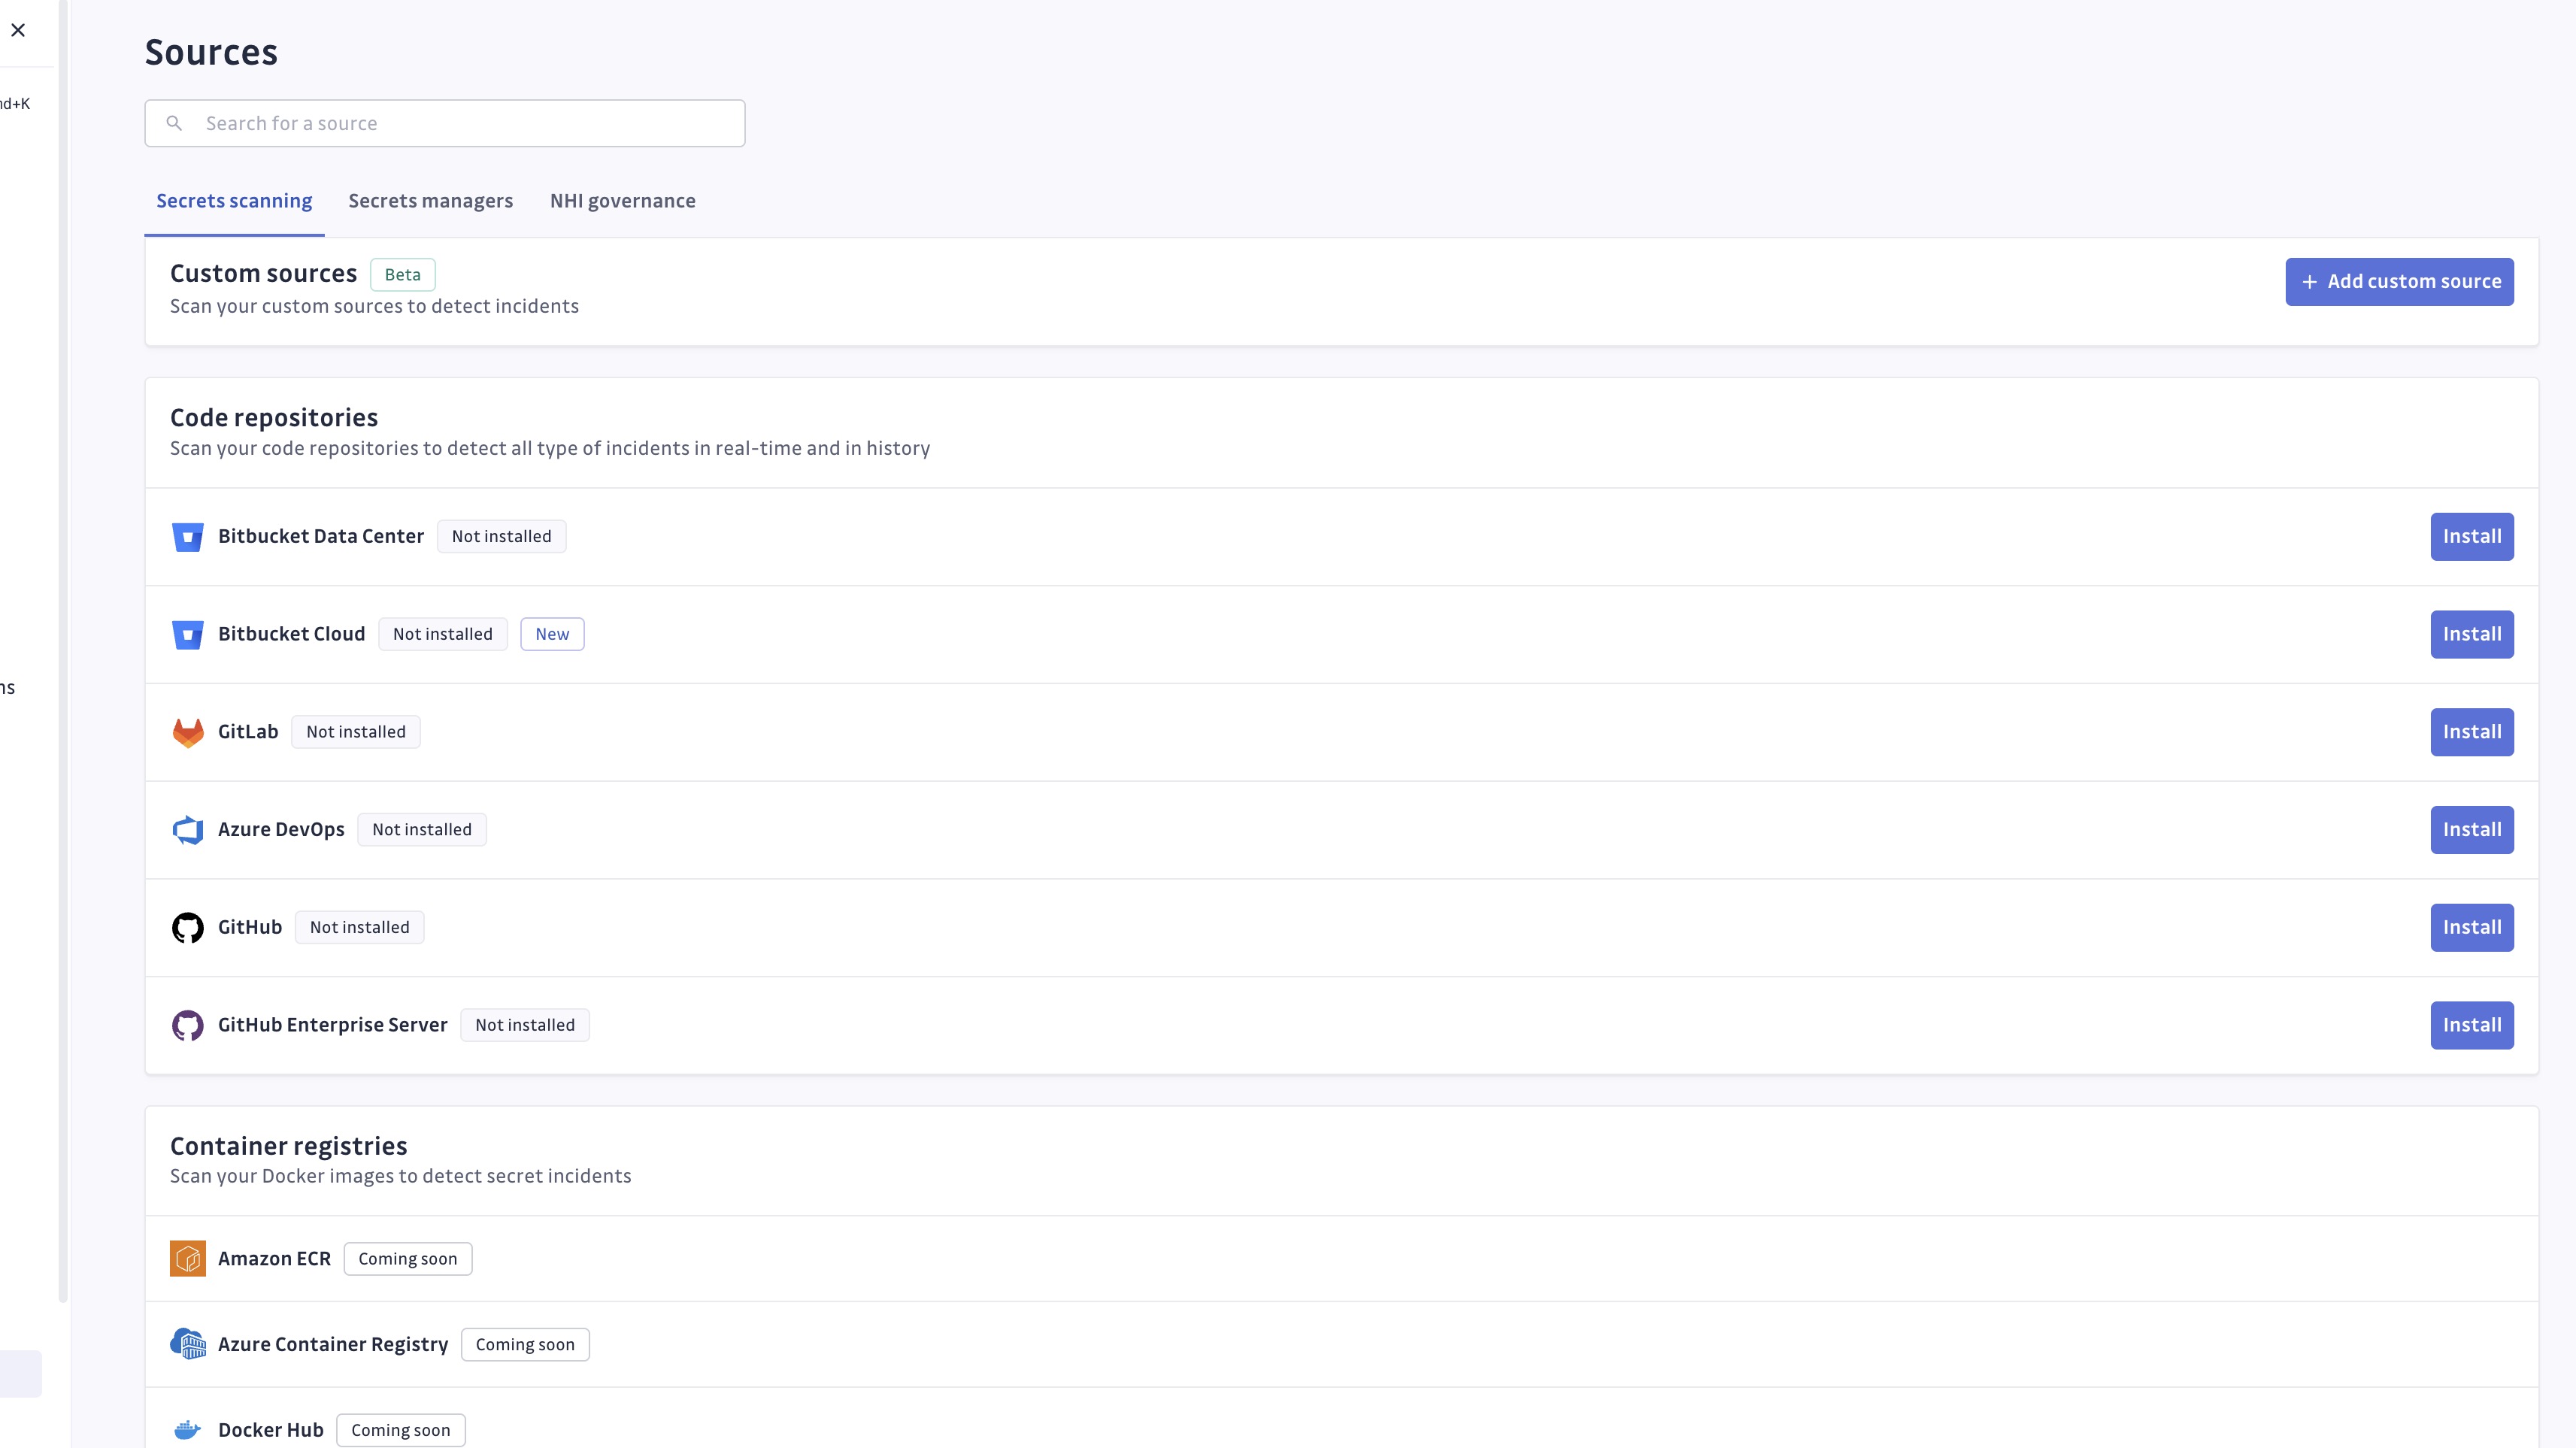
- Give your source a clear name (required) and description (optional).
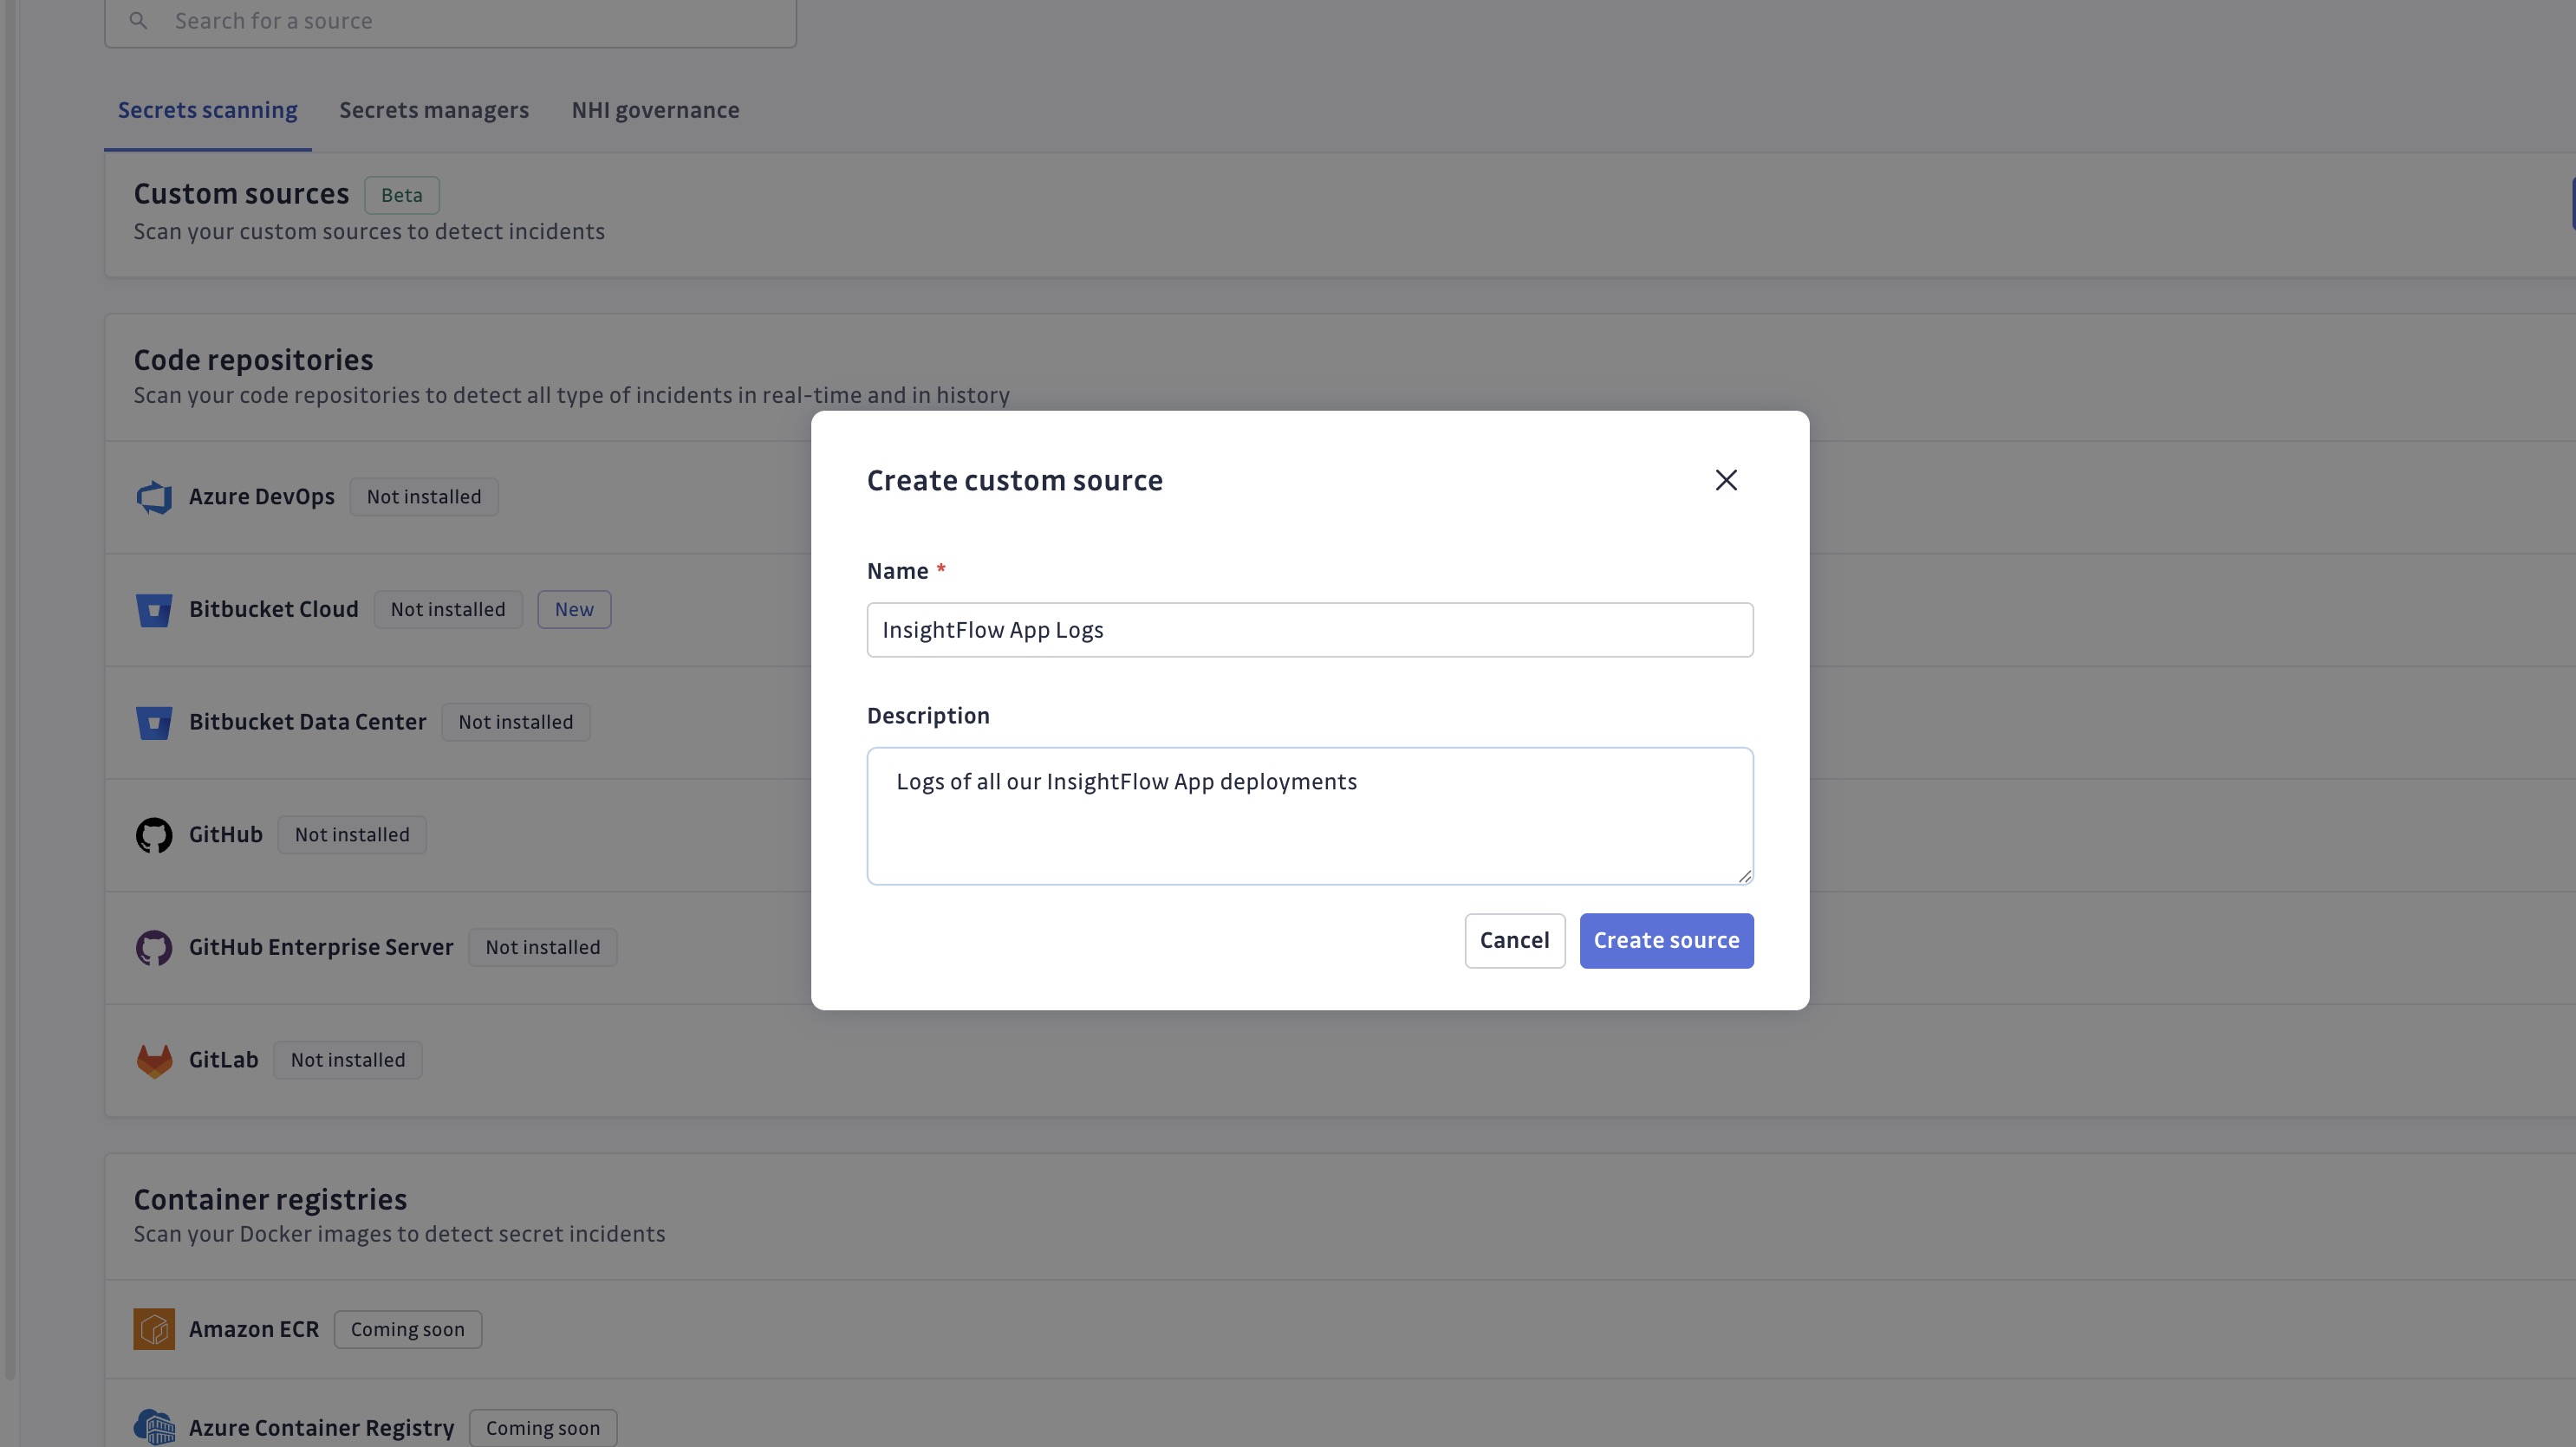
- Click Create Integration. Once saved, note the generated UUID; you’ll need it shortly.
Alternatively, you can create your custom source using the custom-sources endpoint of our Public API.
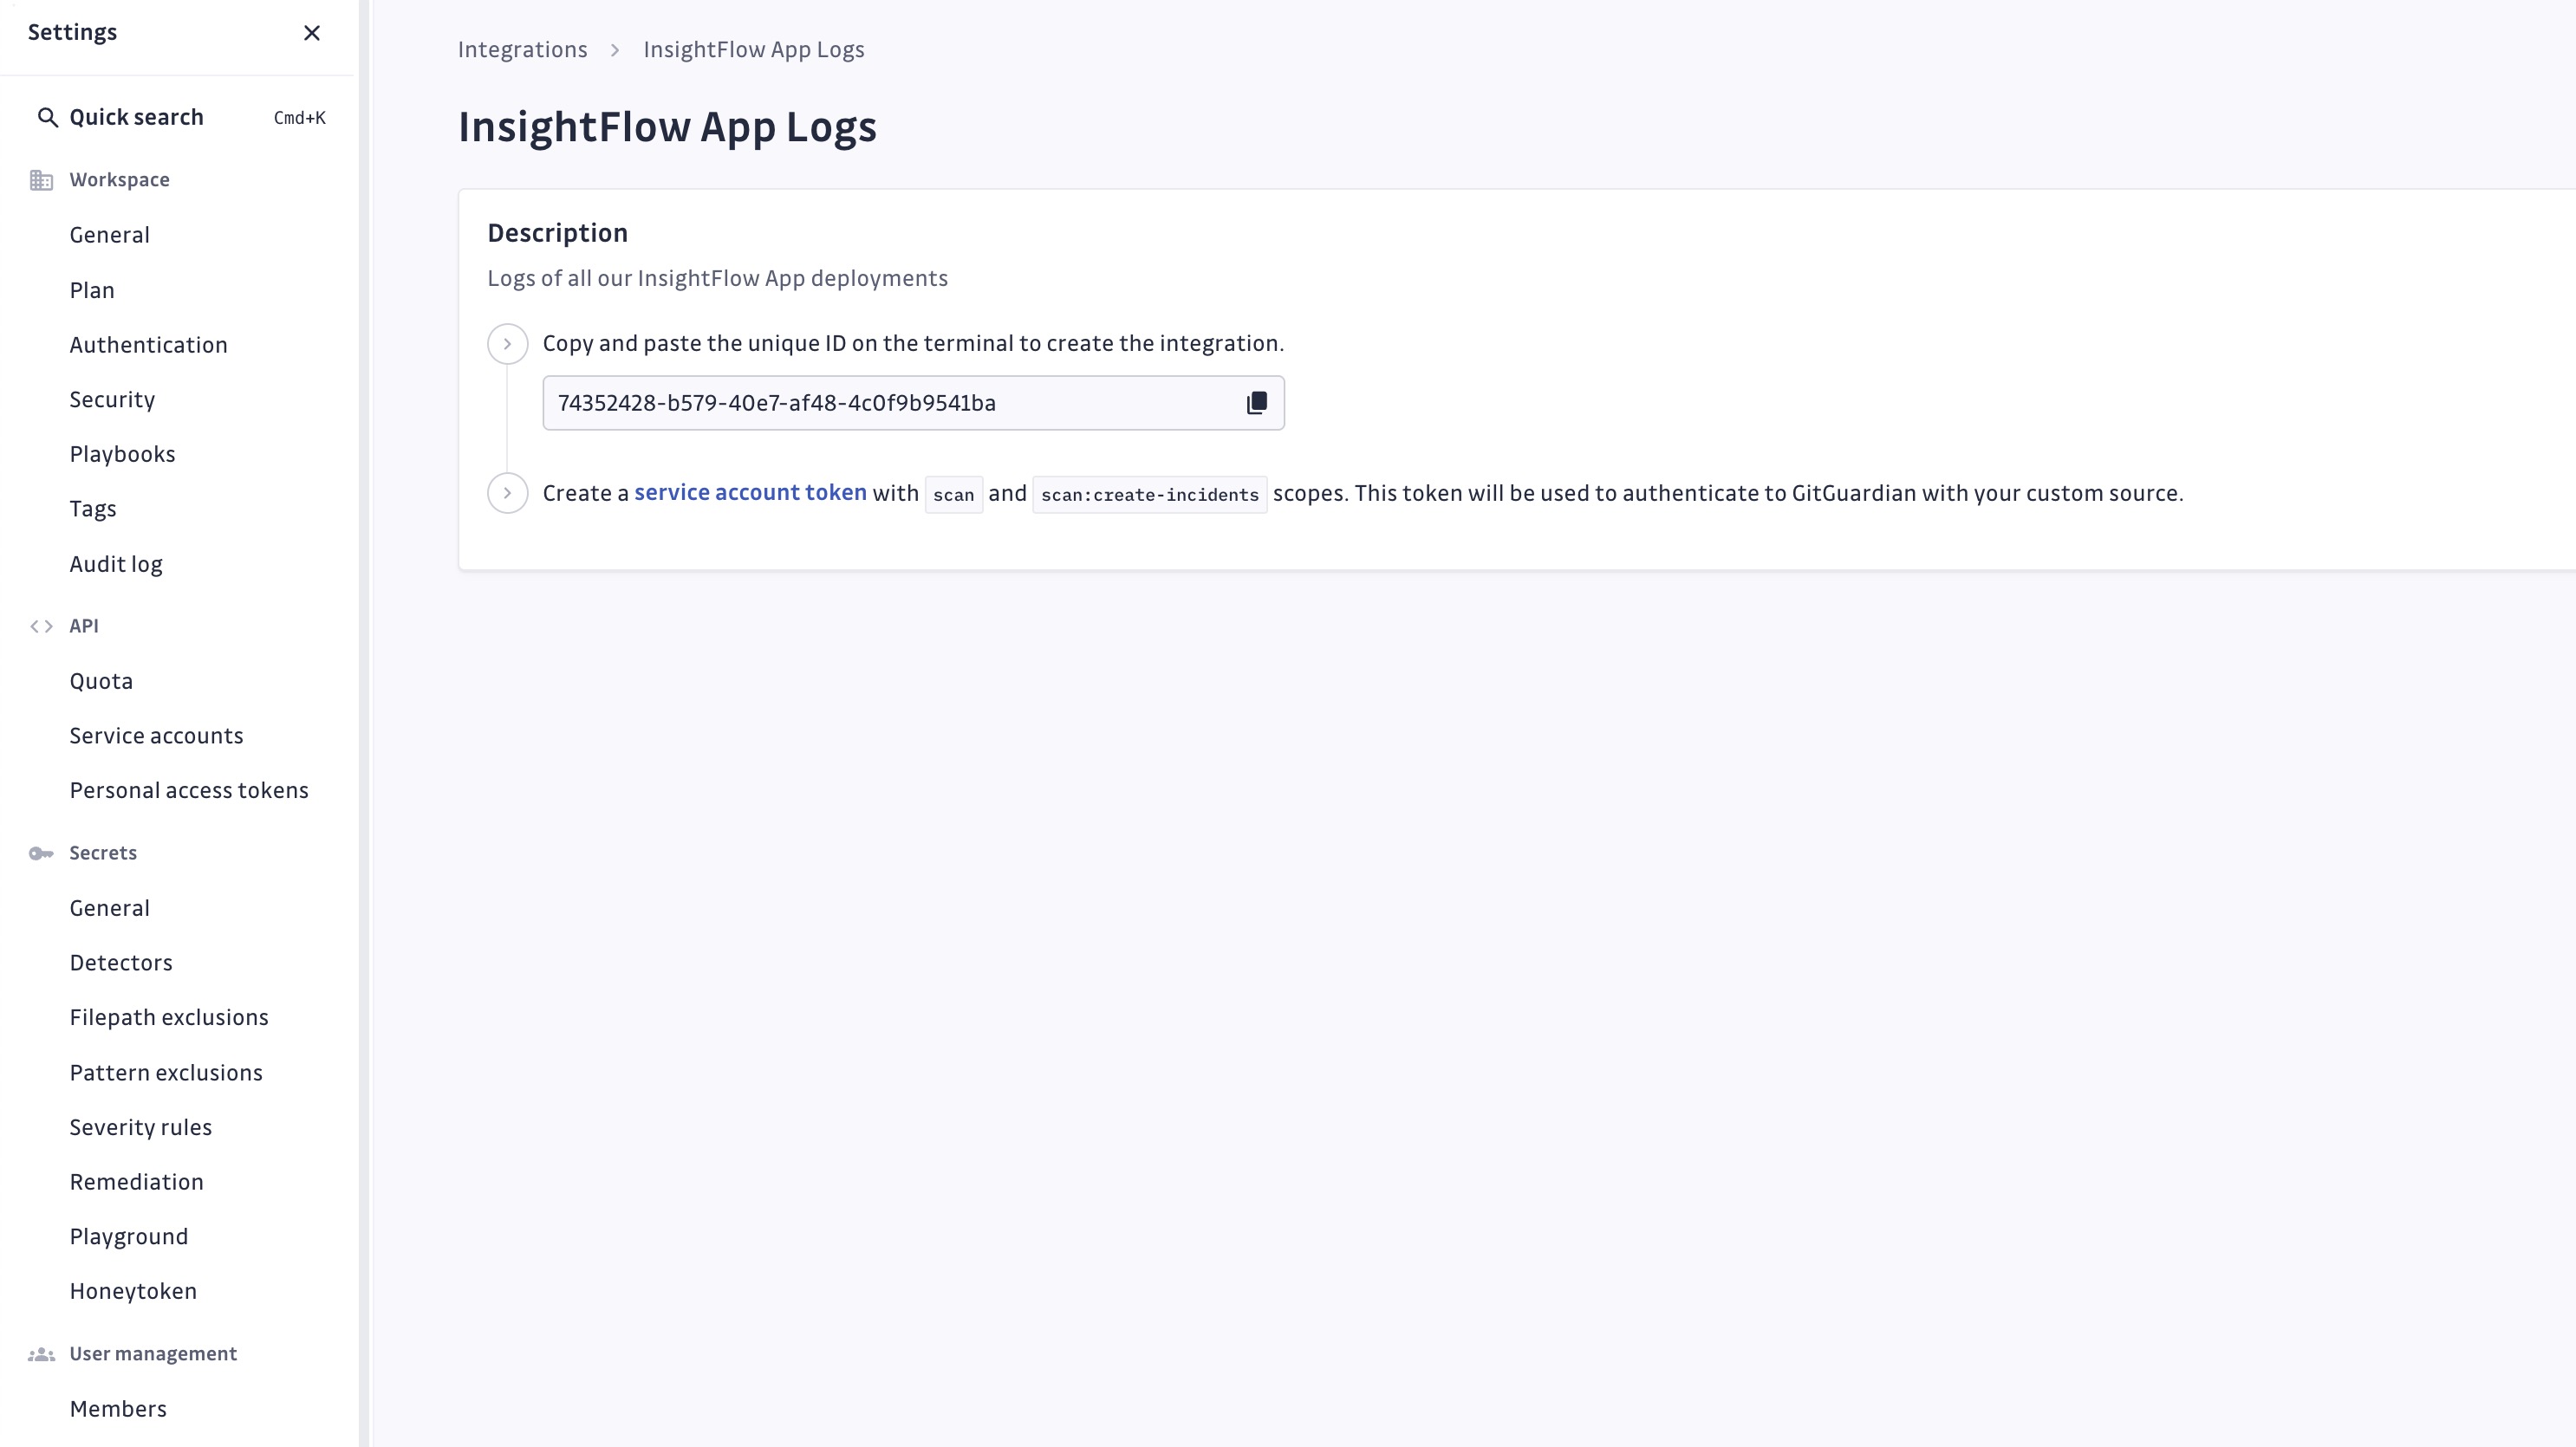
You will need a dedicated Service Account Token with the scan and scan:create-incidents permissions to proceed.
Upon creation, you'll receive:
- A unique integration ID to attach findings and declare incidents to your custom integration. You can view it at any time after creation.
- Instructions for setting up a service account.
Step 2: Configure a Service Account
- Create a dedicated Service Account with the following permissions:
scanandscan:create-incidents.
This allows scanning and creating incidents from your custom sources. - Configure your environment with the necessary credentials, depending on your internal processes (for example, environment variables or a direct connection to your secrets manager, etc.):
export GITGUARDIAN_API_KEY="your-service-account-token"
export GITGUARDIAN_INSTANCE="https://api.gitguardian.com"  # For SaaS US
# export GITGUARDIAN_INSTANCE="https://api.eu1.gitguardian.com"  # For SaaS EU
# export GITGUARDIAN_INSTANCE="https://your-instance.com/exposed"  # For self-hosted
We recommend creating a dedicated service account for each custom source integration to maintain proper access control and audit trails.
Scanning Custom Sources using ggshield
You can use our CLI, ggshield, to scan for exposed secrets in files, directories, build logs, and CI/CD artifacts.
Create incidents by providing your integration’s unique ID so findings are attached to your custom data source in the GitGuardian dashboard.
Here are a few examples to get you started.
Use ggshield secret scan --help to get more details.
Scan files
ggshield secret scan path /path/to/file.txt --source-uuid YOUR_INTEGRATION_ID
Scan directories
ggshield secret scan path -r /path/to/directory --source-uuid YOUR_INTEGRATION_ID
Scan Jenkins build logs
ggshield secret scan path /var/jenkins_home/jobs/*/builds/*/log --source-uuid YOUR_INTEGRATION_ID
Scan GitLab CI artifacts
find /builds -name "*.log" -exec ggshield secret scan path {} --source-uuid YOUR_INTEGRATION_ID \+
Scan application logs
ggshield secret scan path /var/log/legacy-app.log --source-uuid YOUR_INTEGRATION_ID
Scan Docker images
ggshield secret scan docker ubuntu:22.04 --source-uuid YOUR_INTEGRATION_ID
Scanning Custom Sources using the API directly
You can send documents to GitGuardian via the POST /v1/scan/create-incidents endpoint. Each document in the request supports the following fields:
| Field | Required | Description |
|---|---|---|
filename | ✅ | A name or identifier for the document |
document | ✅ | The text content to scan |
location.url | ❌ | A URL pointing to the document's origin (e.g., a wiki page, ticket, or config file). Displayed in incident details for easy navigation to the origin of the leak. |
Example:
{
  "source_uuid": "550e8400-e29b-41d4-a716-446655440000",
  "documents": [
    {
      "filename": "document.txt",
      "document": "<content to scan>",
      "location": {
        "url": "https://wiki.example.com/my-config-page"
      }
    }
  ]
}
Scanning Custom Sources using an automation workflow (for example, n8n)
You can also use your existing automation tool or simple scripts to scan content from any of your data sources.
Here is a sample scenario using n8n to send GitHub Issues content to GitGuardian via a GitHub webhook.
Step 1: Set Up GitGuardian Authentication
- Once your custom source is created, set up a Header Auth credential in n8n.
- Provide both values:
- Header Name: Authorization
- Value: Bearer
<GG_TOKEN_VALUE>(replace with your GitGuardian token)
Step 2: Trigger the Workflow with a GitHub Webhook
- Add a Webhook node as the trigger.
- Copy its test URL, then go to your GitHub repository’s settings.
- Under Webhooks, add the n8n URL and set it to trigger on “Issues” events.
Step 3: Send Issues to GitGuardian’s API
- Add an HTTP node in n8n.
- Configure it to send a POST request to
https://api.gitguardian.com/v1/scan/create-incidentsusing your Header Auth credential. - For the request body (JSON), use:
{
  "source_uuid": "my_source",
  "documents": [
    {
      "filename": "{{ $json.body.issue.url }}",
      "document": {{ JSON.stringify($json.body.issue.body) }},
      "location": {
        "url": "{{ $json.body.issue.url }}"
      }
    }
  ]
}
The optional location.url field links the document to its origin (e.g., a wiki page, ticket, or config page). When provided, this URL appears in the incident details in the GitGuardian dashboard, making it easy to navigate back to the source.
- Replace "my_source" with your actual source UUID.
- Test your workflow by clicking Execute workflow in n8n, then create an Issue in your GitHub repository—try including a mock secret. Seconds later, you should see your first security incident appear in your GitGuardian dashboard.
- Go live: activate the workflow.
Voilà! You now have real-time secrets detection running on your GitHub Issues.
Filter, view, and manage incidents
Custom sources and their incidents appear in the GitGuardian dashboard just like native integrations.
Filtering and Organization
Use dashboard filters to organize incidents:
- Integration: Select the custom source integration.
- Source: Filter by the source name provided within your integration.
- Source type: Select Custom Source.
- Standard filters: Apply date, severity, and status filters as usual.

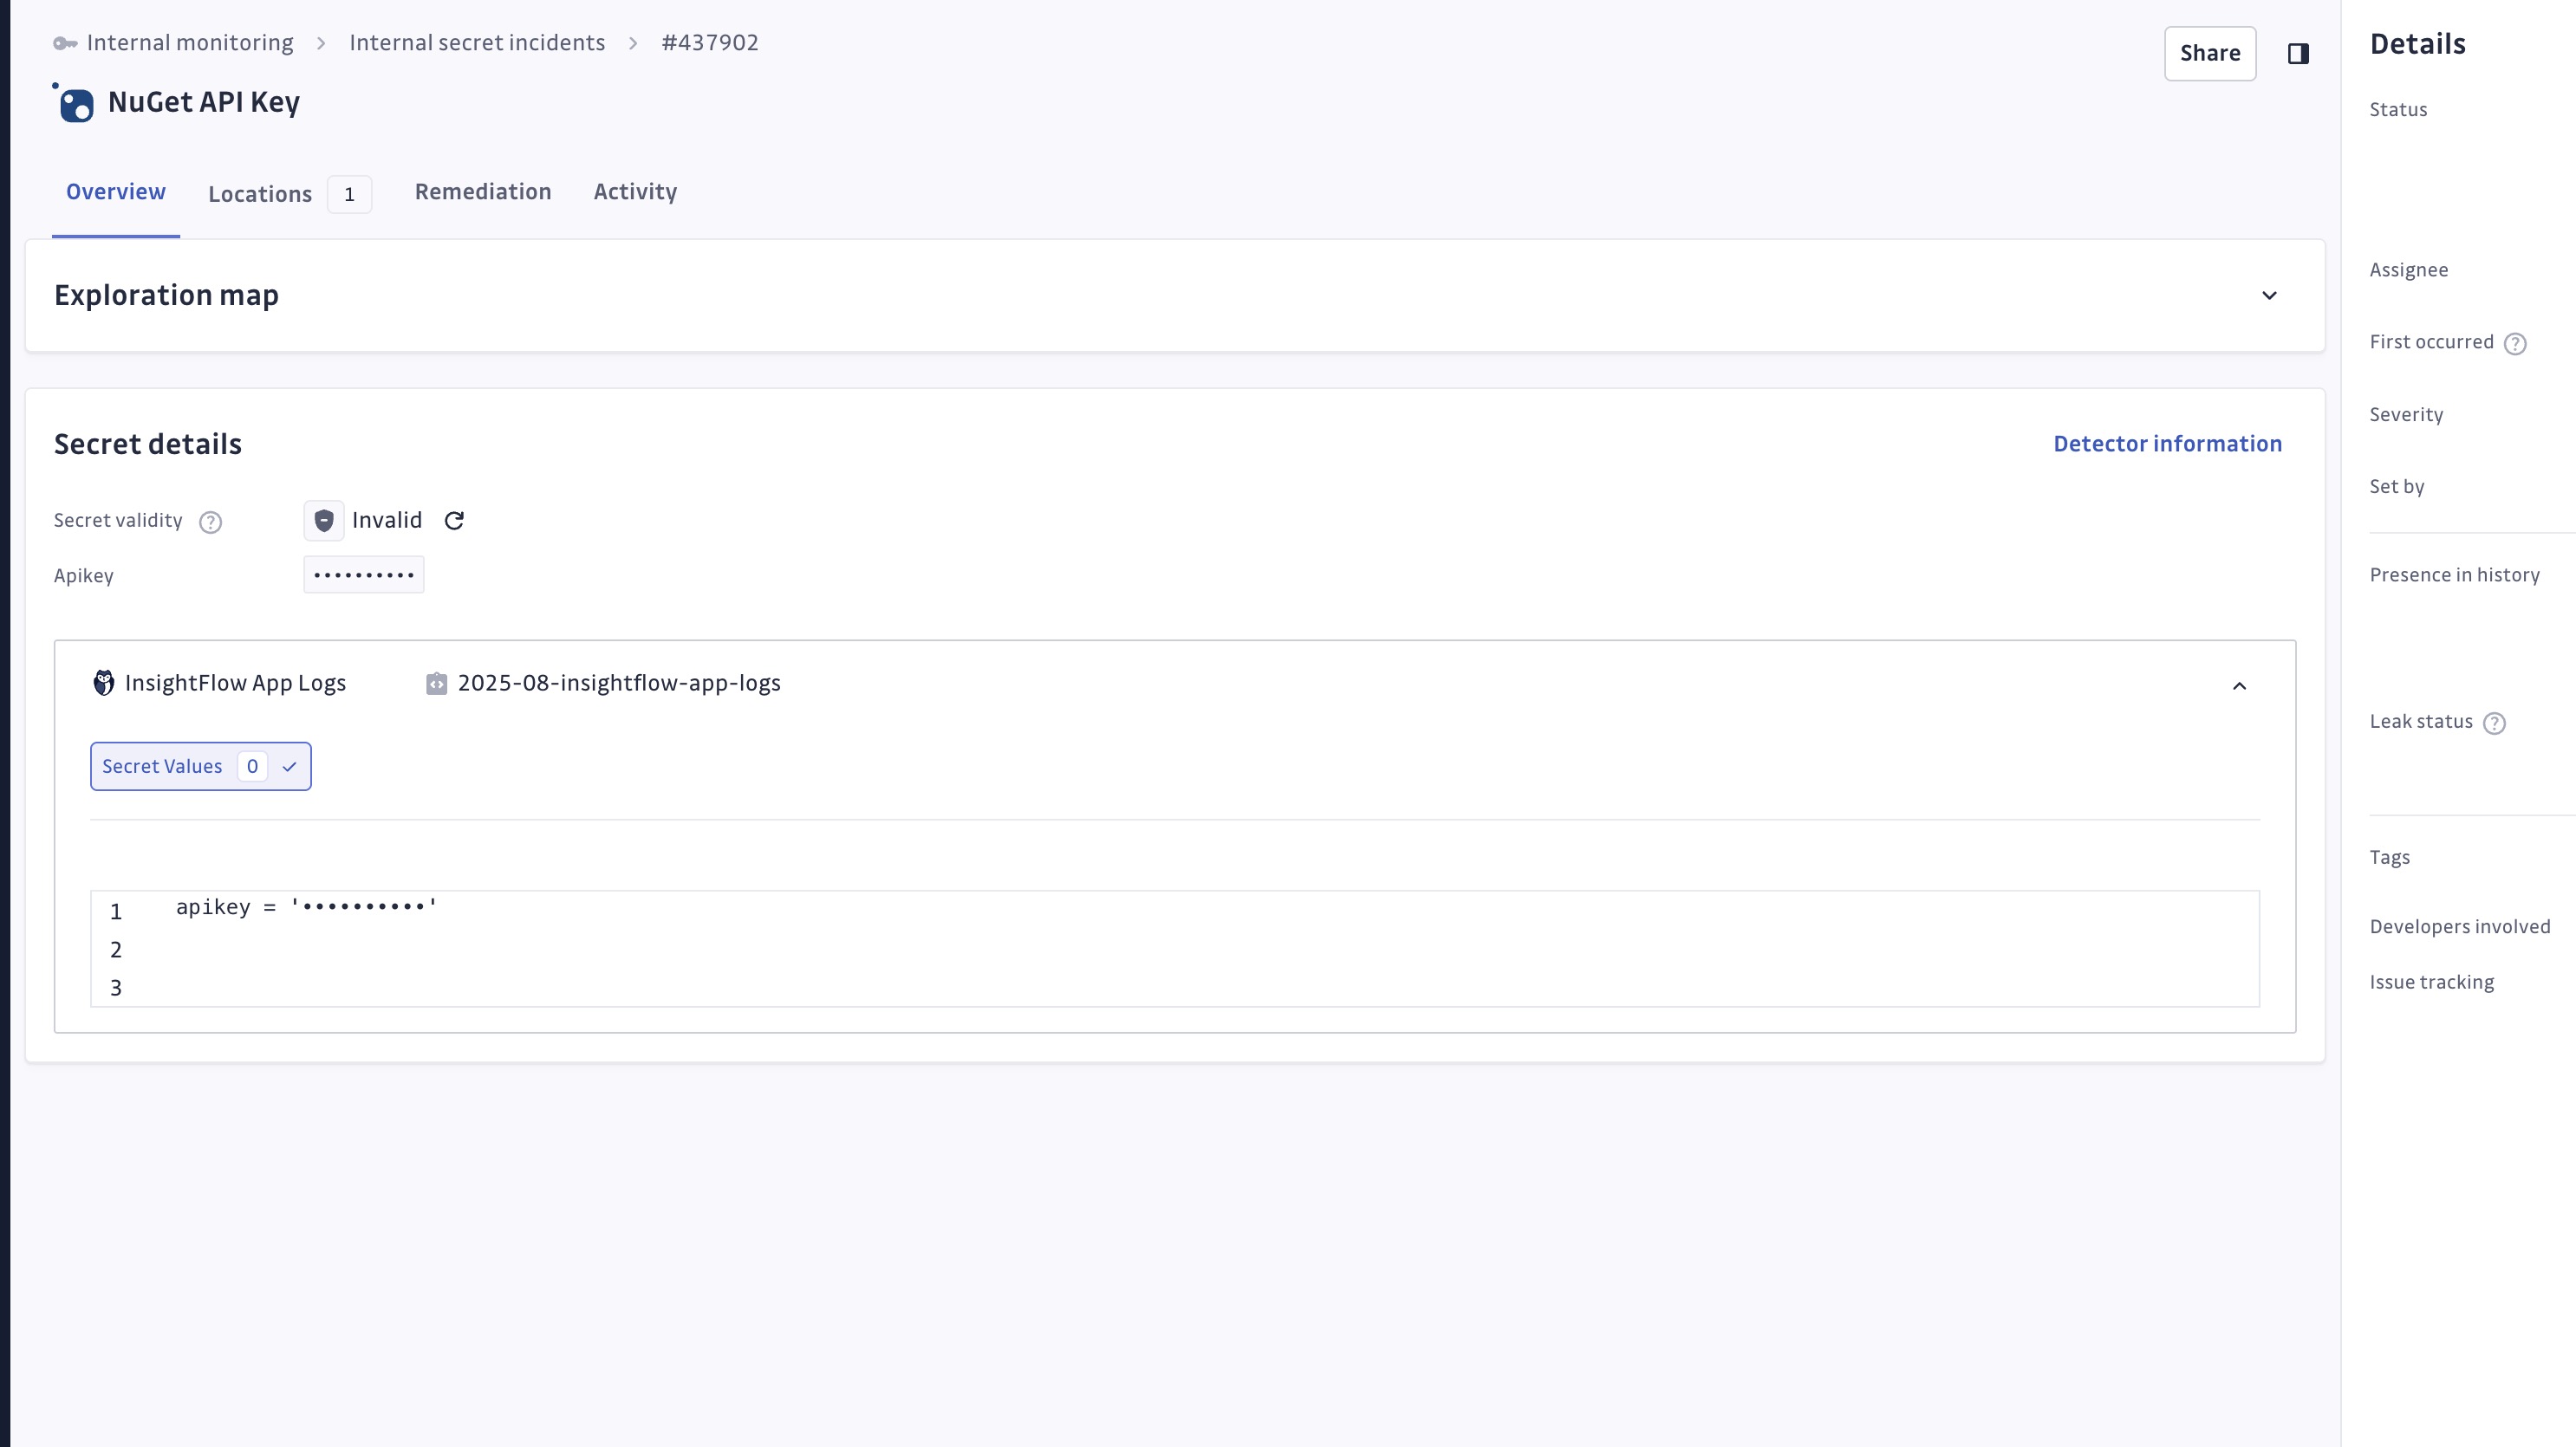
Viewing Custom Source Incidents
All incidents created from custom sources appear in the Incidents and Incident Details pages:
- Secret preview in the list.
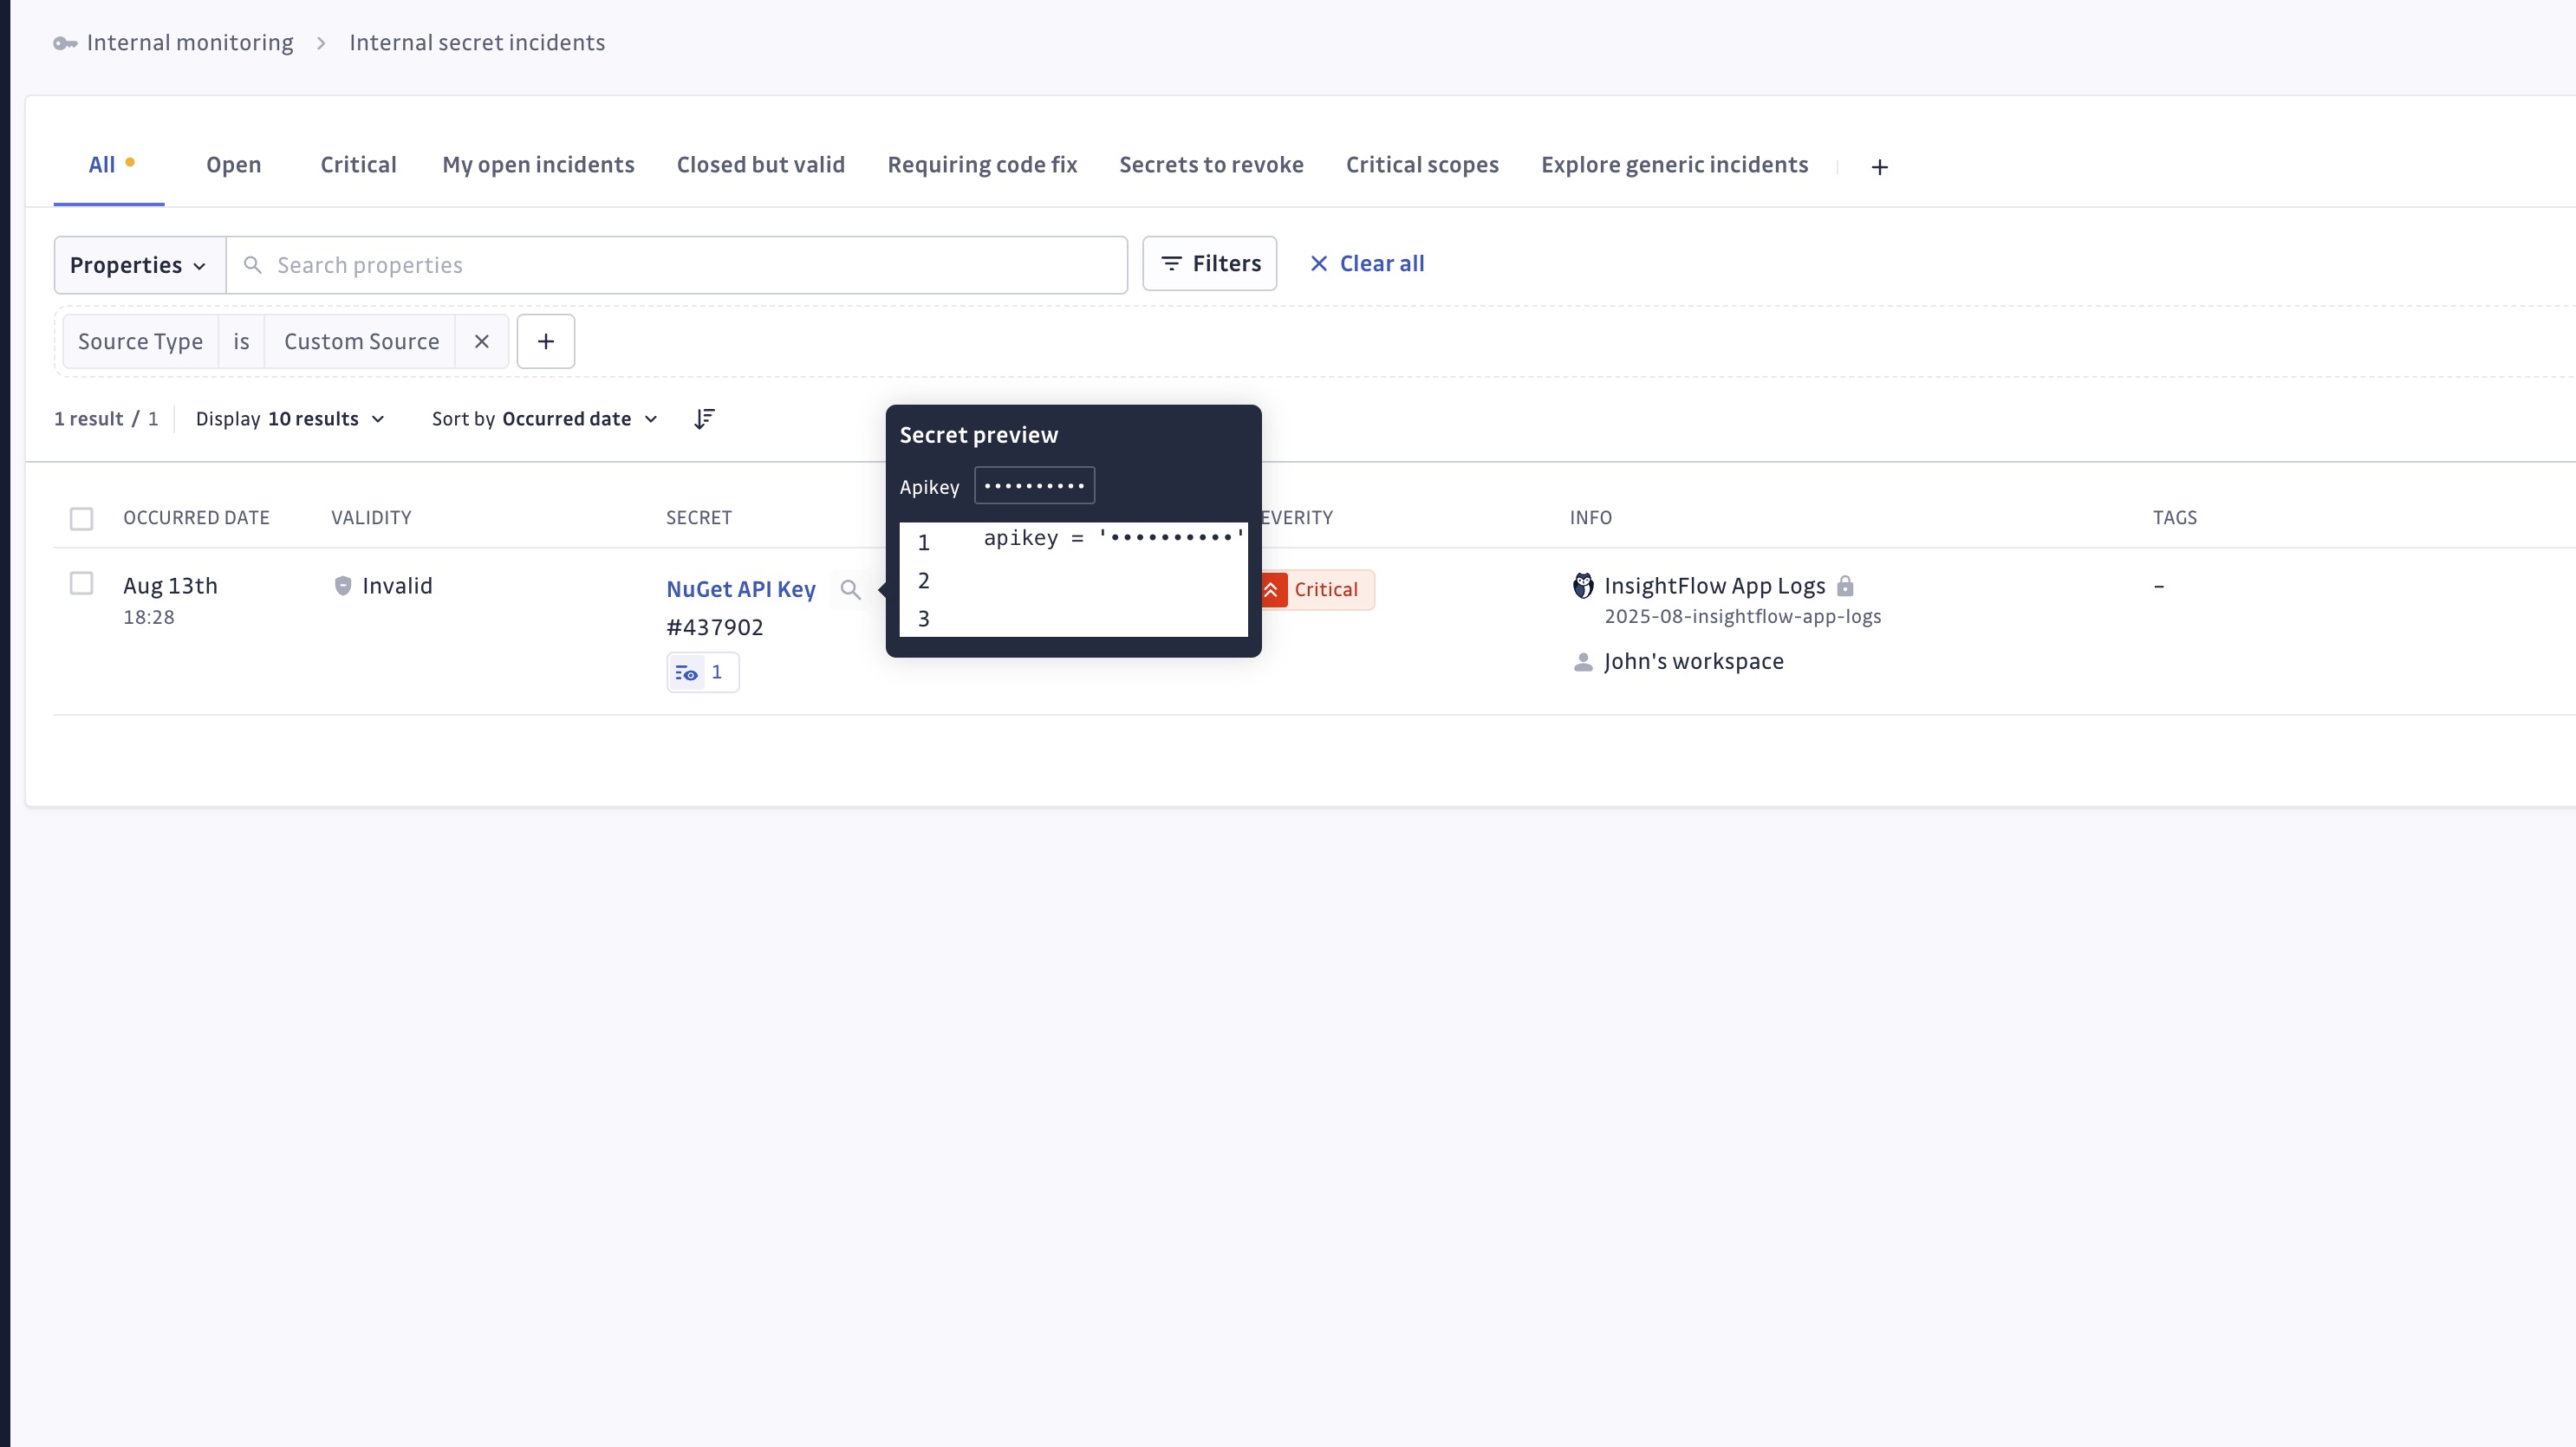
- Full incident details and context.
- Source identification showing your custom integration name.
- Standard incident management capabilities (assign, resolve, ignore, etc.).
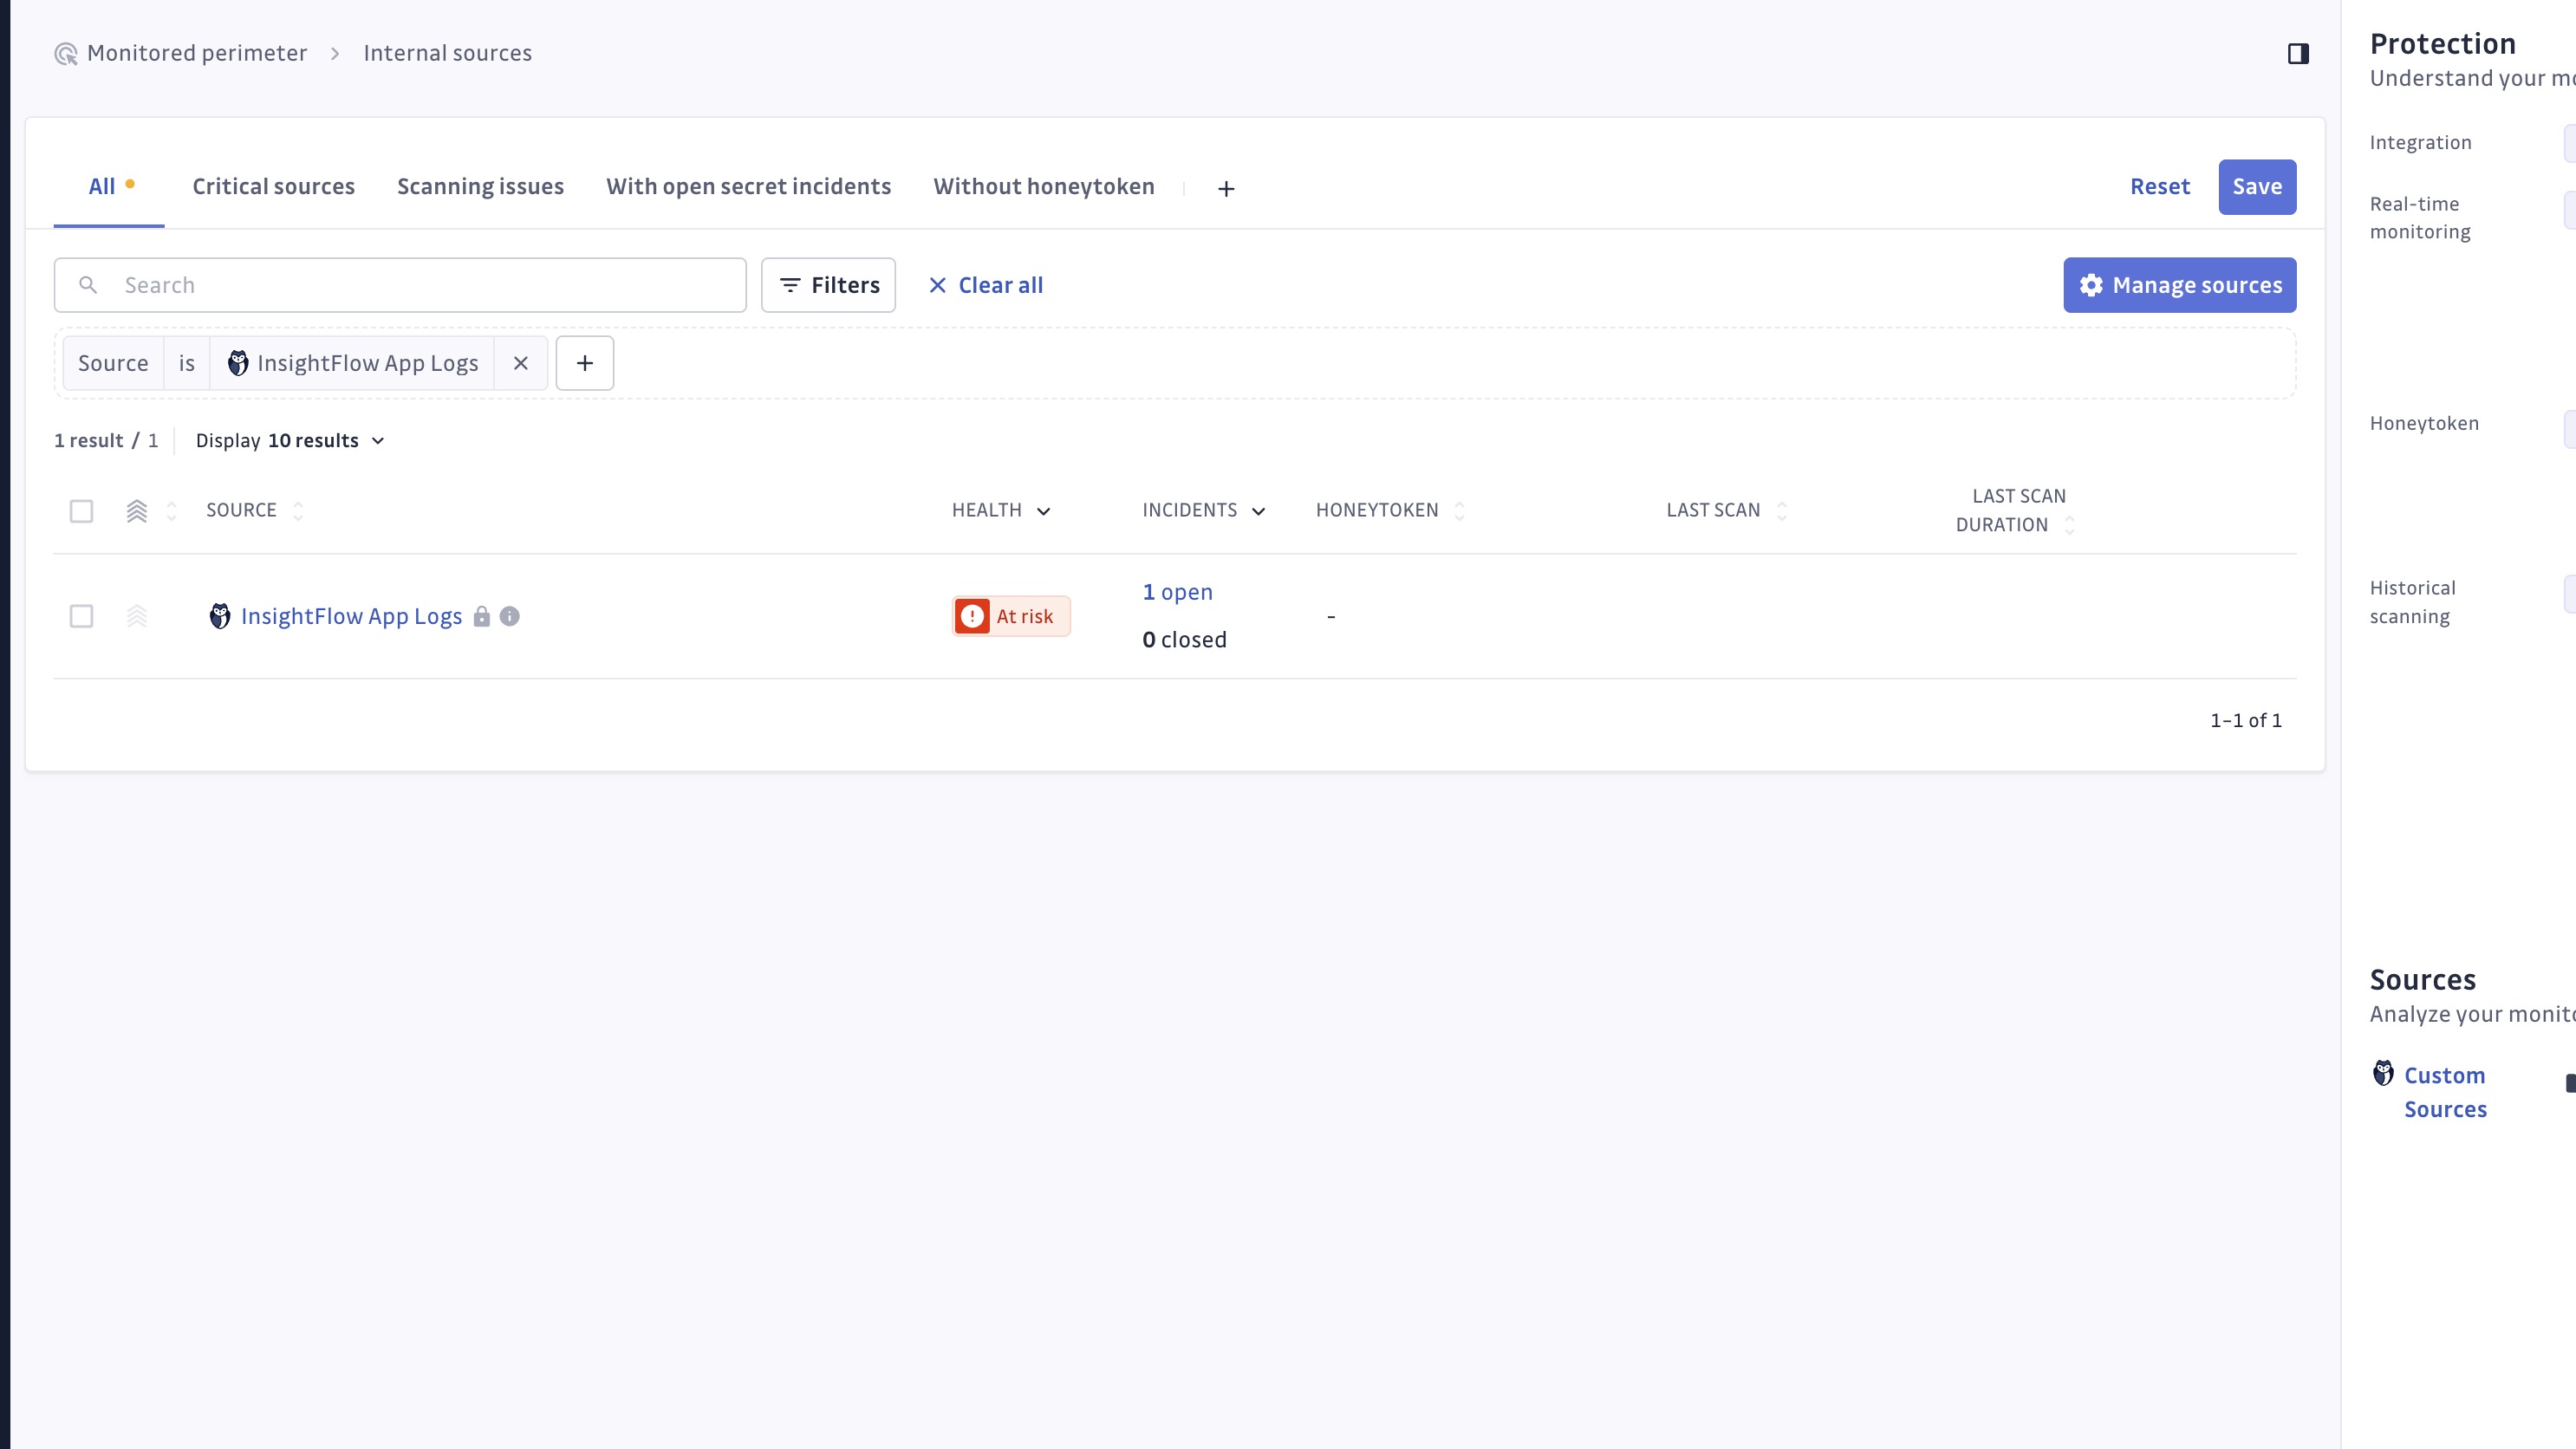
Perimeter Visibility
Custom sources appear in the Monitored Perimeter with:
- Disabled status (cannot be scanned from the dashboard).
- Integration name and description.
Considerations
Current Limitations
- File size: Individual files are limited to 50 MB due to API limits.
- Sources per integration: Each custom integration supports one source.
- Batch scanning: Large datasets should be scanned in batches for optimal performance.
Performance Considerations
- API rate limits: The GitGuardian API limits batches to 20 documents per call.
- Large directories: Scanning directories with more than 20 files will result in multiple API calls.
- Network timeouts: Consider network stability for large scanning operations.
Future Enhancements
- Support for multiple sources per integration.
- Increased file size limits.
- Enhanced batch processing capabilities.
Pro Tips and Best Practices
Security
- Use a dedicated Service Account Token for each custom source.
- Rotate Service Account Tokens regularly.
- Apply the principle of least privilege for token permissions.
- Avoid storing tokens in plaintext files.
Performance
- Scan files in batches rather than individually when possible.
- Use the
--recursiveflag judiciously with large directory trees. - Monitor API usage to avoid rate limiting.
- Consider scheduling scans during off-peak hours for large datasets.
Organization
- Use descriptive names for custom integrations.
- Add meaningful descriptions to provide context for team members.
- Implement consistent naming conventions across custom sources.
- Document your custom scanning workflows for team knowledge sharing.
Troubleshooting
Common Issues
Authentication Errors
- Verify your Service Account Token has the
scanandscan:create-incidentspermissions. - Ensure the GitGuardian API key has been properly configured for ggshield or your custom script.
- Check that your instance URL is correct for SaaS or self-hosted deployments.
Integration ID Not Found
- Confirm the integration ID is correctly set in your ggshield command or custom script.
- Verify the integration is active and not deleted.
File Size Errors
- Files larger than 50 MB will be skipped.
- Use the
--verboseflag to see which files are skipped. - Consider splitting large files into smaller chunks.
Network Connectivity
- Verify network connectivity to your GitGuardian instance.
- Check firewall rules and proxy configurations.
- Refer to the connectivity troubleshooting guide.
Getting Help
For additional support:
- Check the ggshield documentation for general CLI usage.
- Review the API documentation for advanced integrations.
- Contact our Support team at support@gitguardian.com.
Privacy and compliance
Data handling
GitGuardian processes your data solely to detect exposed secrets:
- Read-only access: We never require write access unless scoped to creating webhooks to receive and process real-time events
- Minimal data retention: We store only data and metadata necessary for incident management
- Encryption: All data in transit and at rest is encrypted
- Compliance: We follow the same data protection standards as our other integrations
Regional considerations
GitGuardian hosts its services in two AWS regions: eu-central-1 (Frankfurt) and us-west-2 (Oregon). Ensure your GitGuardian deployment region aligns with your data residency requirements. Contact support if you need guidance on compliance with local regulations.
User notification
When implementing custom source scanning, consider informing relevant teams and users about the secret detection process. Here's a suggestion for a message you may want to use:
As part of our internal information security process, the company scans custom data sources for potential secrets leaks using GitGuardian. All data collected will be processed for the purpose of detecting potential leaks. To find out more about how we manage your personal data and to exercise your rights, please refer to our employee/partner privacy notice.
Please note that only business-related systems and data sources may be monitored and that users shall refrain from including personal or sensitive data not relevant to business purposes.
Managing your integration
Monitoring health and Maintenance
If you need to modify your integration settings or troubleshoot connectivity issues, access the management interface through Sources integration.
Uninstalling the integration
While our goal is to help you maintain comprehensive security coverage, you may uninstall the integration whenever necessary:
- Navigate to Sources integration
- Click Edit next to the integration name
- Click Configure
- Click the delete icon next to your resource
- Confirm the removal
Note: Removing the integration preserves your incident history, but stops future scanning and presence checks for the integrations that support it.

