Integrate Jira Cloud
Monitor Jira Cloud projects for exposed secrets in issue descriptions, comments, and project documentation.
File attachment scanning requires Jira attachment access in OAuth scopes, including read:attachment:jira. If you integrated with Jira Cloud prior the 27th of April 2026, we recommend you uninstall and reinstall your Jira Cloud site from Sources to benefit from this new feature.
Why Monitor Jira Cloud?
Jira Cloud serves as the central repository for project management and issue tracking where teams document technical problems, share debugging information, and collaborate on solutions. During troubleshooting and issue resolution, developers frequently paste configuration details, error logs, and code snippets containing API keys, database credentials, and environment secrets directly into issue descriptions and comments.
Capabilities
| Feature | Support | Details |
|---|---|---|
| Historical Scanning | ✅ (Manual Trigger) | Analyze existing projects issues and their histories |
| Recurrent Scanning | ✅ (Supported) | Regular scheduled scanning for new and updated content |
| Monitored Perimeter | ✅ (Supported) | Granular monitoring of projects |
| Team Perimeter | ✅ (Supported) | Team-based access control |
| Presence Check | ❌ (Not Supported) | Not applicable for project management content |
| Source Visibility | ❌ (Not Supported) | All projects show as private |
| File Attachments | ✅ (Supported) | Uploaded file attachments are scanned |
What we scan:
- Issue descriptions and summaries
- Comments and discussion threads
- File attachments
- Custom fields and project documentation
Plan requirements: Available for GitGuardian Enterprise plan. Try it for free with a 30-day trial - any detected incidents remain accessible after the trial ends.
Detector coverage: To minimize false positives, Generic High Entropy Secret and Generic Password are disabled. All other detectors are enabled.
Setup your Jira Cloud integration
Prerequisites:
- Owner or Manager account on your GitGuardian Dashboard
- Jira Cloud admin permissions for the sites you want to monitor
GitGuardian integrates with Jira Cloud via a Jira Cloud app with read-only access to your projects.
You can install GitGuardian on multiple Jira Cloud sites to monitor your projects.
- Make sure you're logged in the Jira Cloud site you want to install
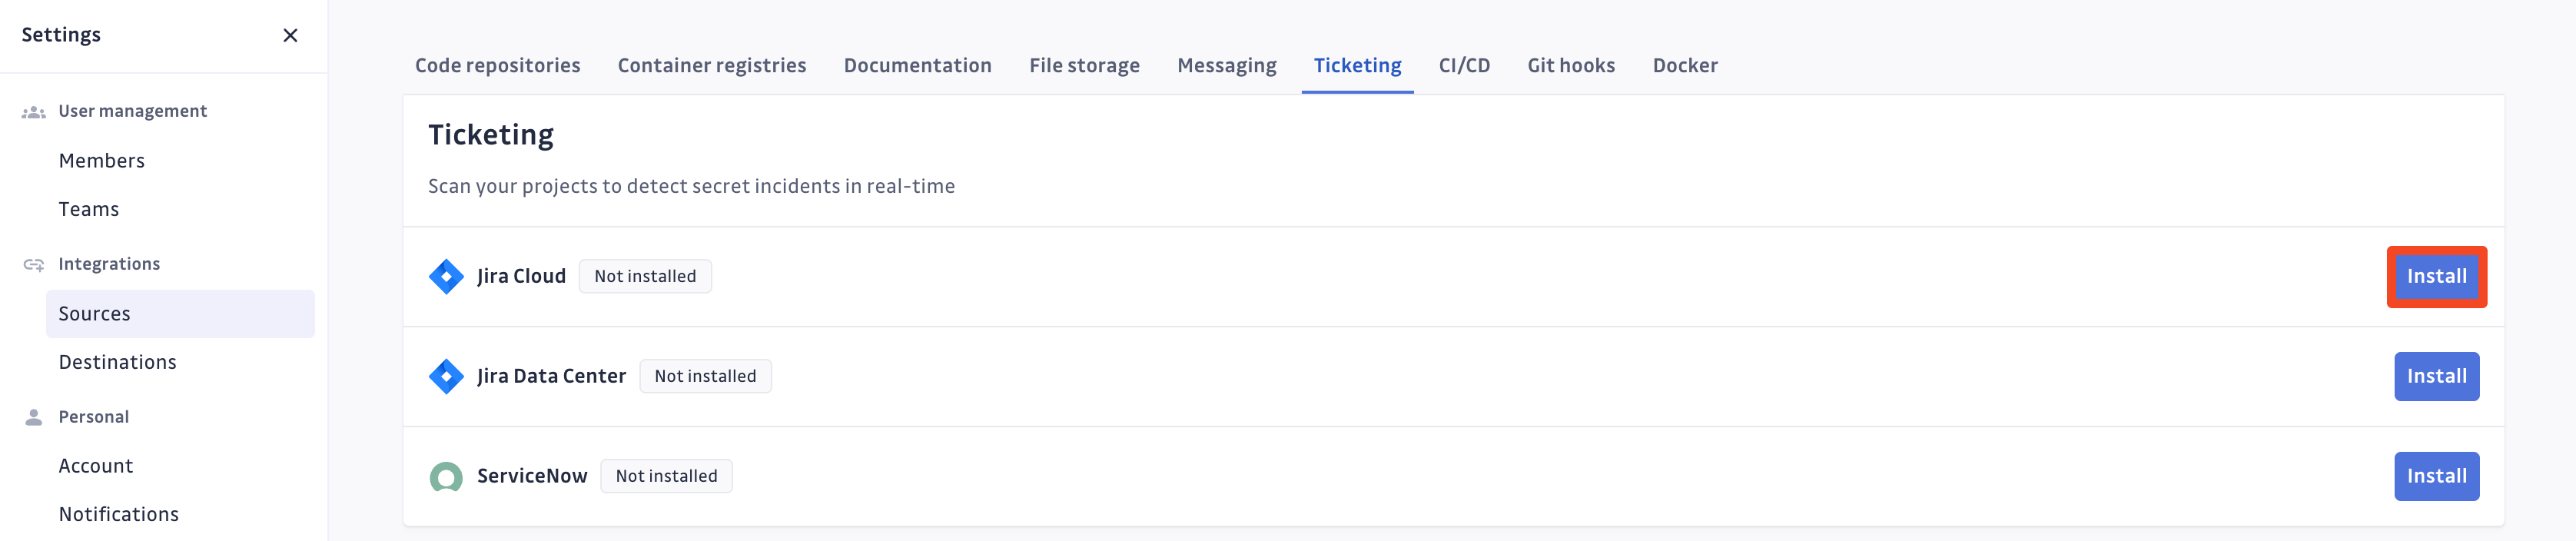
- In the GitGuardian platform, navigate to the Sources integration page
- Click Install next to Jira Cloud in the Ticketing section
- Click Install on the Jira Cloud integration page
- Select the Jira Cloud site you want to add
- Click Accept to grant the permissions requested by GitGuardian

That's it! Our GitGuardian app is now automatically invited on all your projects. It will now start monitoring all issues of your projects for secrets.
Integration with GitGuardian Self-Hosted
We recommend using dedicated workers for this integration. For more detailed information on scaling and configuration, please visit our scaling page.
If you are using a self-hosted GitGuardian instance, you must first configure a dedicated Jira Cloud App so that you own the entire data stream. This will ensure that your Jira Cloud App is created with all the appropriate rights.
1. Create a Jira Cloud app
- Navigate to the Jira Cloud integration page
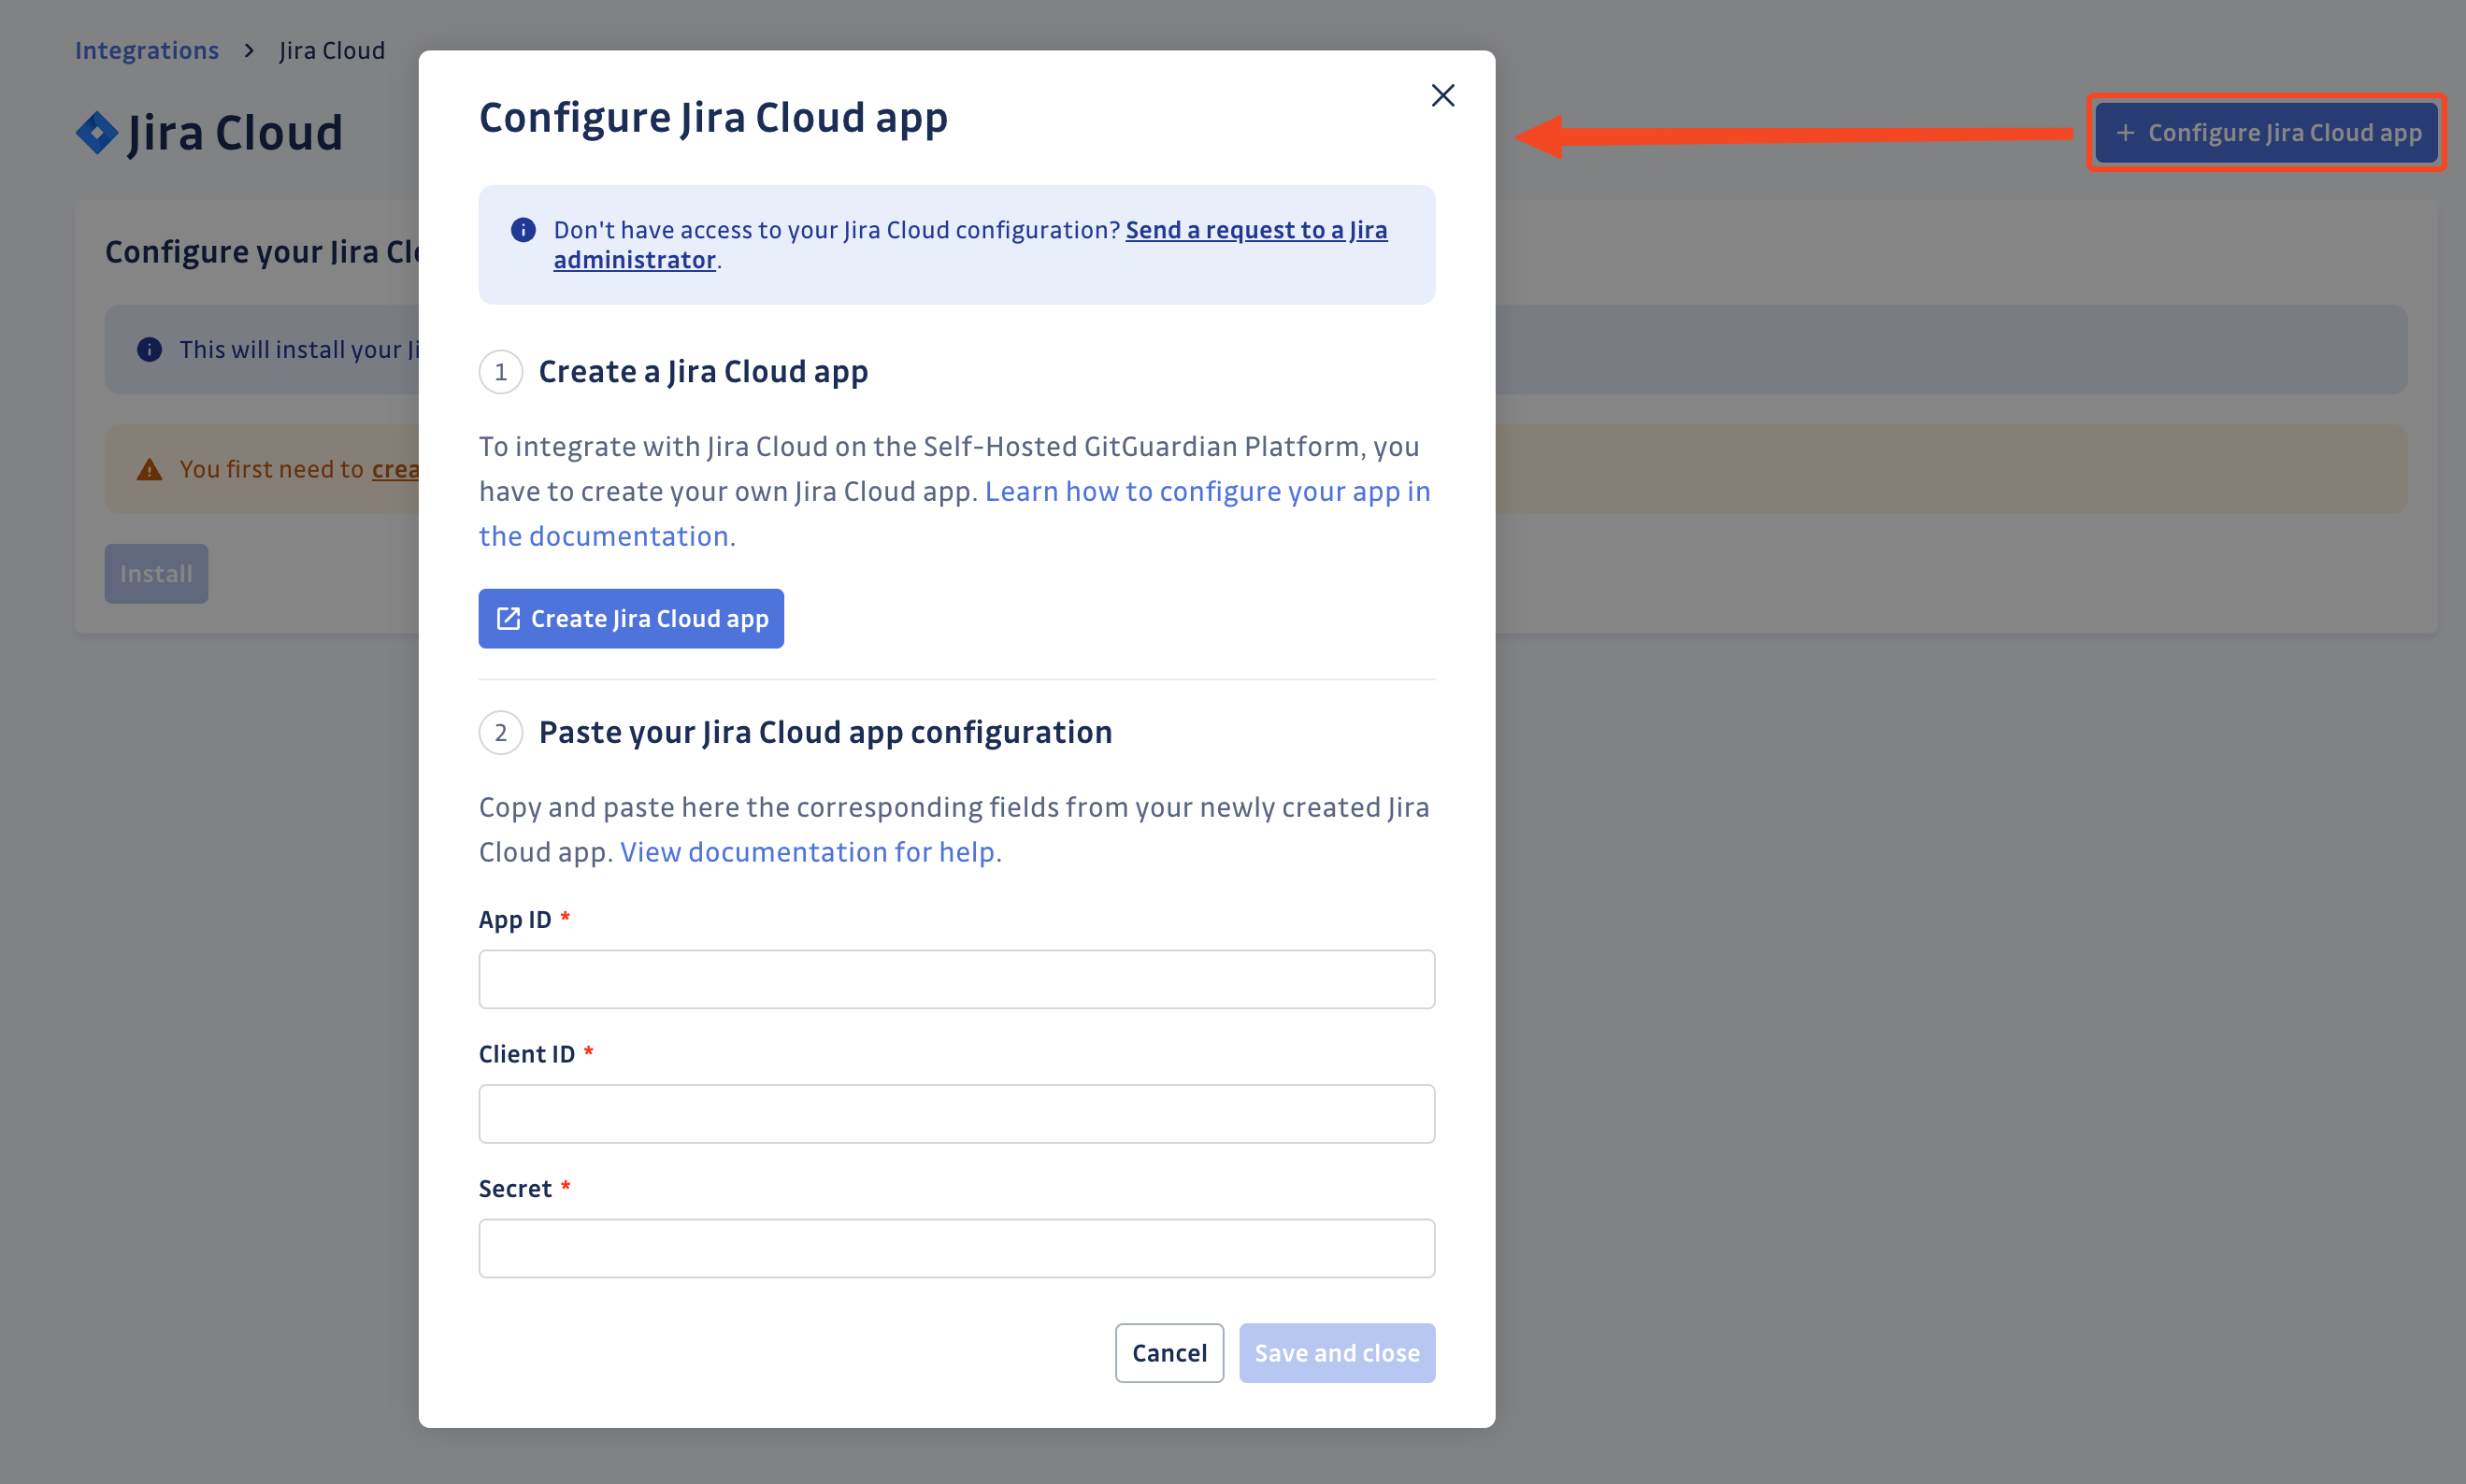
- Click Configure Jira Cloud app
As a Jira Cloud administrator
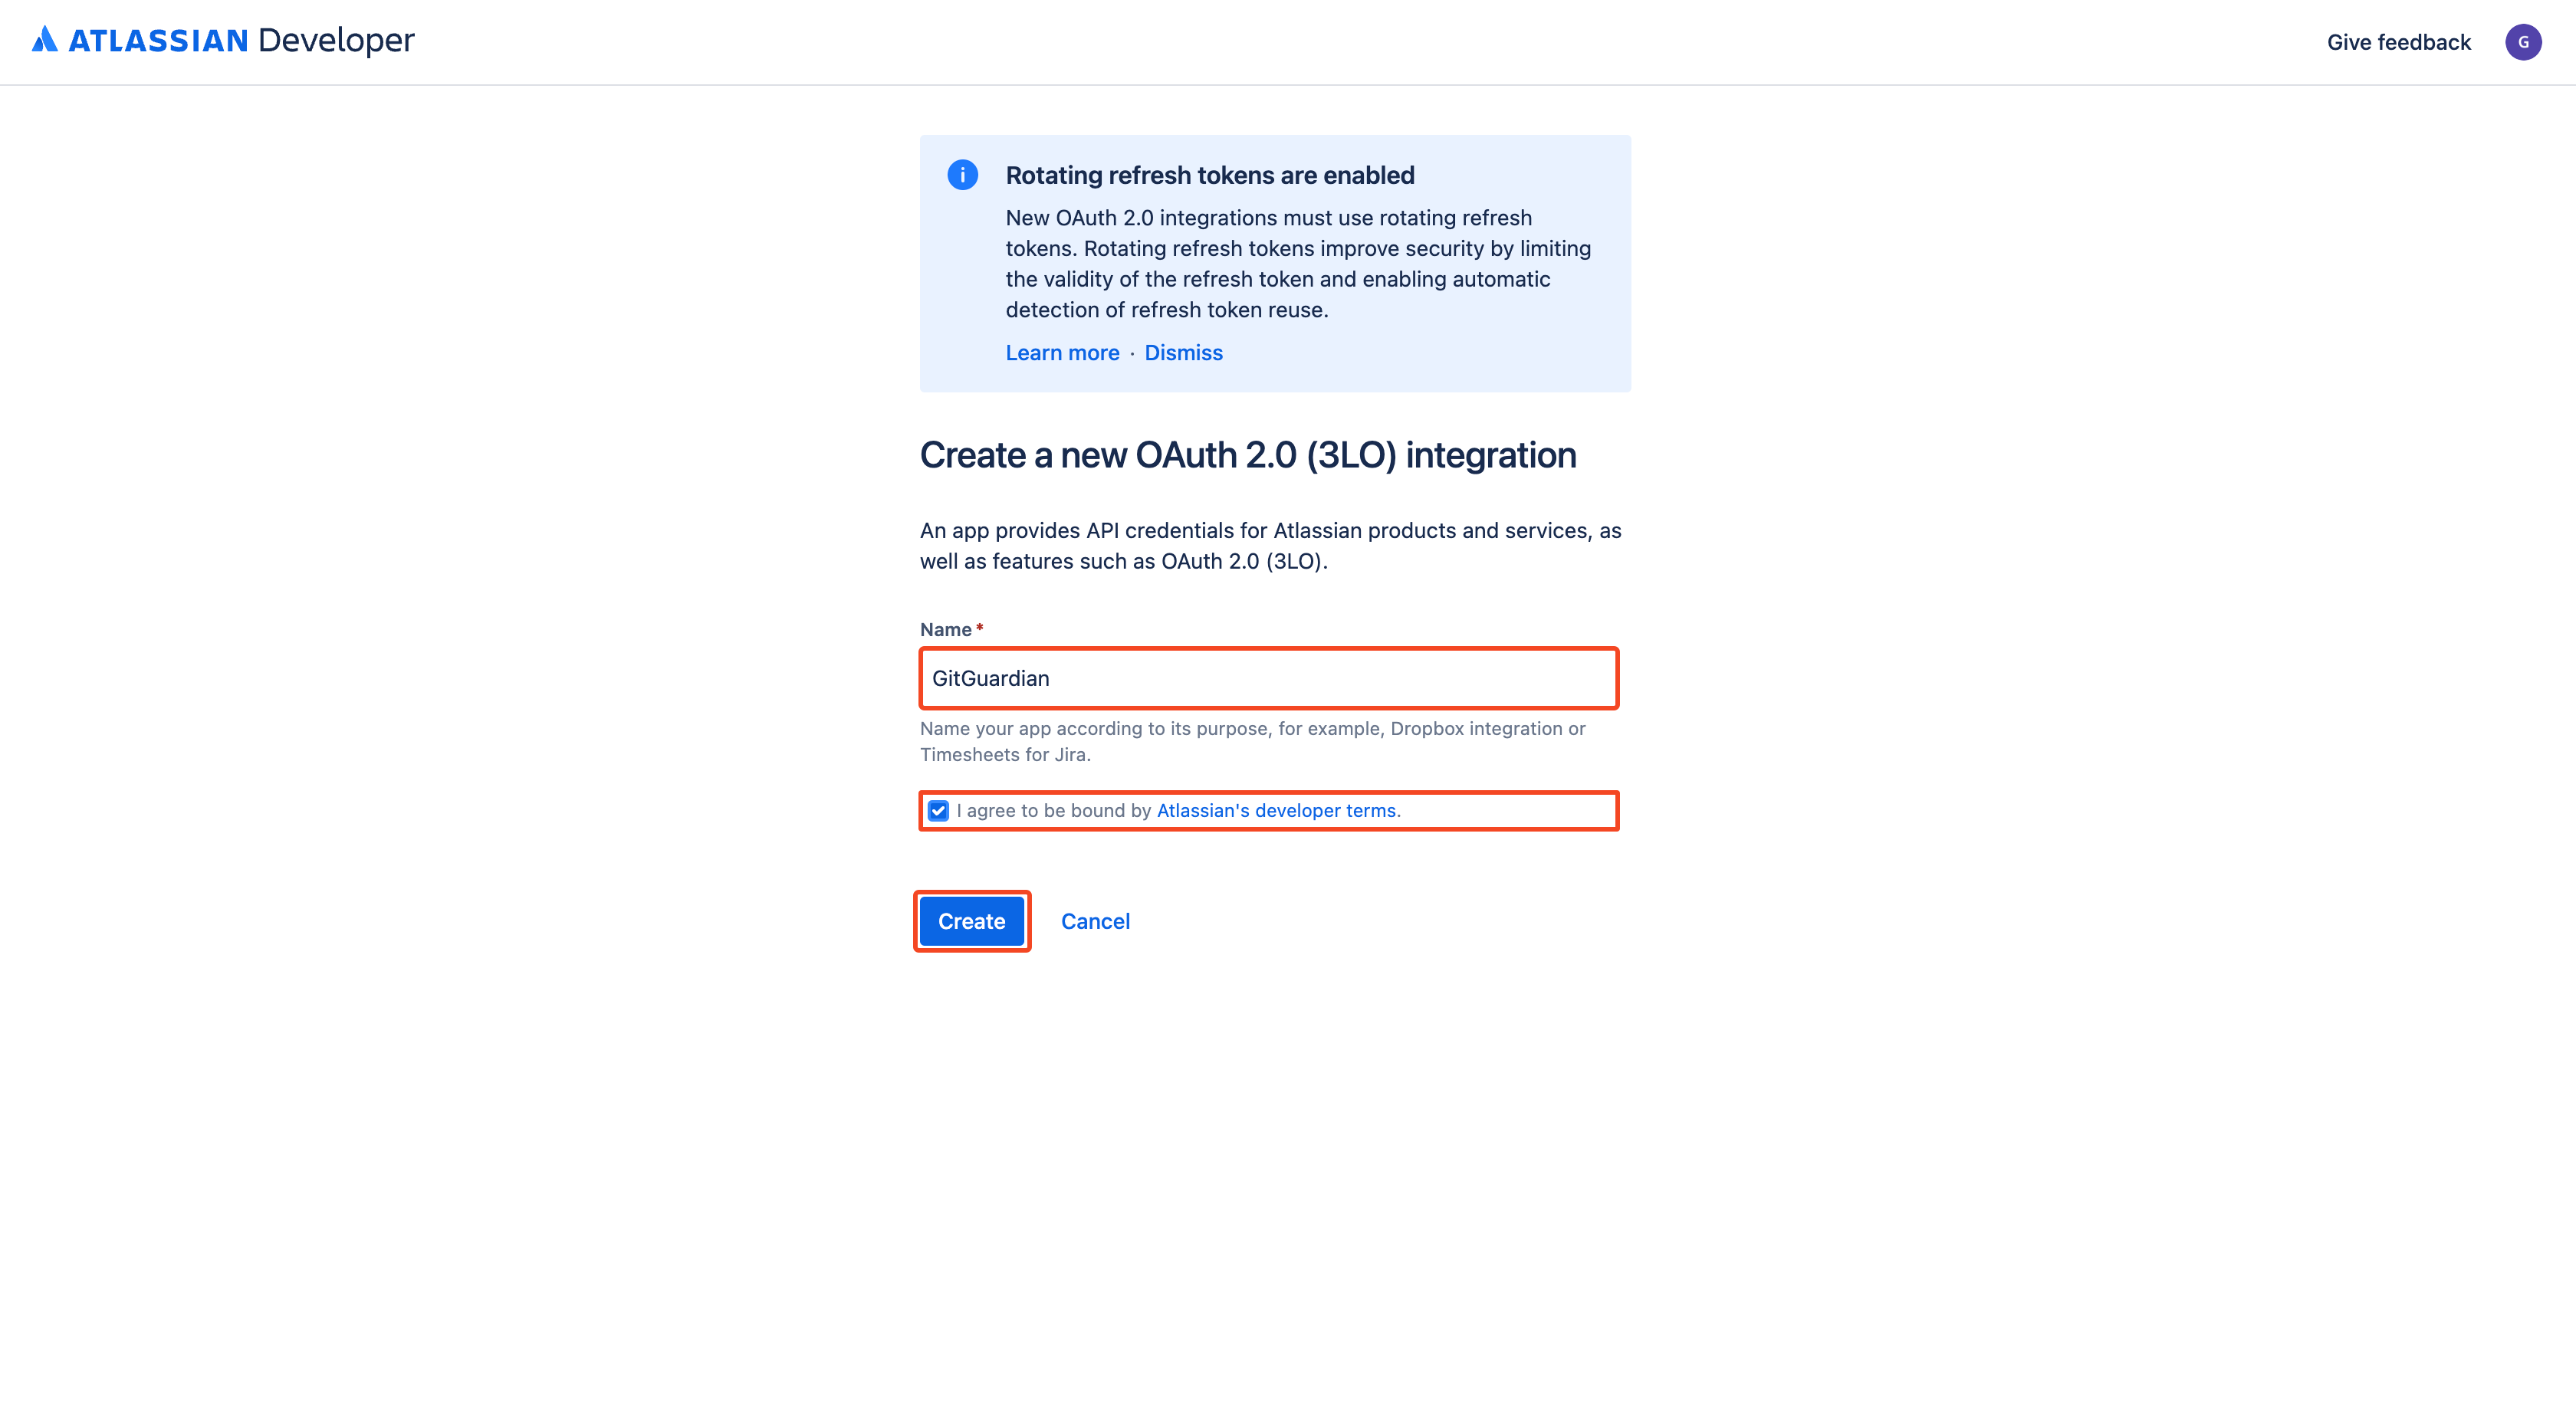
- Click Create Jira Cloud app (Alternatively, if you're not a GitGuardian Manager, you can access the Atlassian developer console directly)
- Type the name of your new Jira Cloud app:
GitGuardian - Agree to Atlassian's developer terms by checking: I agree to be bound by Atlassian's developer terms.
- Click Create
- Go to the Permissions page
- Click Add next to the Jira API line
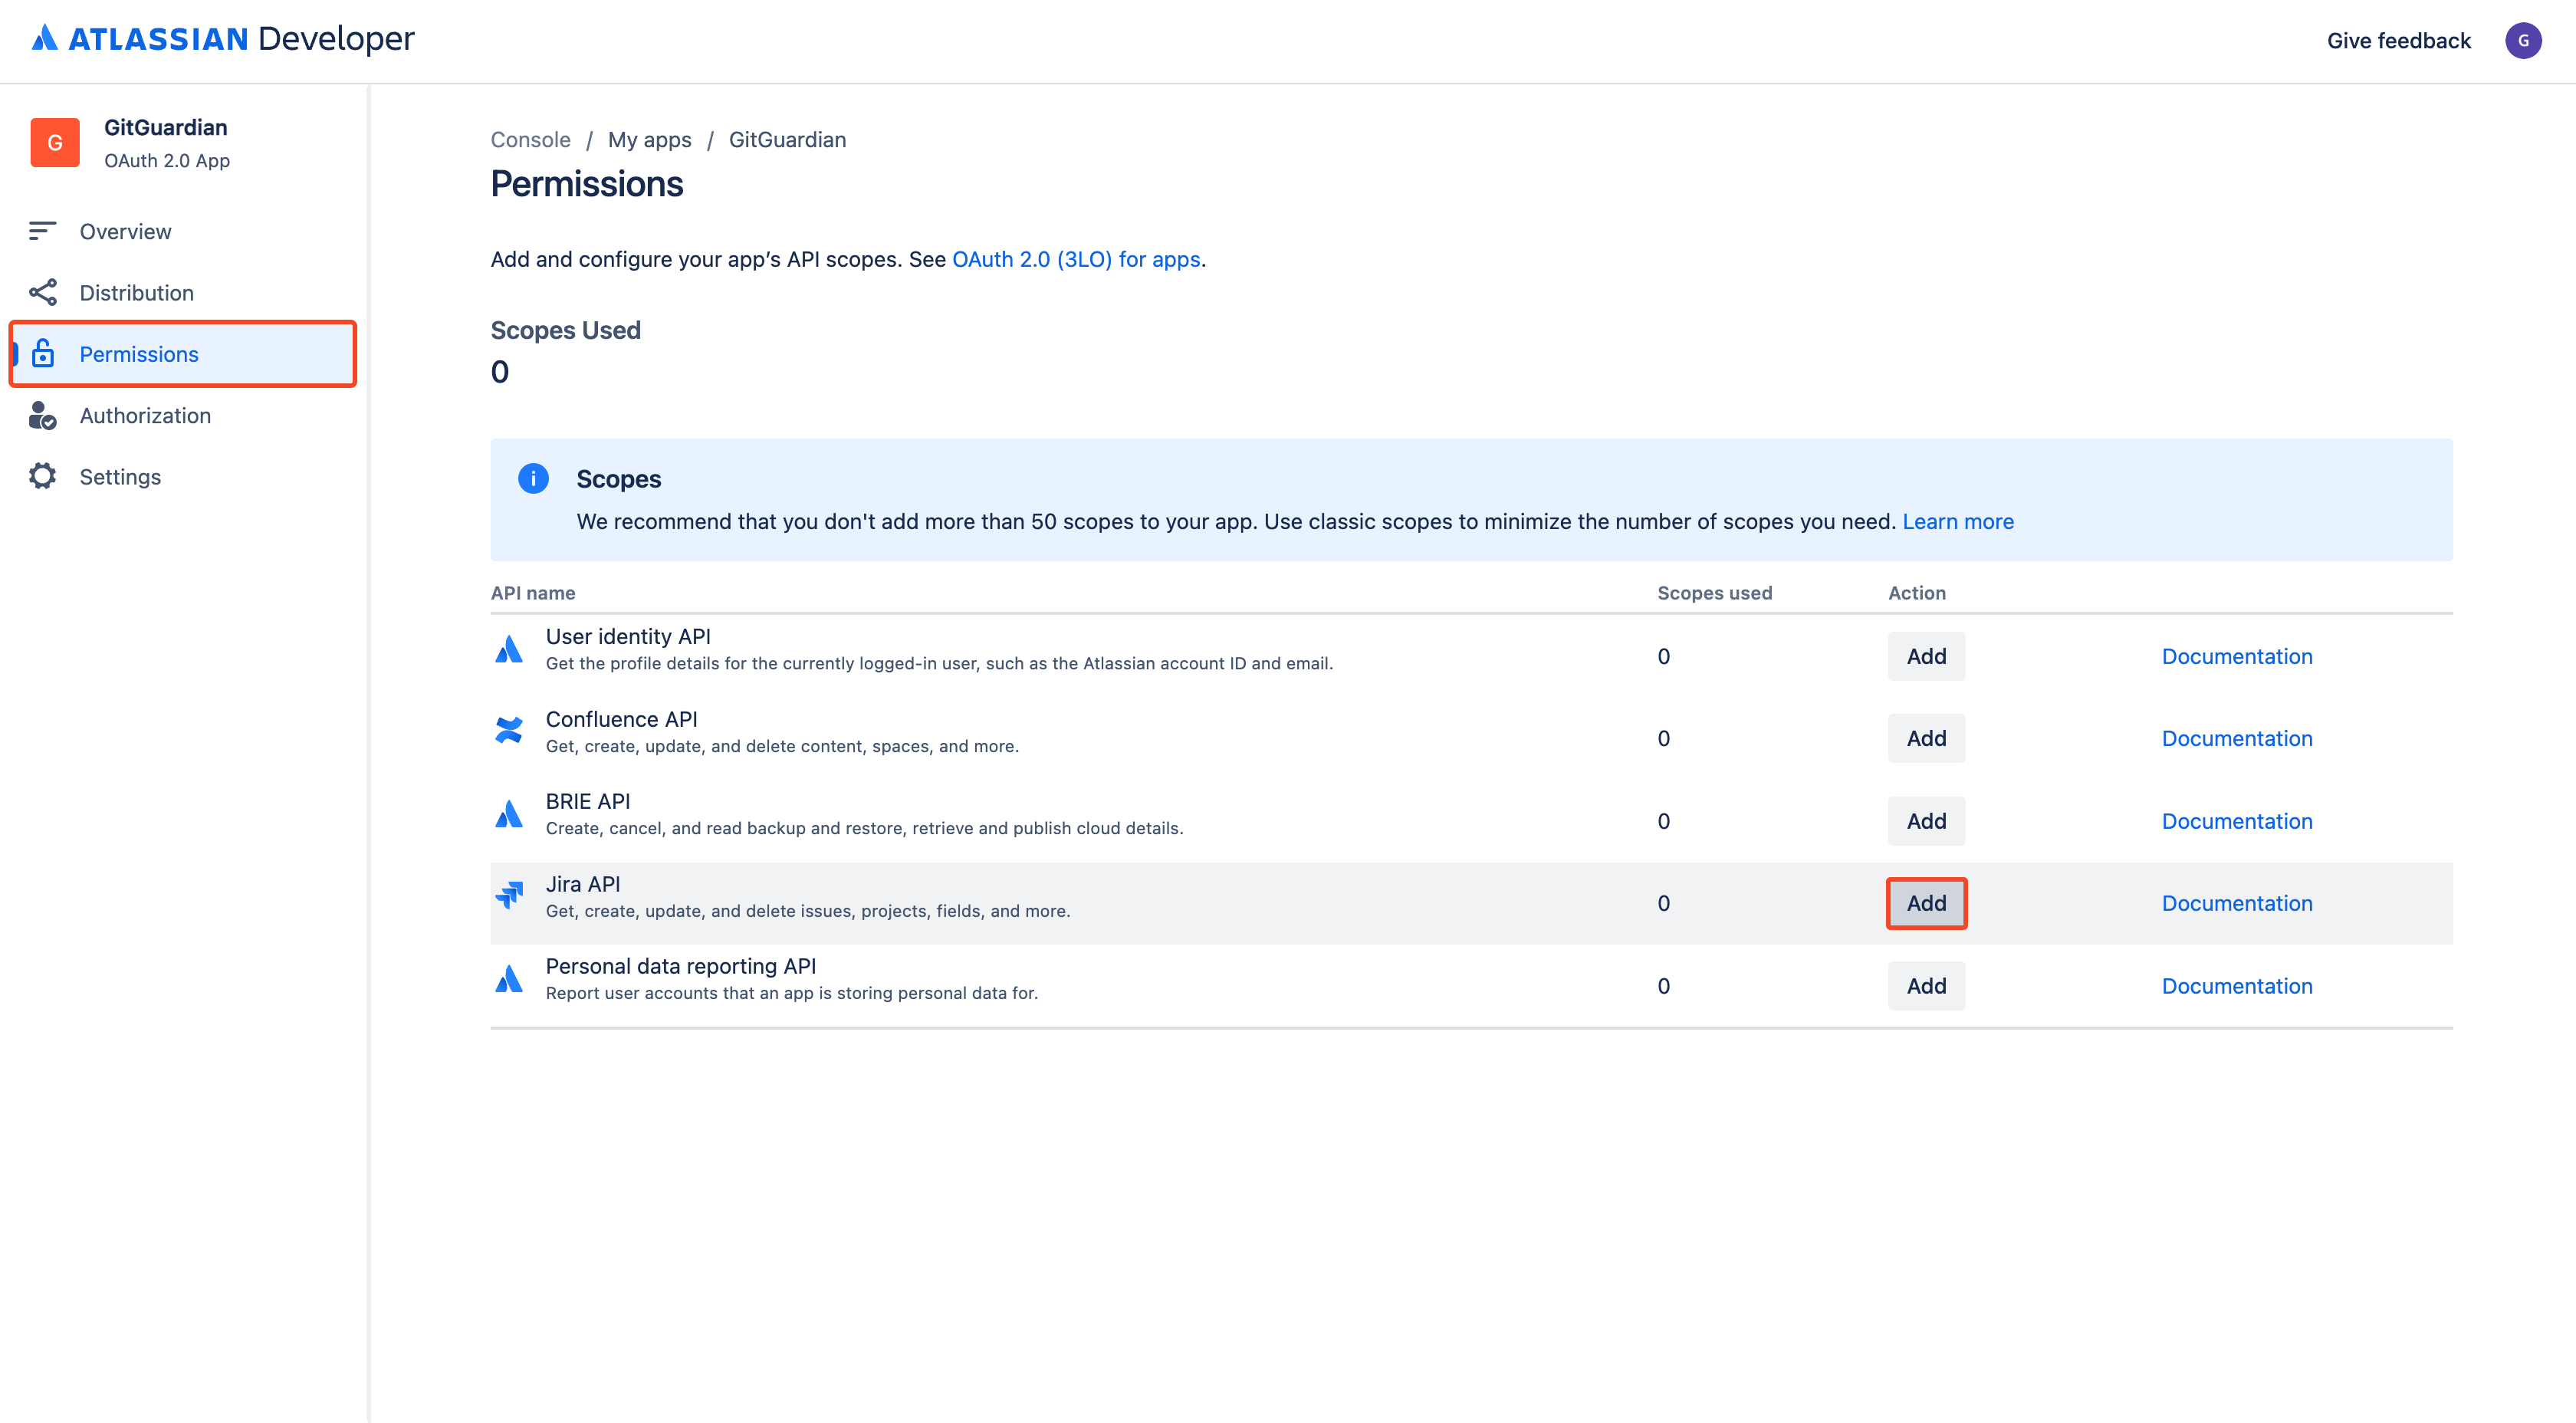
- Click Configure next to the Jira API line
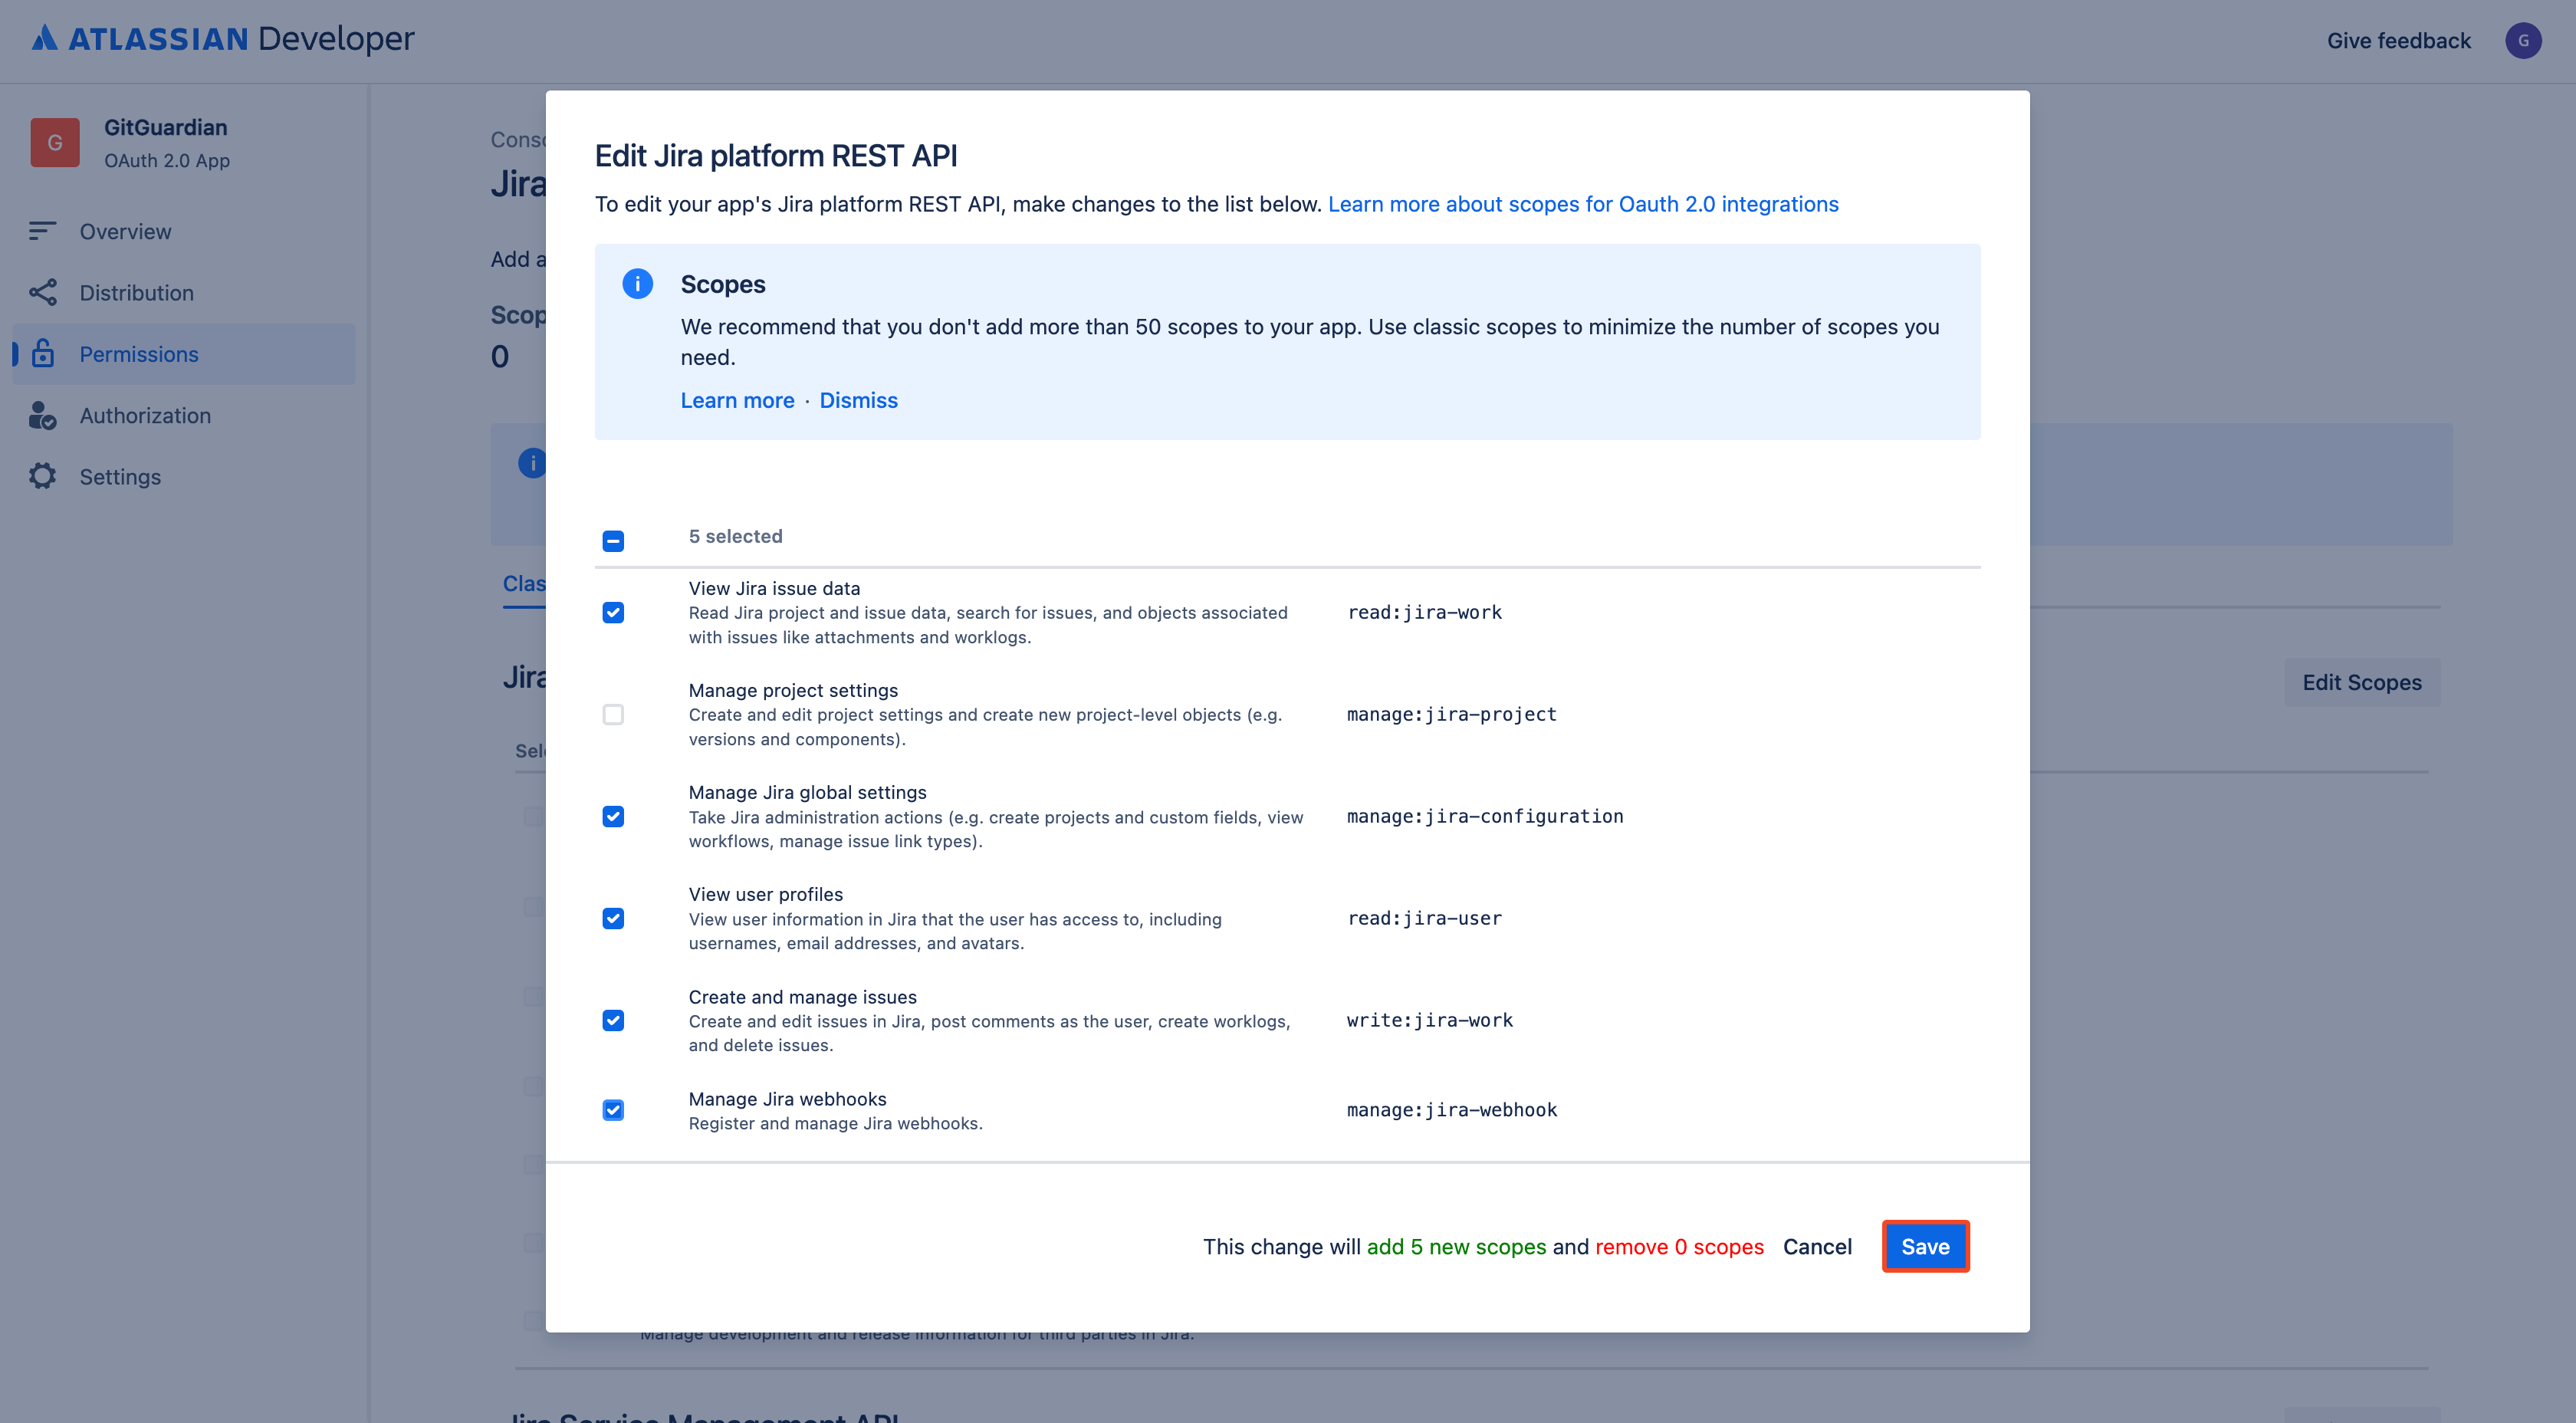
- In the Classic scopes tab, click Edit Scopes in the Jira platform REST API section
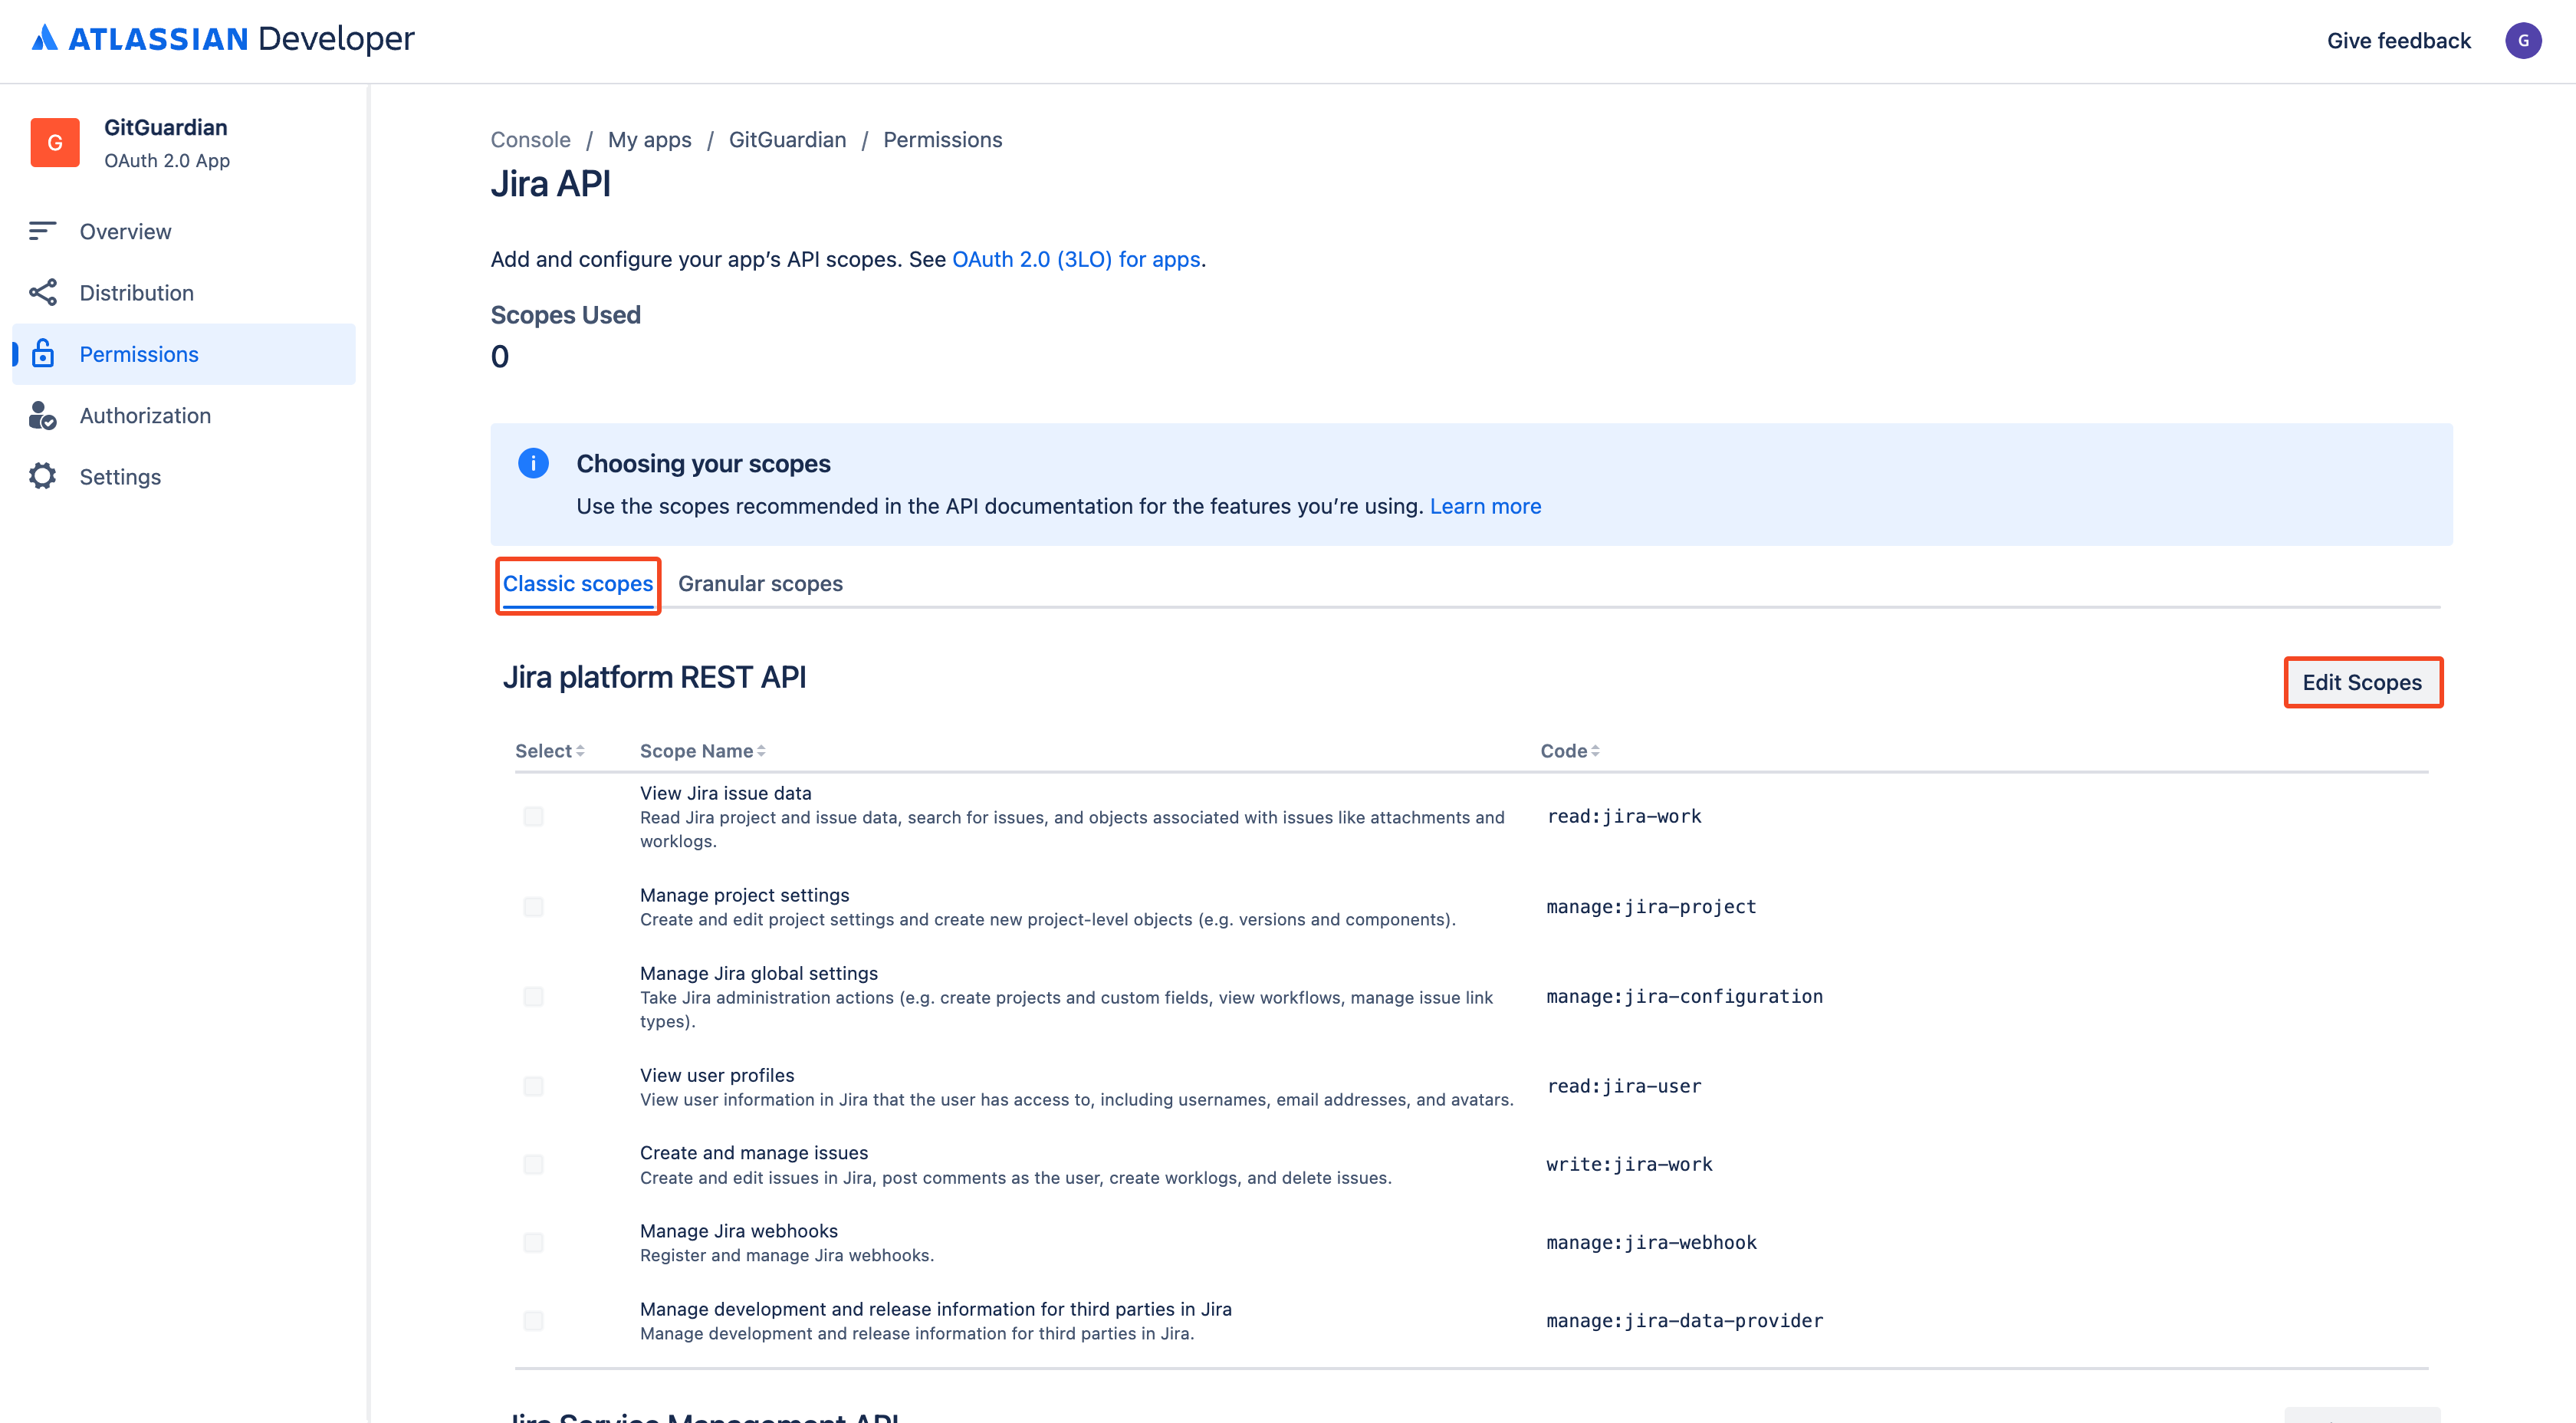
- Select the following classic scopes:
read:jira-workmanage:jira-configurationread:jira-userwrite:jira-workmanage:jira-webhook(only ≤ 2026.5.0)
- Click Save
- In the Granular scopes tab, click Edit Scopes
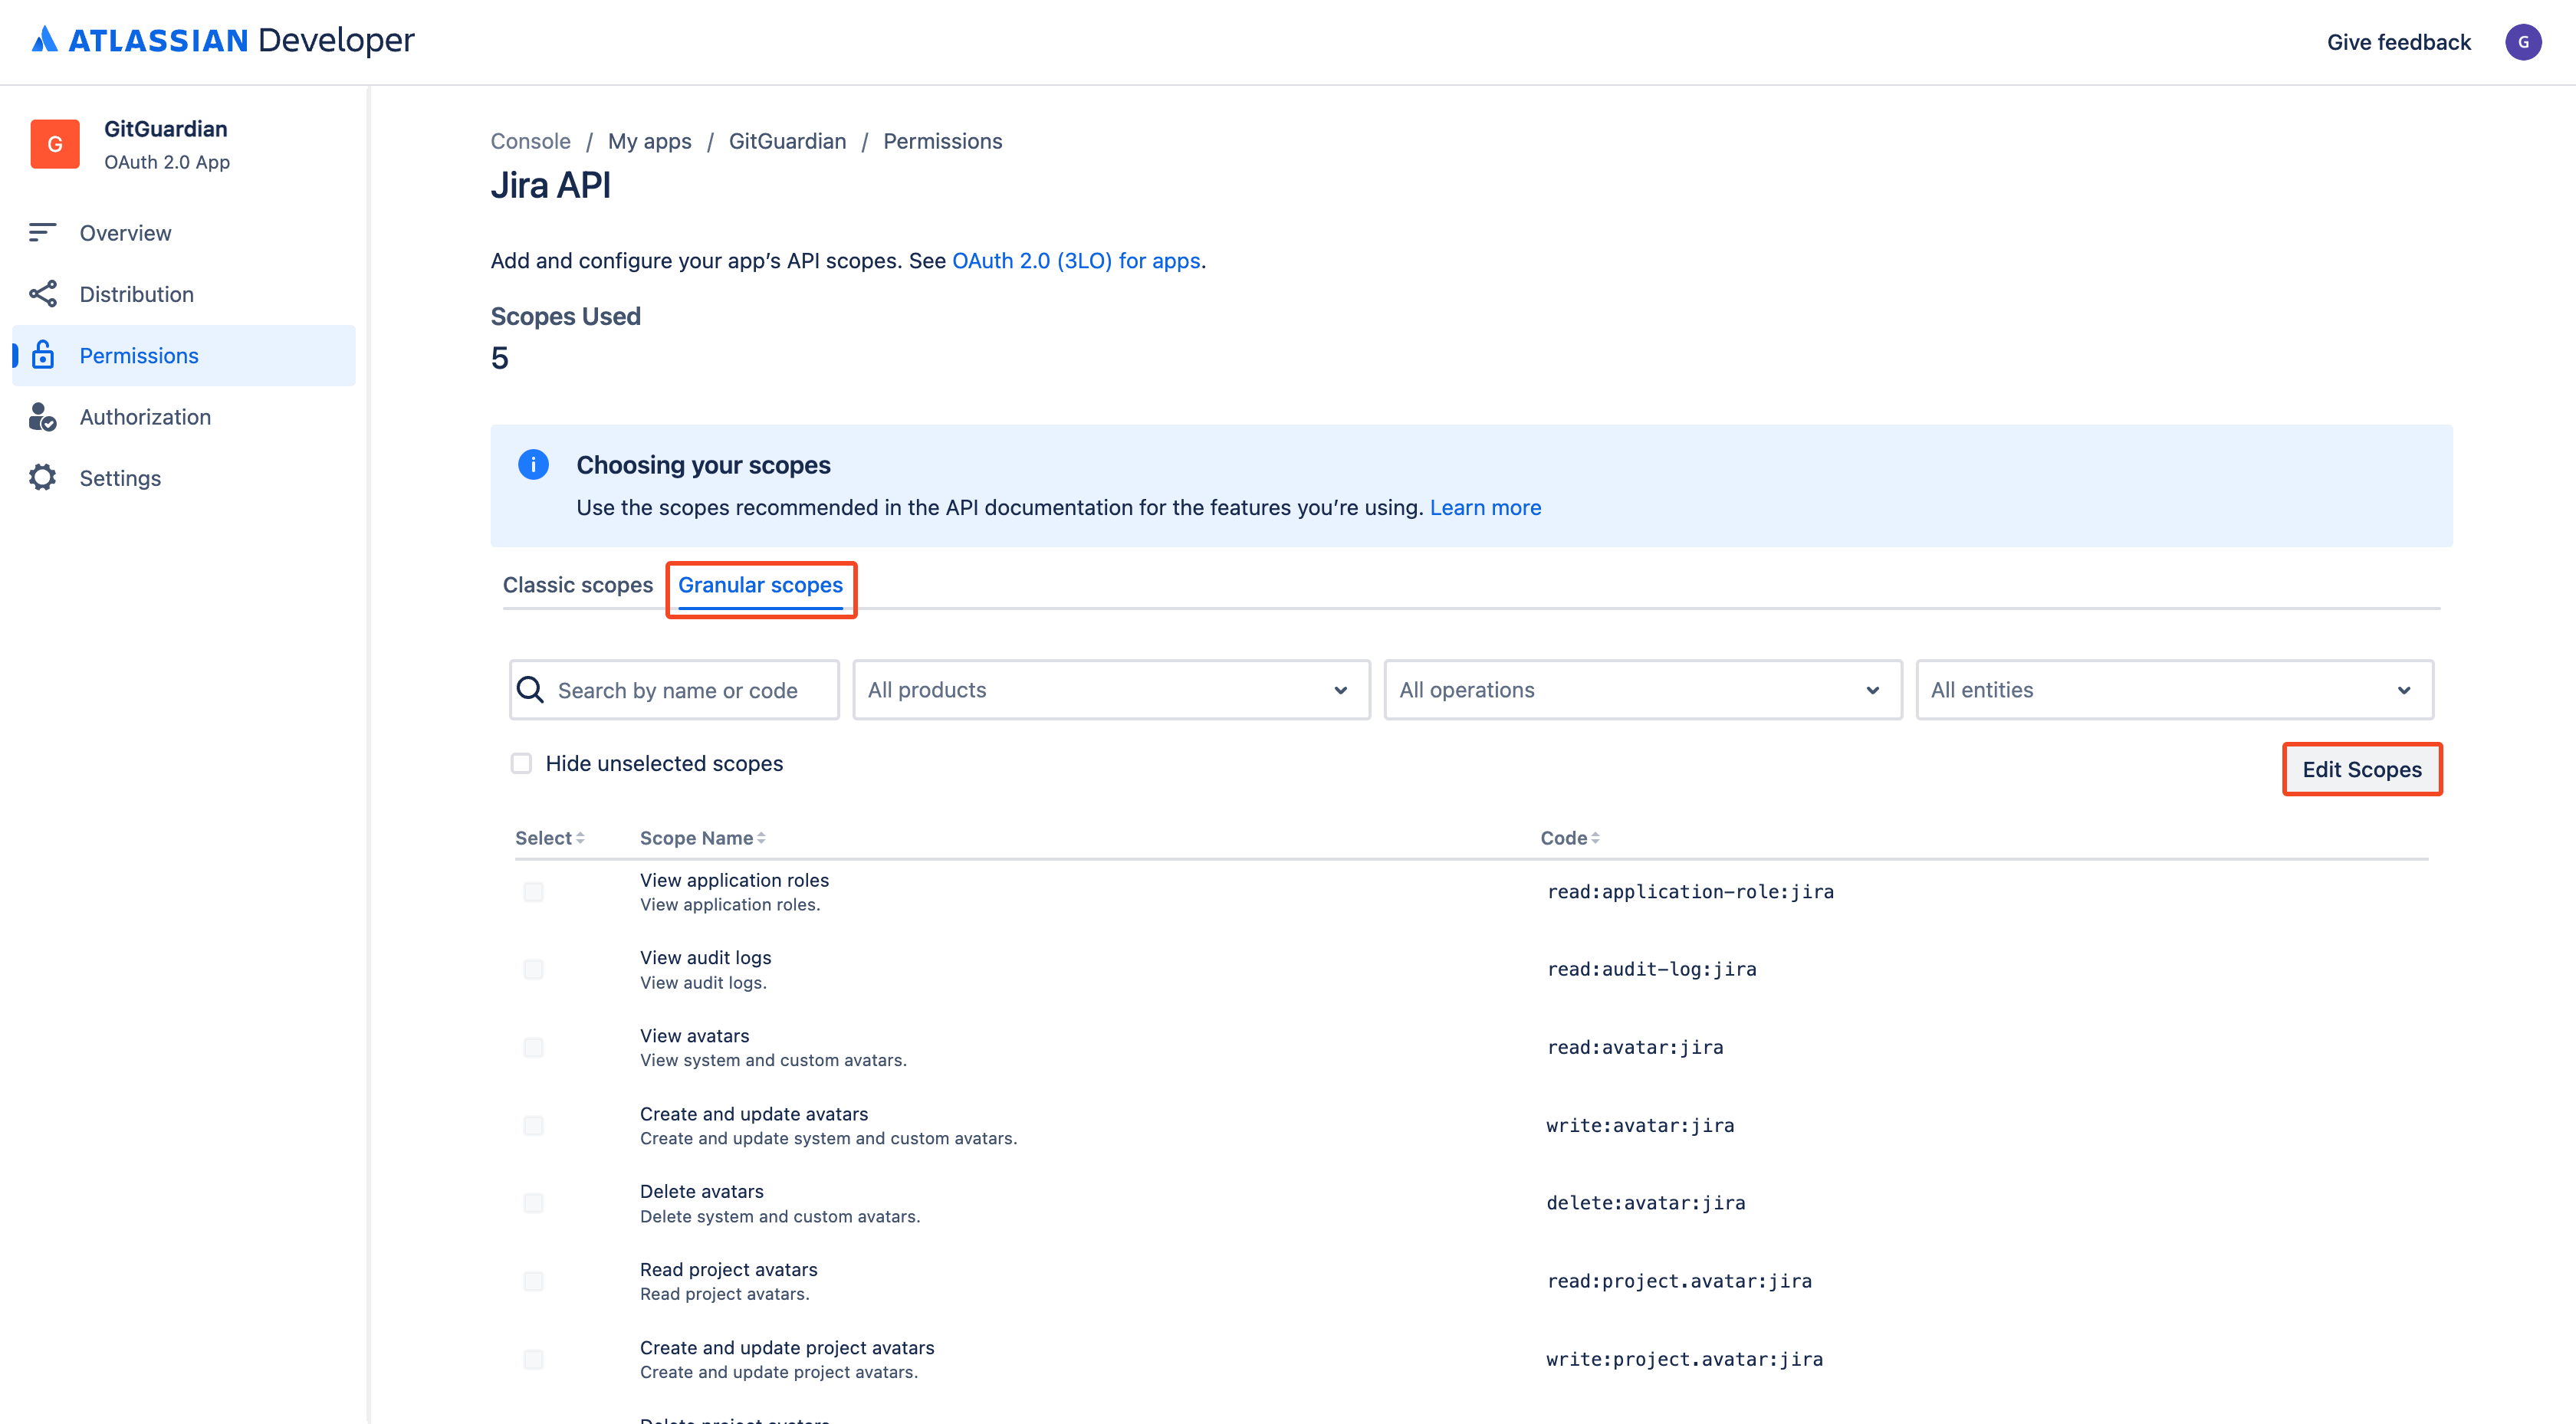
- Select the following granular scopes:
read:application-role:jiraread:avatar:jiraread:project.avatar:jiraread:group:jiraread:issue:jiraread:issue-meta:jiraread:attachment:jiraread:comment:jiraread:comment.property:jiraread:field:jiraread:field.default-value:jiraread:field.option:jiraread:field-configuration:jiraread:issue.property:jiraread:issue-details:jiraread:issue-type:jiraread:issue-field-values:jiraread:issue-security-level:jiraread:issue-type-hierarchy:jiraread:issue.changelog:jiraread:issue.vote:jiraread:issue-event:jiraread:user:jiraread:project:jiraread:project-category:jiraread:project.component:jiraread:project.property:jiraread:project-role:jiraread:project-version:jiraread:project.feature:jiraread:webhook:jira(only ≤ 2026.5.0)write:webhook:jira(only ≤ 2026.5.0)delete:webhook:jira(only ≤ 2026.5.0)read:status:jiraread:jql:jiraread:project-type:jiraread:project.email:jiraread:epic:jira-software
- Click Save

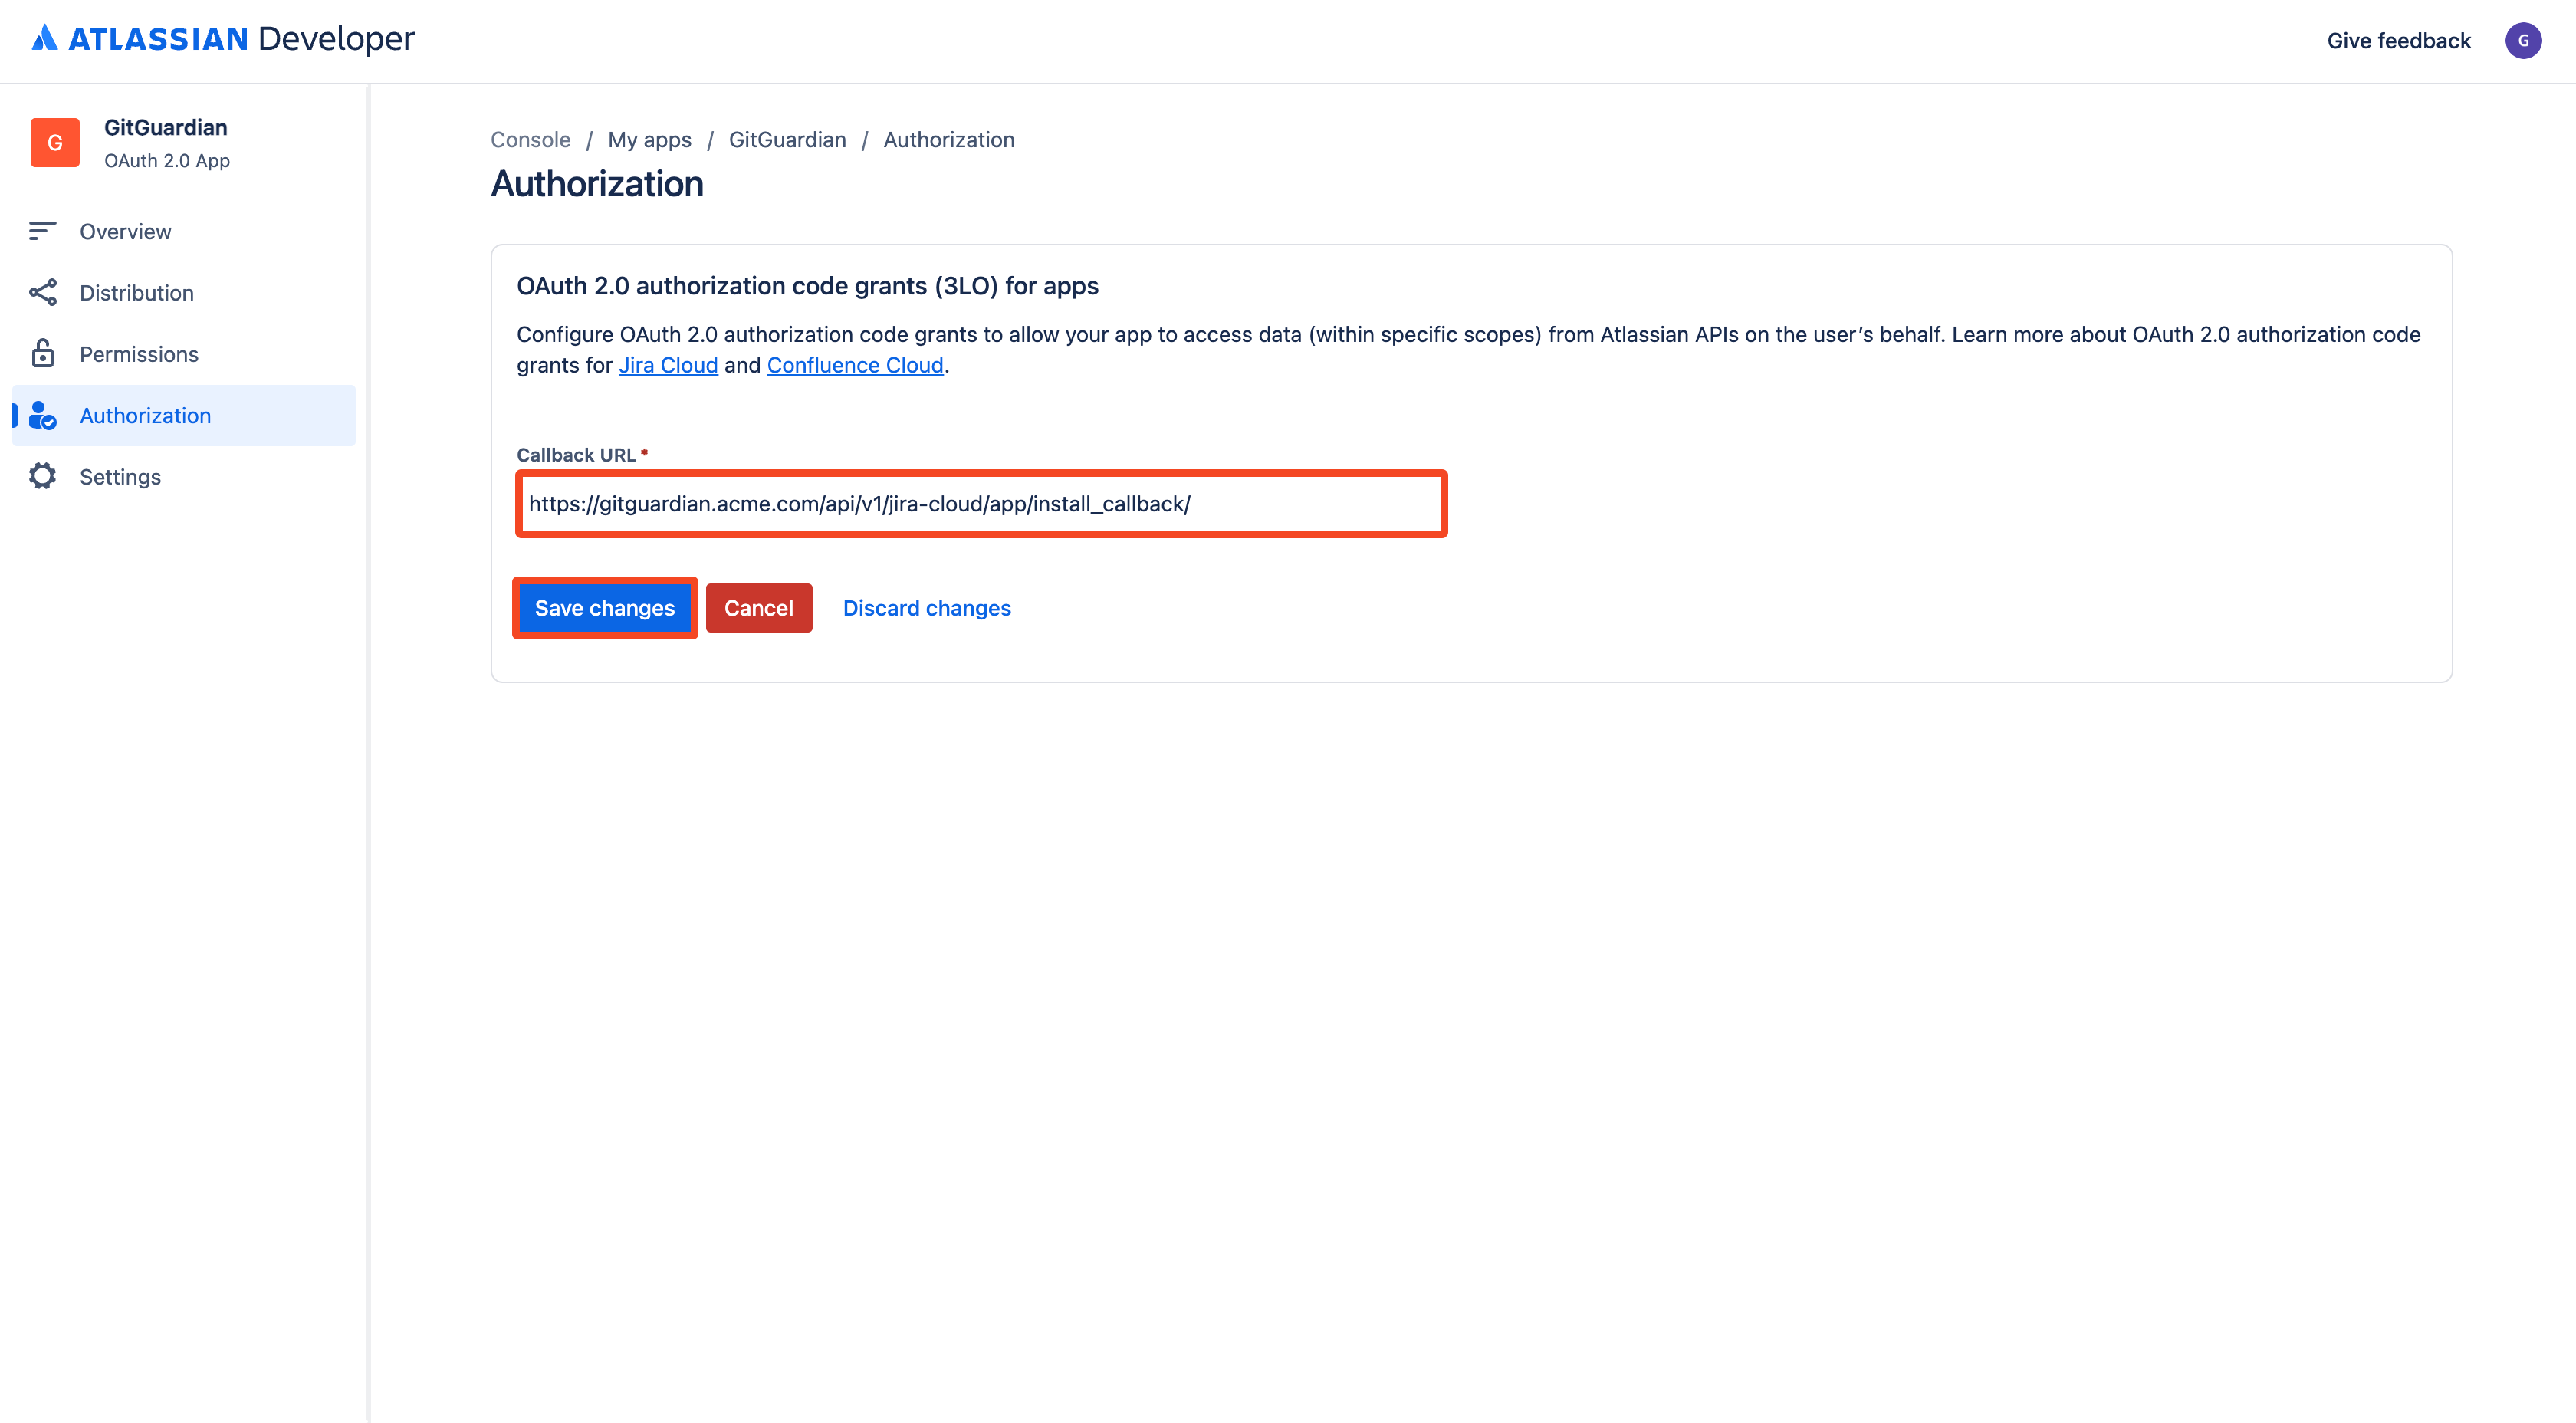
- Go to the Authorization page
- Click Add next to the OAuth 2.0 (3LO) line
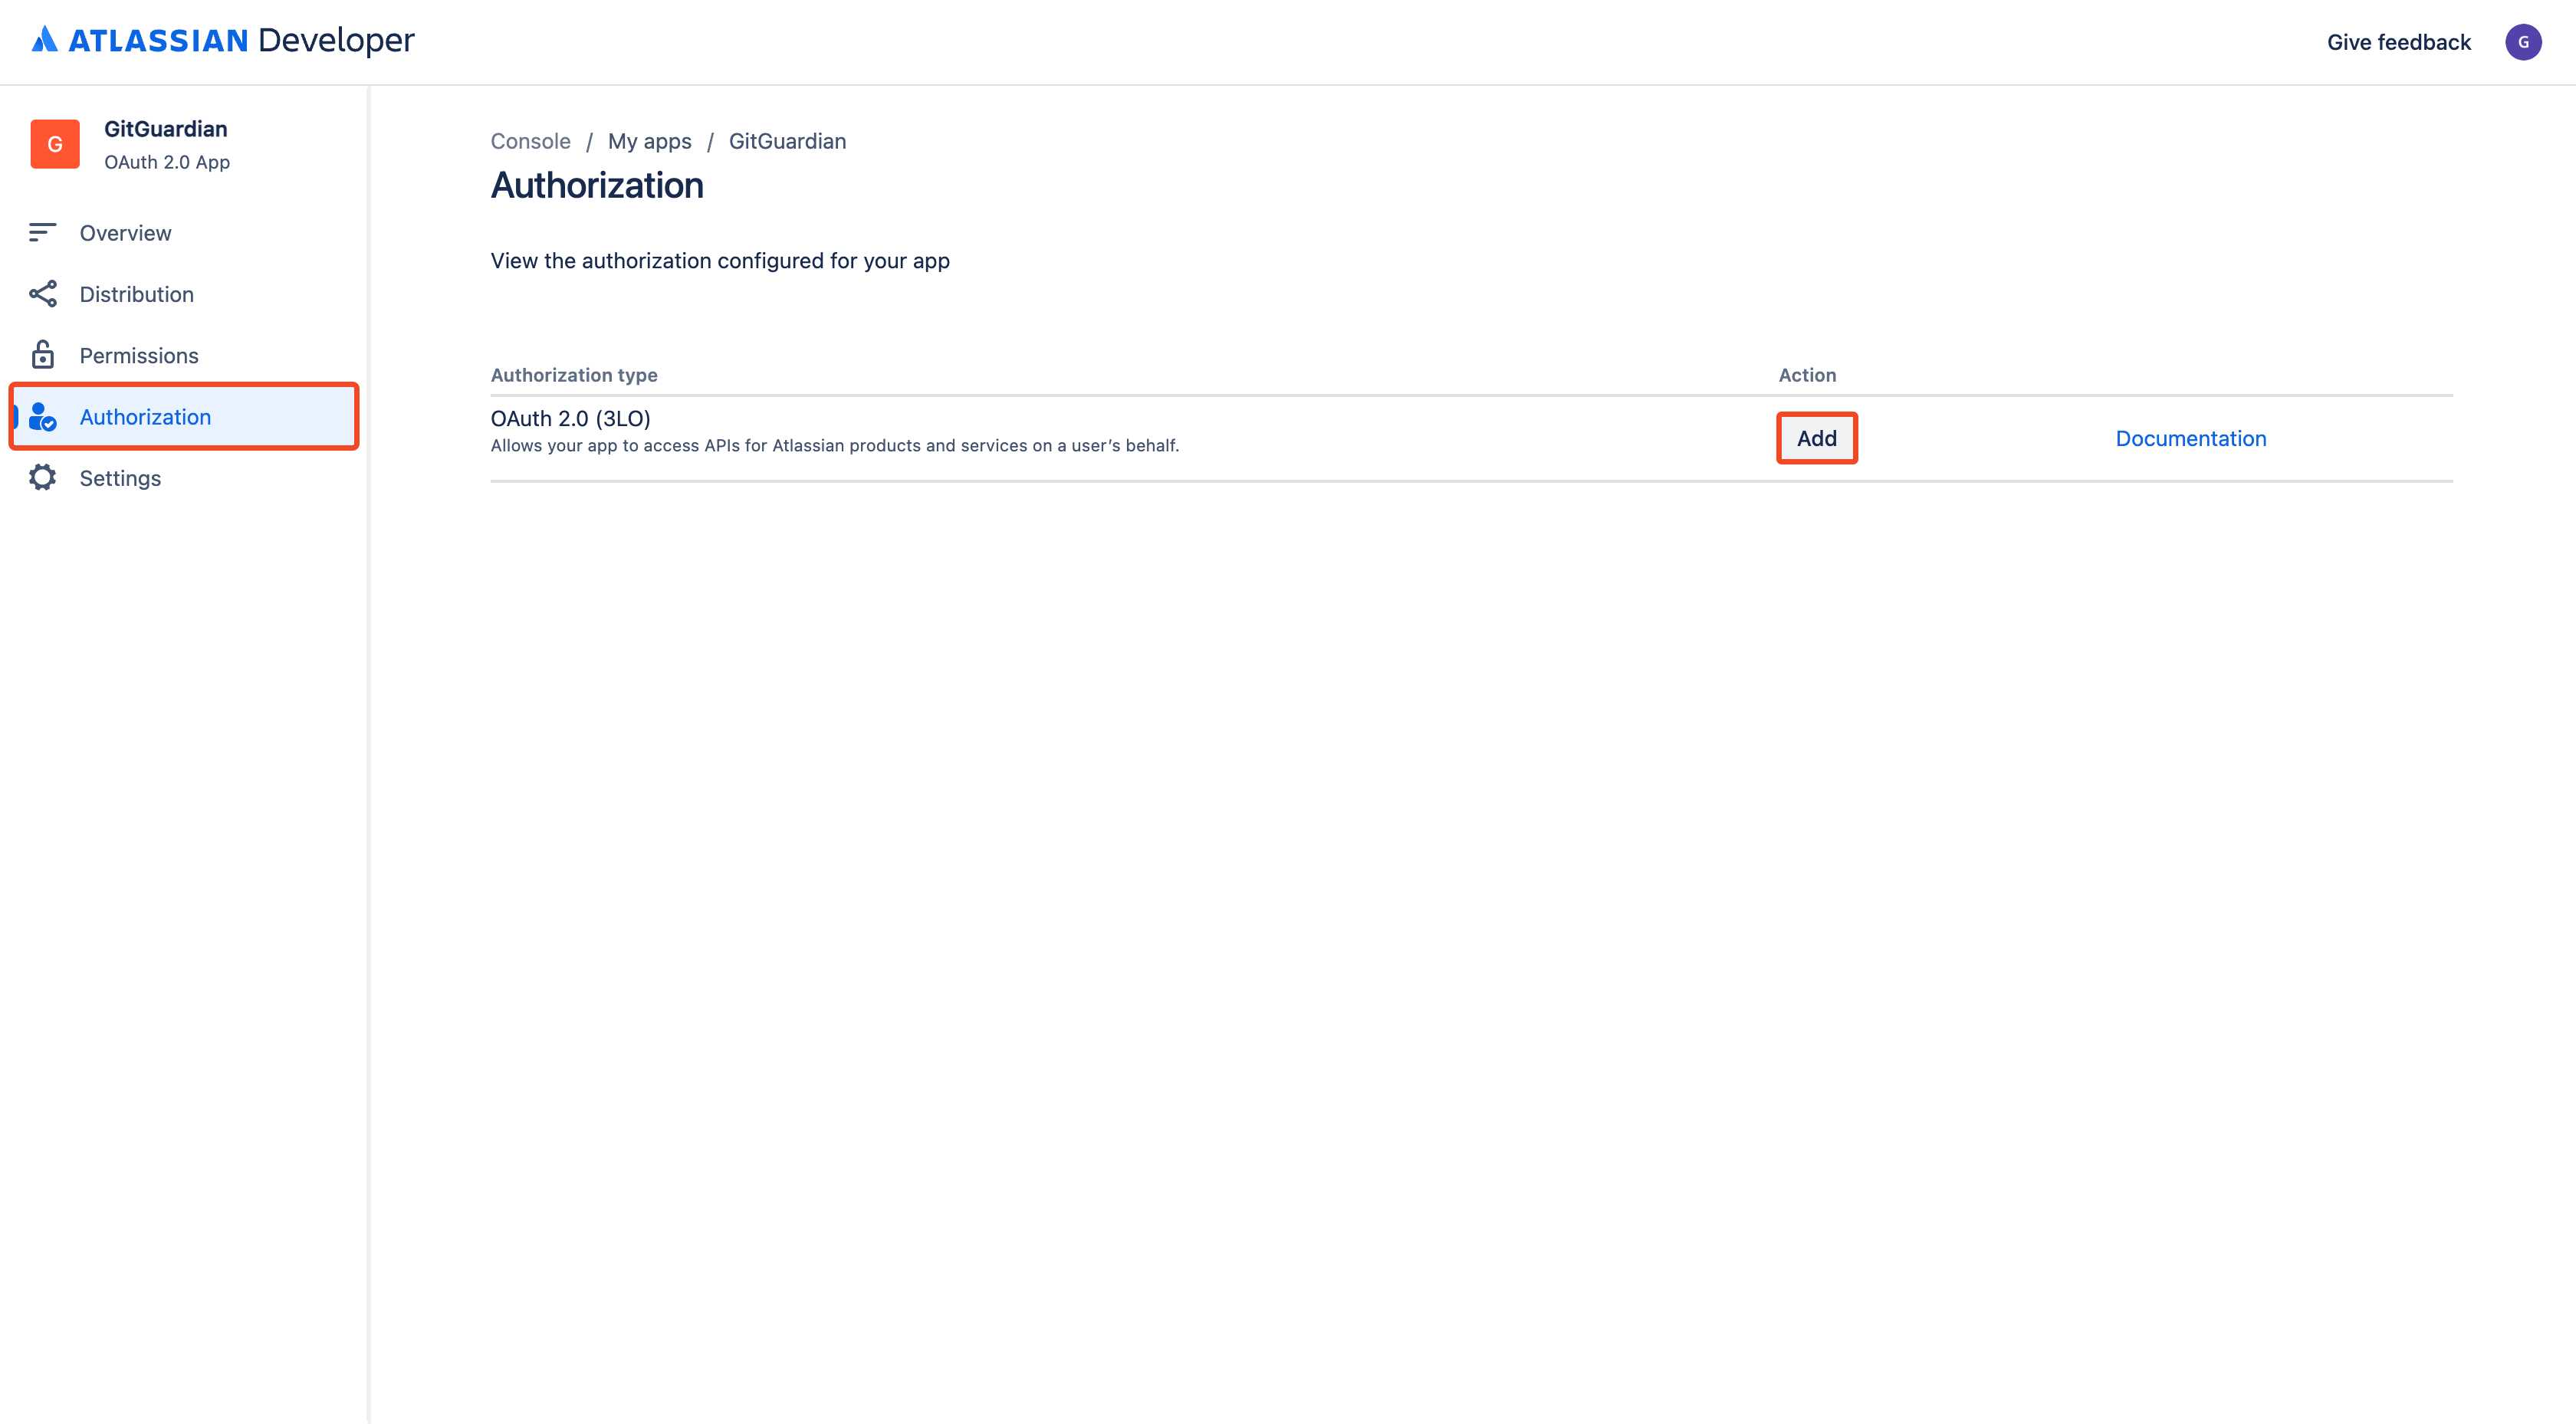
- Enter the callback URL based on your GitGuardian self-hosted instance URL:
https://<gitguardian.acme.com>/api/v1/jira-cloud/app/install_callback/ - Click Save changes
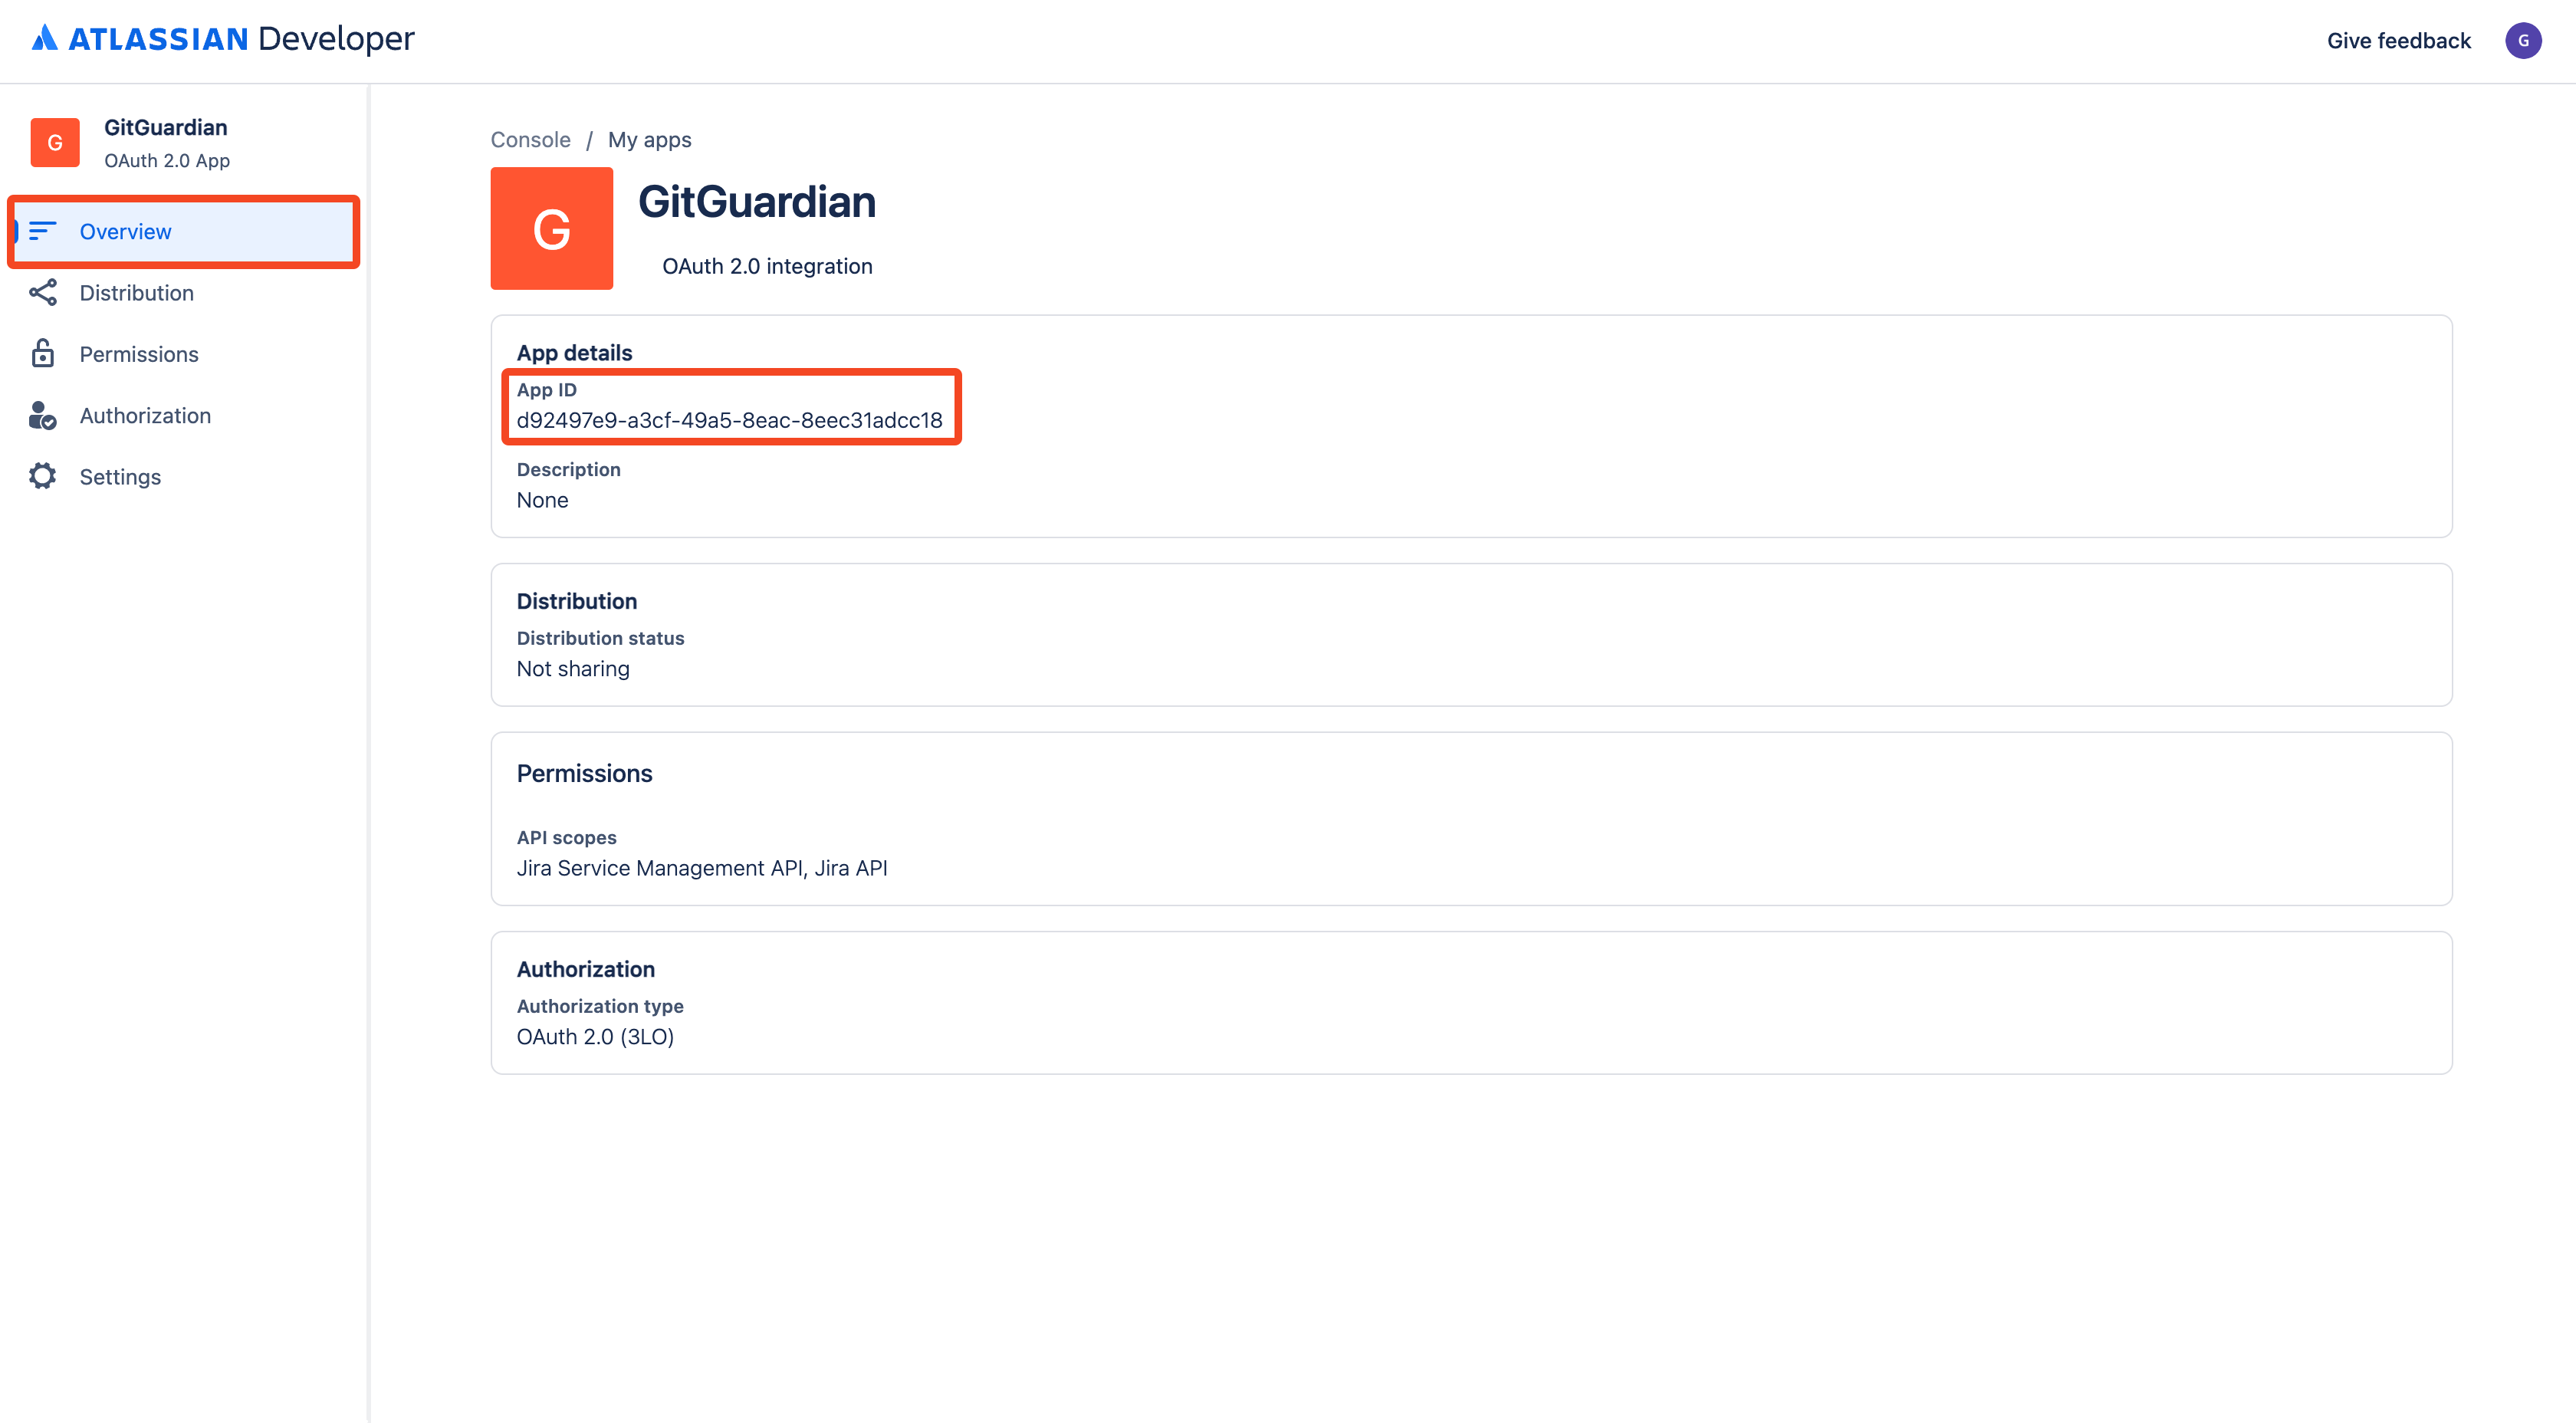
- Go to the Overview page
- Get your App details (
App ID) (alternatively, you can find and copy it more easily from the URL)
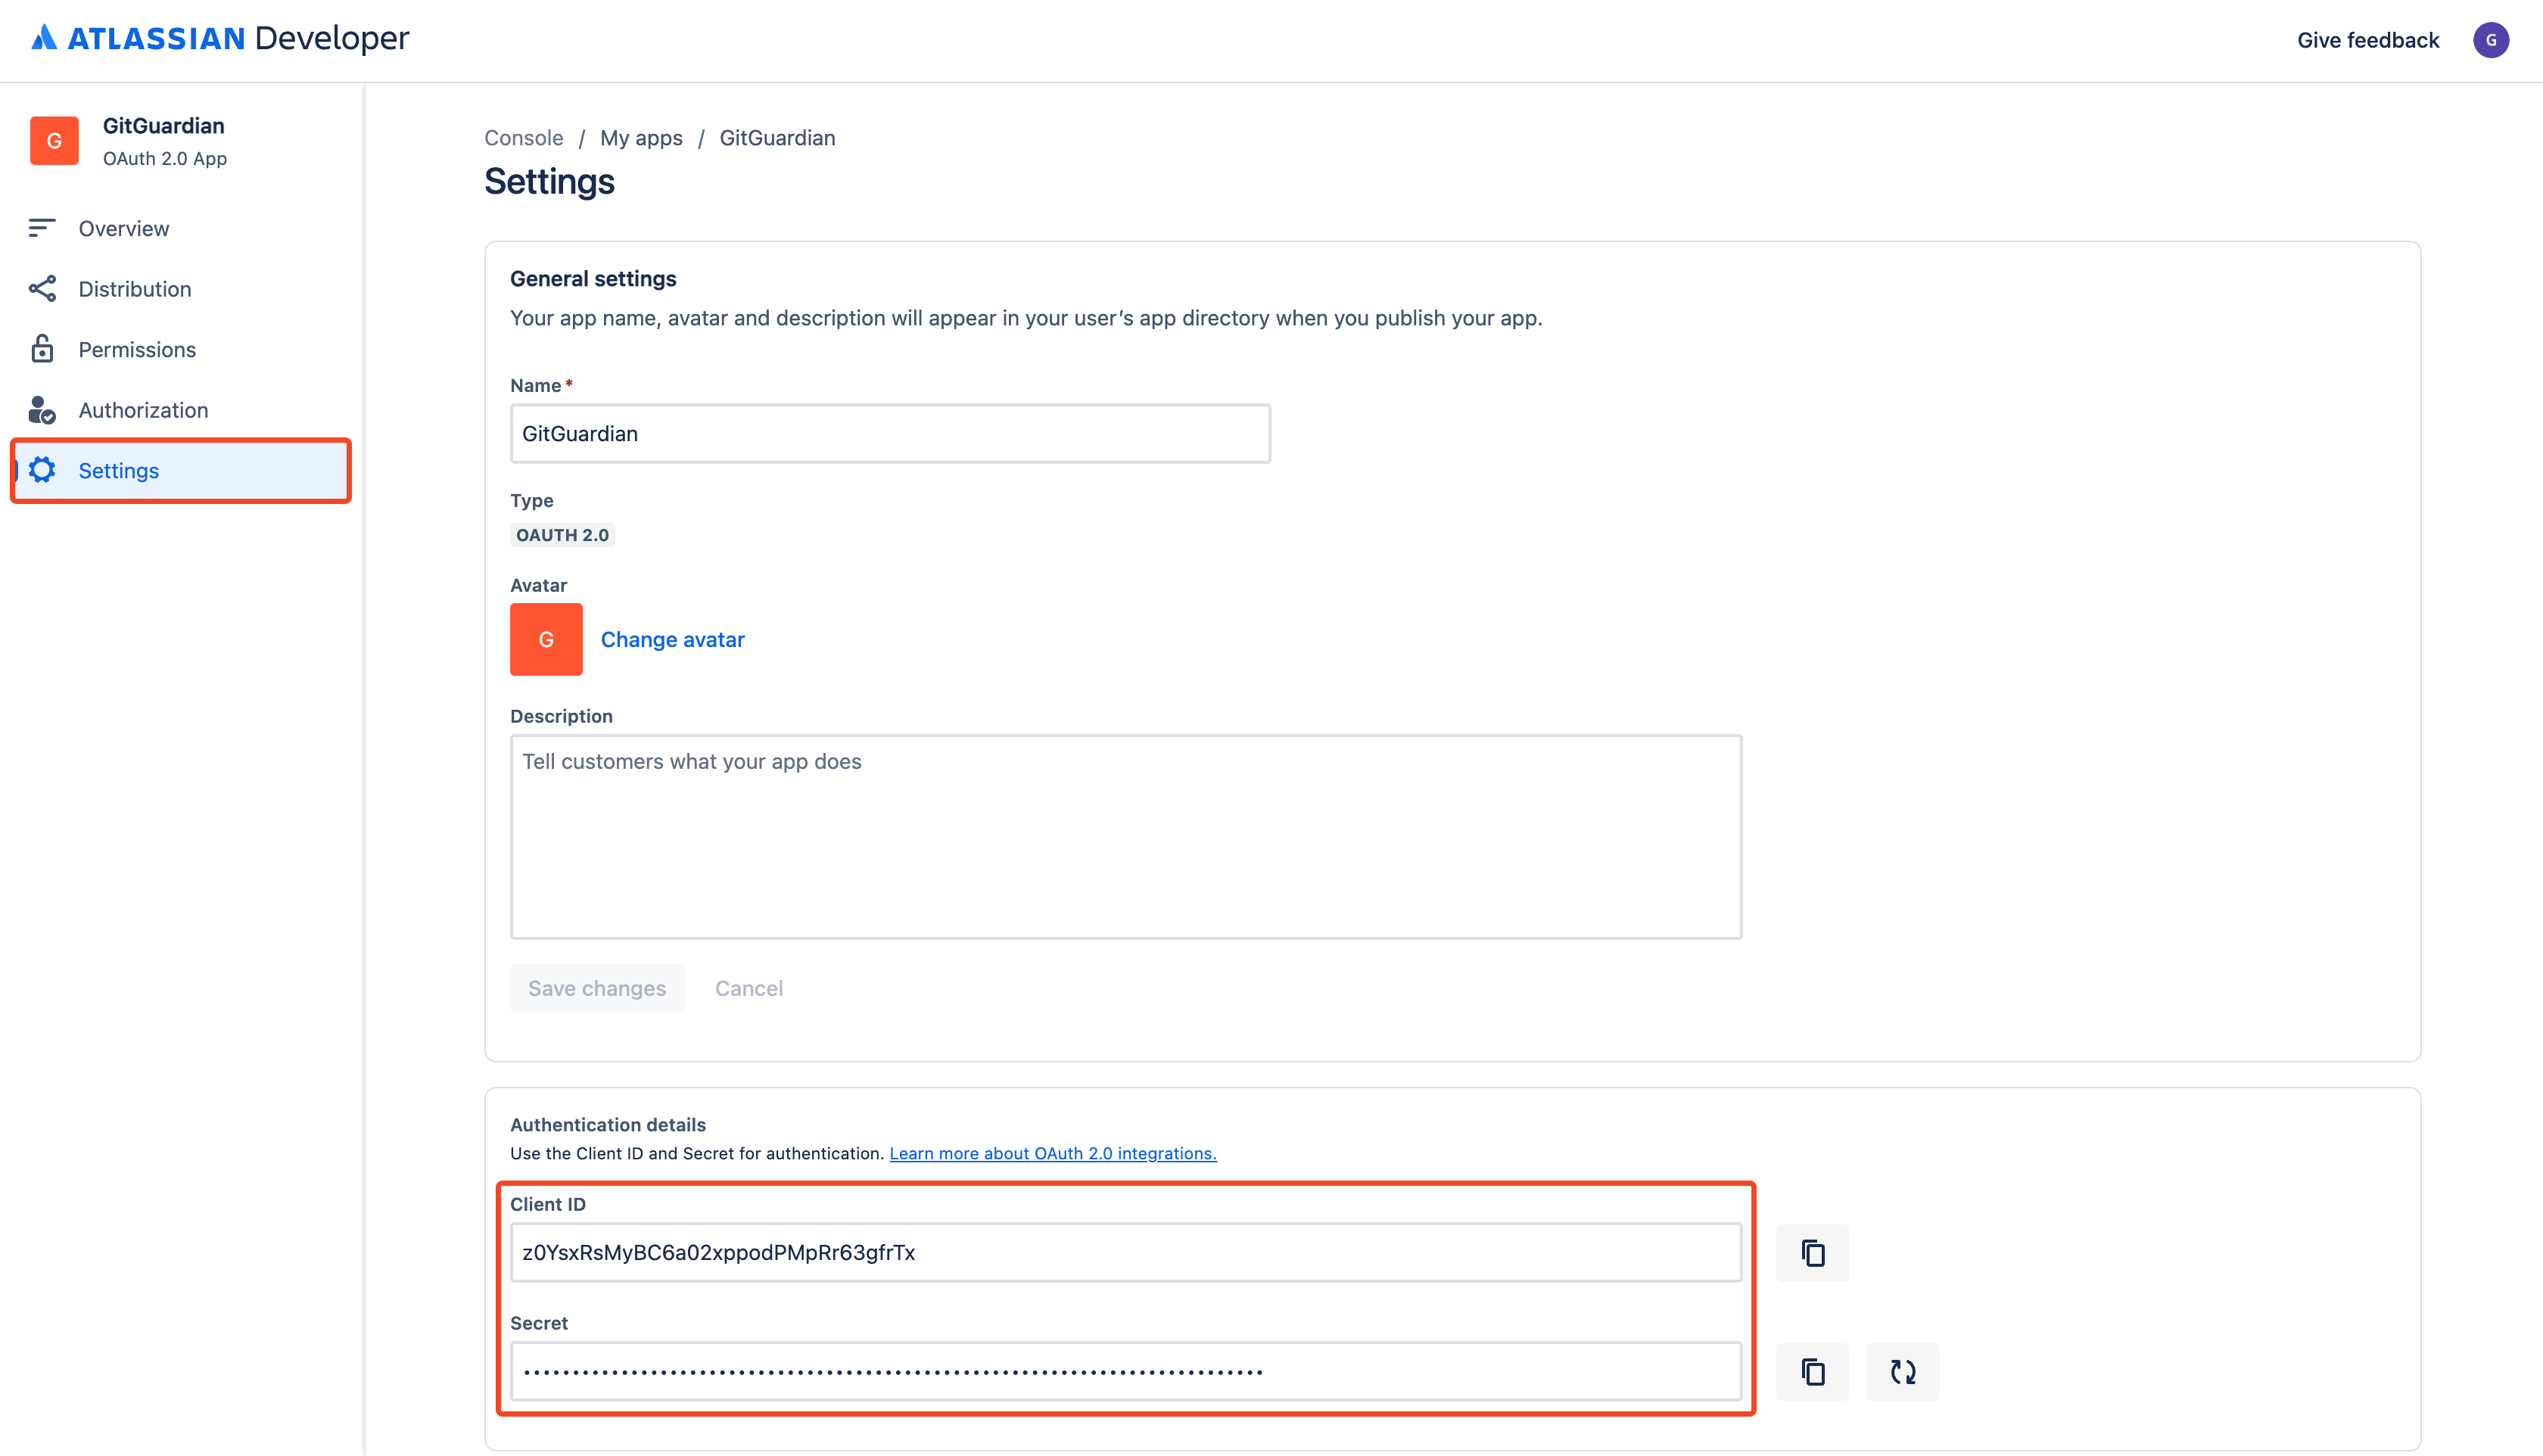
- Go to the Settings page
- Get your Authentication details (
Client ID,Secret)
That's it! Your Jira Cloud app has been created and you can now declare your Jira Cloud app in the GitGuardian Platform.
Alternatively, if you are not a GitGuardian Manager, you can now return the Jira Cloud app credentials to your requester in the secure way of your choice (App ID, Client ID, Secret).
All these permissions are defined for the creation of your Jira Cloud app. This Jira Cloud app can be used for any type of Jira Cloud integration (secret detection, issue tracking). When installing a Jira Cloud site for a specific integration, only a subset of your Jira Cloud app's permissions will be requested. GitGuardian requires only the minimum number of permissions per integration.
As a non Jira Cloud administrator
If you don't have the right to create a Jira Cloud app, please ask your Jira Cloud administrator to do it for you. You can easily forward a request with this procedure:
- Click the Send a request to a Jira administrator link to easily forward your request
- They should in turn provide you with the Jira Cloud app credentials to proceed with the rest of the configuration.
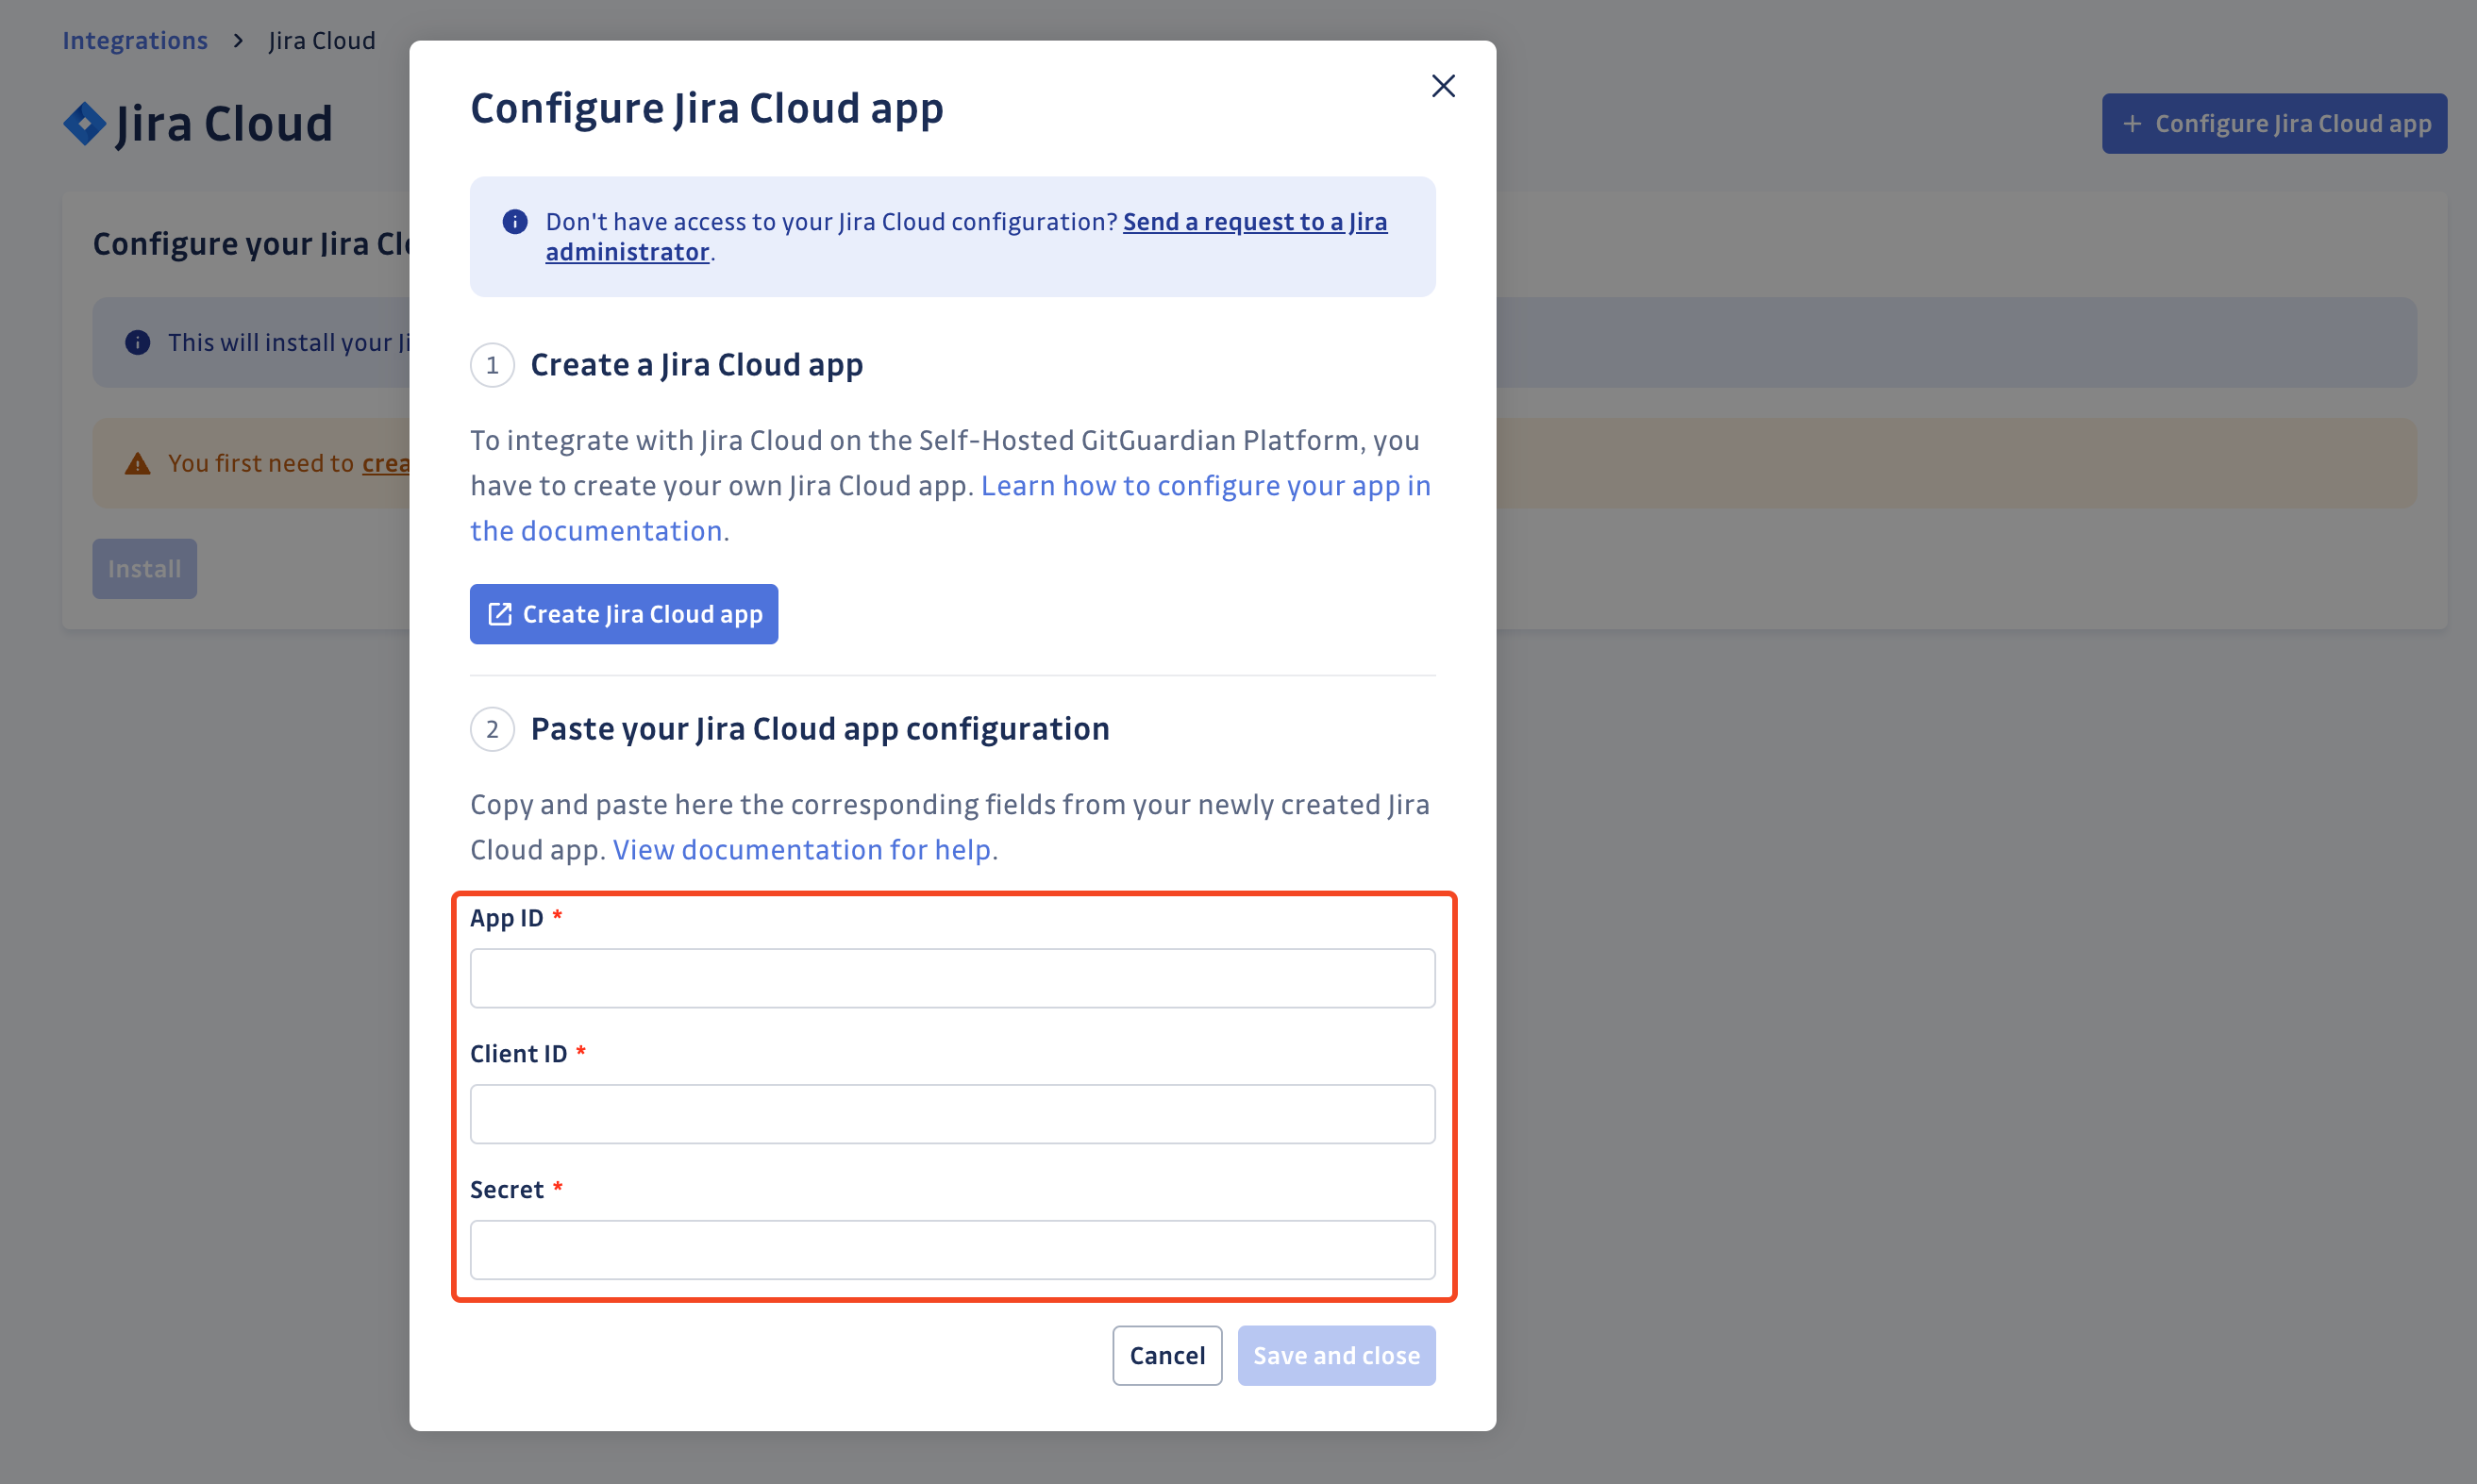
2. Declare your Jira Cloud app in the GitGuardian Platform
- Paste your Jira Cloud app credentials (
App ID,Client ID,Secret) - Click Save and close
That's it! Your Jira Cloud configuration is ready and you can now setup your Jira Cloud integration.
Understanding scanning capabilities
Historical scanning
Uncover your secret debt: When you first integrate this source, GitGuardian performs a comprehensive scan of your entire content history, based on your customized perimeter. This reveals secrets that may have been exposed weeks, months, or even years ago - helping you address your existing security debt.
How to trigger a historical scan: Go to your perimeter page, select the sources you want to scan, and click Scan in the bulk actions bar. See Manage your monitored perimeter for plan-based size limits, error handling, and full details.
Incremental scanning
Stay protected with regular monitoring: Once integrated, GitGuardian provides ongoing protection through scheduled automated scans of your content. New and modified content is systematically monitored at regular intervals, ensuring comprehensive coverage and timely detection of any secret exposures. Your source remains under GitGuardian's protection, giving you confidence that secrets won't go unnoticed.
Scanning your JIRA Cloud history
GitGuardian enables you and encourages you to scan the entire history of your perimeter. By executing historical scanning, all secrets present in your JIRA sources prior to installing GitGuardian will be detected.
Unlike Version Control Systems, historical scanning has to be manually executed from your perimeter page, by:
- Selecting your JIRA sources
- Click scan from the top action bar
If you previously integrated your sources for real-time scanning, you will need to uninstall and reinstall the GitGuardian app from the Settings > Sources. This step is required as the GitGuardian application requires additional access rights:
- read:field.default-value:jira
- read:field.option:jira
Fresh installations do not require this step.
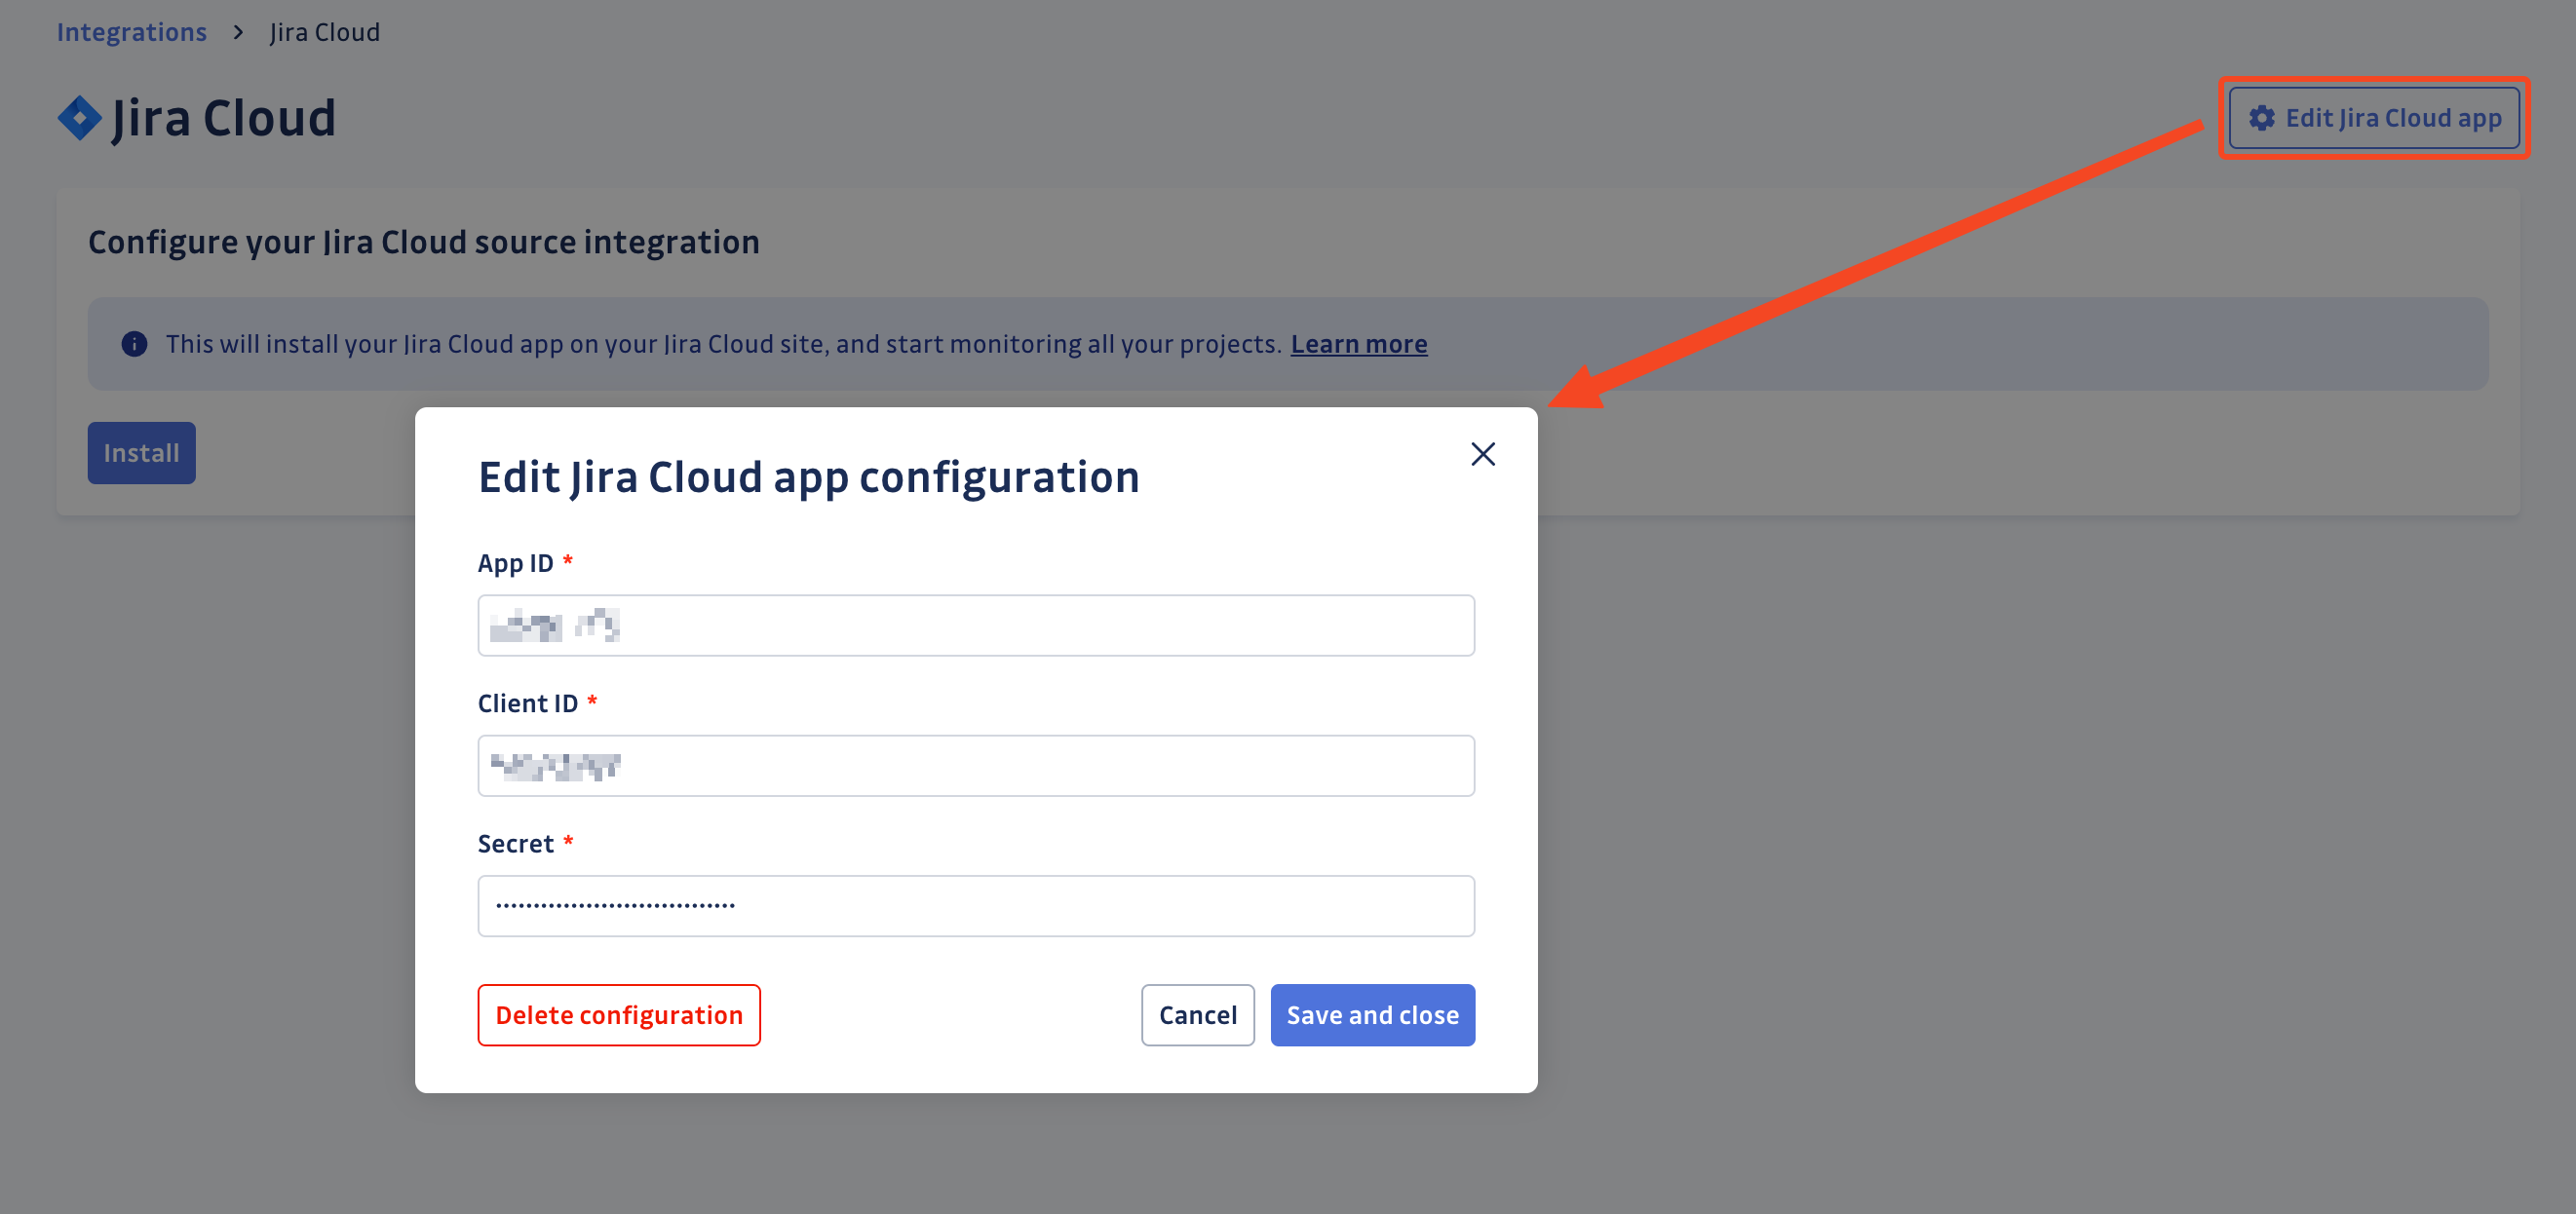
Edit your Jira Cloud app configuration
In case you need to edit your Jira Cloud app configuration, due to an error when declaring your Jira Cloud app credentials or due to a secret rotation, you can do so as follows:
- Click Edit Jira Cloud app
- Update your Jira Cloud app credentials
- Click Save and close
Delete your Jira Cloud app configuration
In case you need to delete your Jira Cloud app configuration, you can do so as follows:
- Click Edit Jira Cloud app
- Click Delete configuration
- Confirm by clicking Delete configuration in the confirmation modal
Deleting your Jira Cloud app configuration will uninstall all your Jira Cloud integrations. However, all your existing incidents detected on Jira Cloud will remain available on your dashboard. Note that deleting the Jira Cloud app configuration will only delete the configuration, not the Jira Cloud app. If you want to delete your Jira Cloud app, you must do so from your Jira Cloud site.
Uninstall your Jira Cloud site
To uninstall a Jira Cloud site:
- In the GitGuardian platform, navigate to the Sources integration page
- Click Edit next to Jira Cloud in the Ticketing section
- Click the bin icon next to the Jira Cloud site to uninstall
- Confirm by clicking Yes, uninstall in the confirmation modal
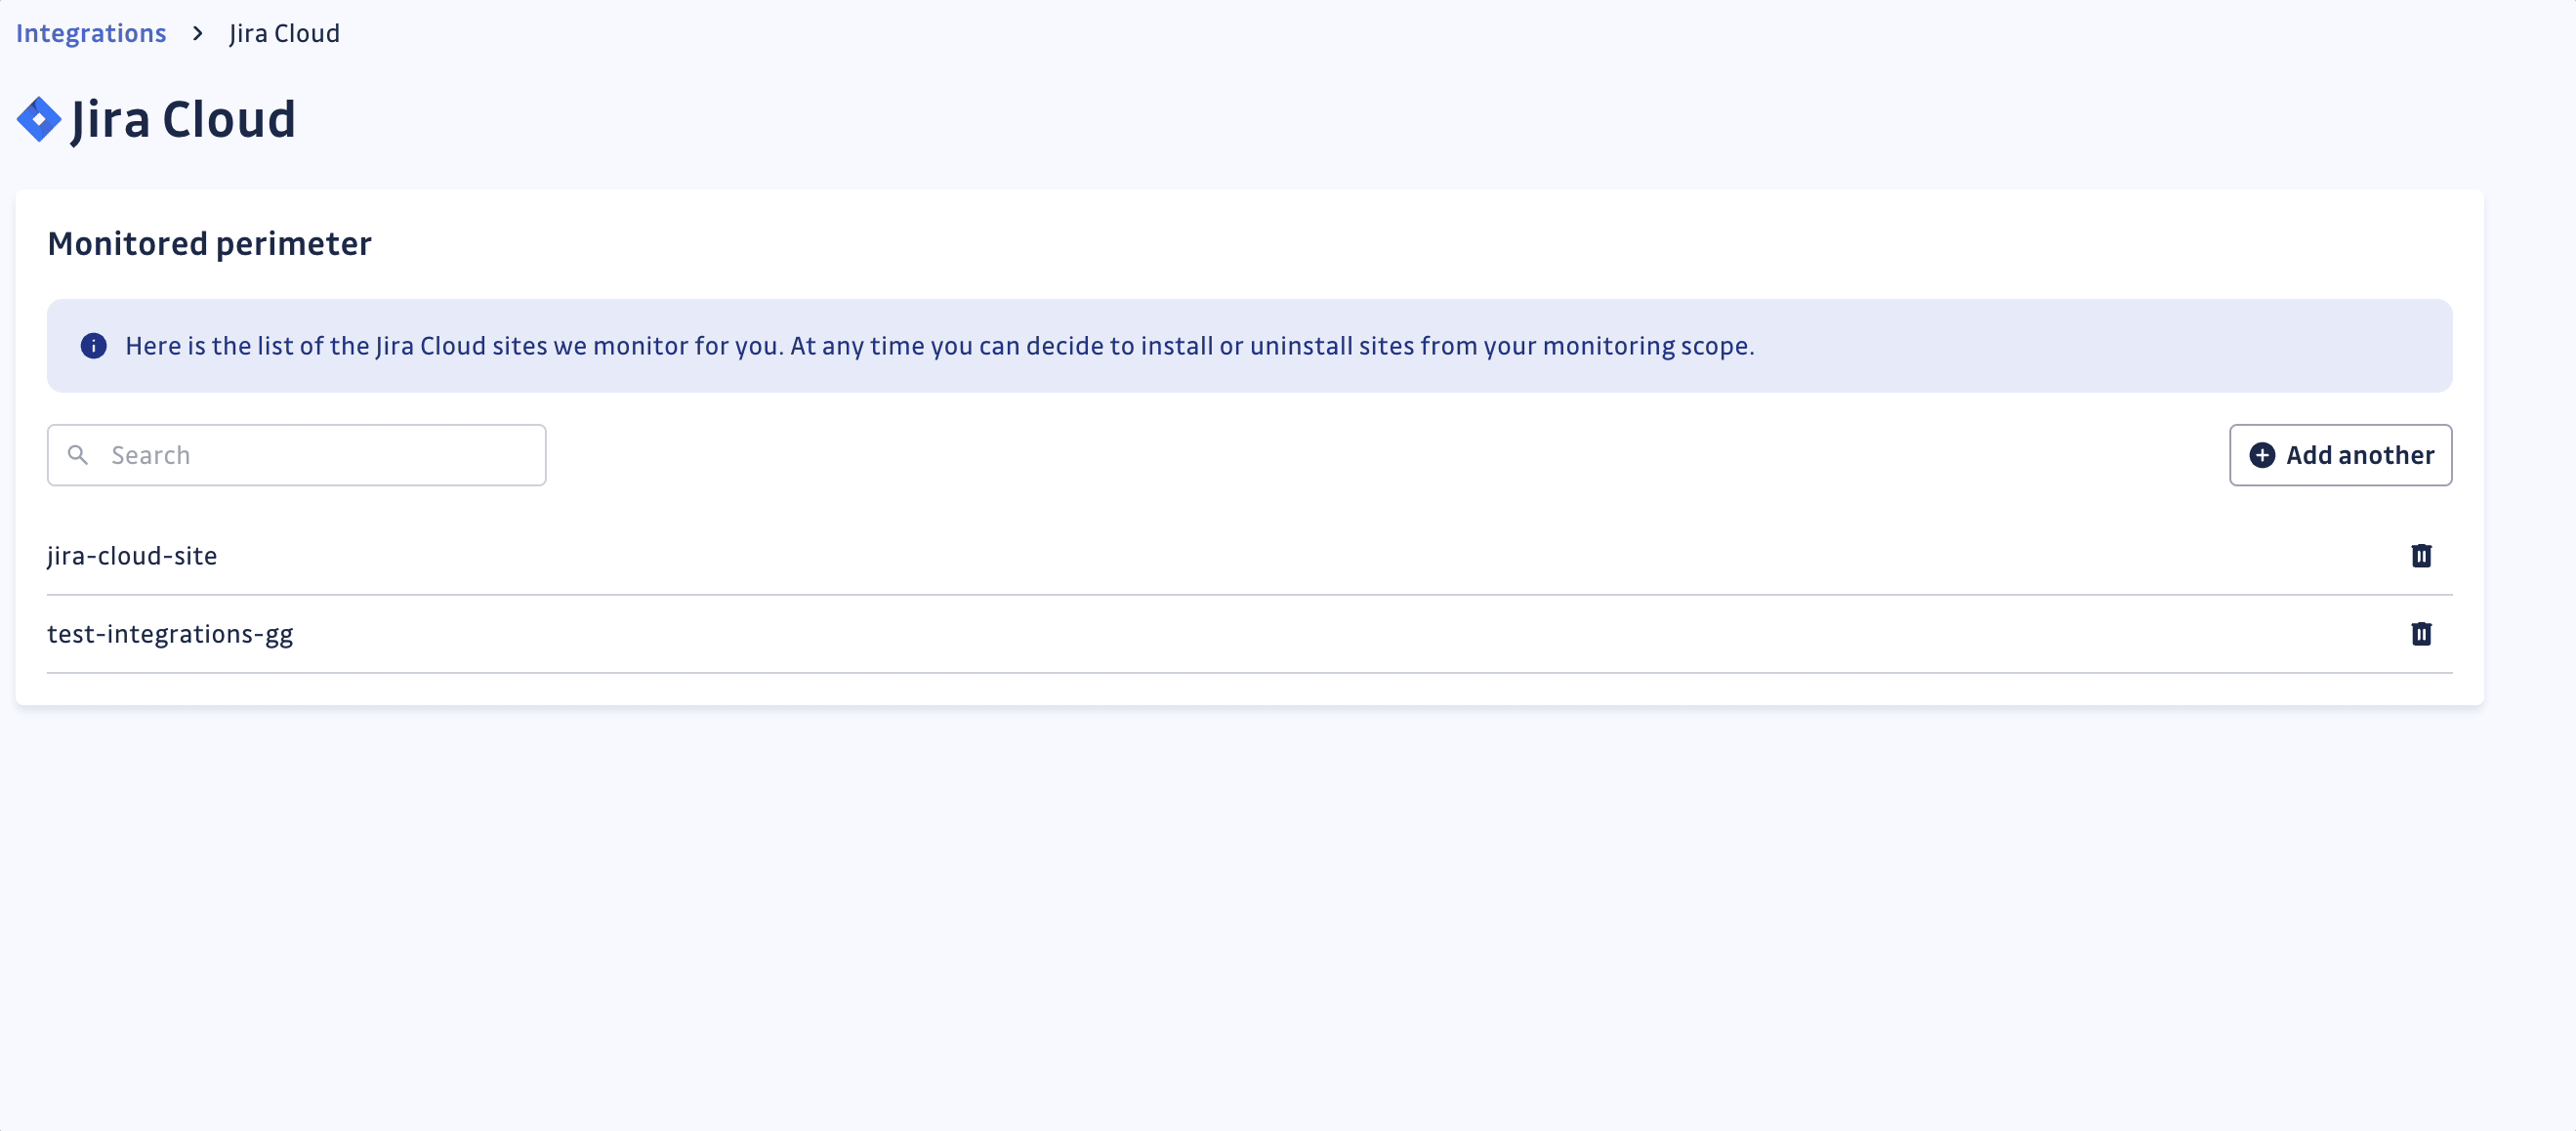
That's it! Your Jira Cloud site is now uninstalled.
Remove the GitGuardian app from your Jira Cloud site
Uninstalling a Jira Cloud site from the GitGuardian platform does not remove the GitGuardian app from your Jira Cloud site. This is not a mandatory step, but you can remove it manually after uninstalling your Jira Cloud site from the GitGuardian platform.
The GitGuardian app is shared with the Jira Cloud issue tracking integration. Removing the app from your Jira Cloud site will break any existing integration in the GitGuardian platform. Make sure your Jira Cloud site is no longer installed on the GitGuardian platform before removing the GitGuardian app manually.
To remove the GitGuardian app from your Jira Cloud site:
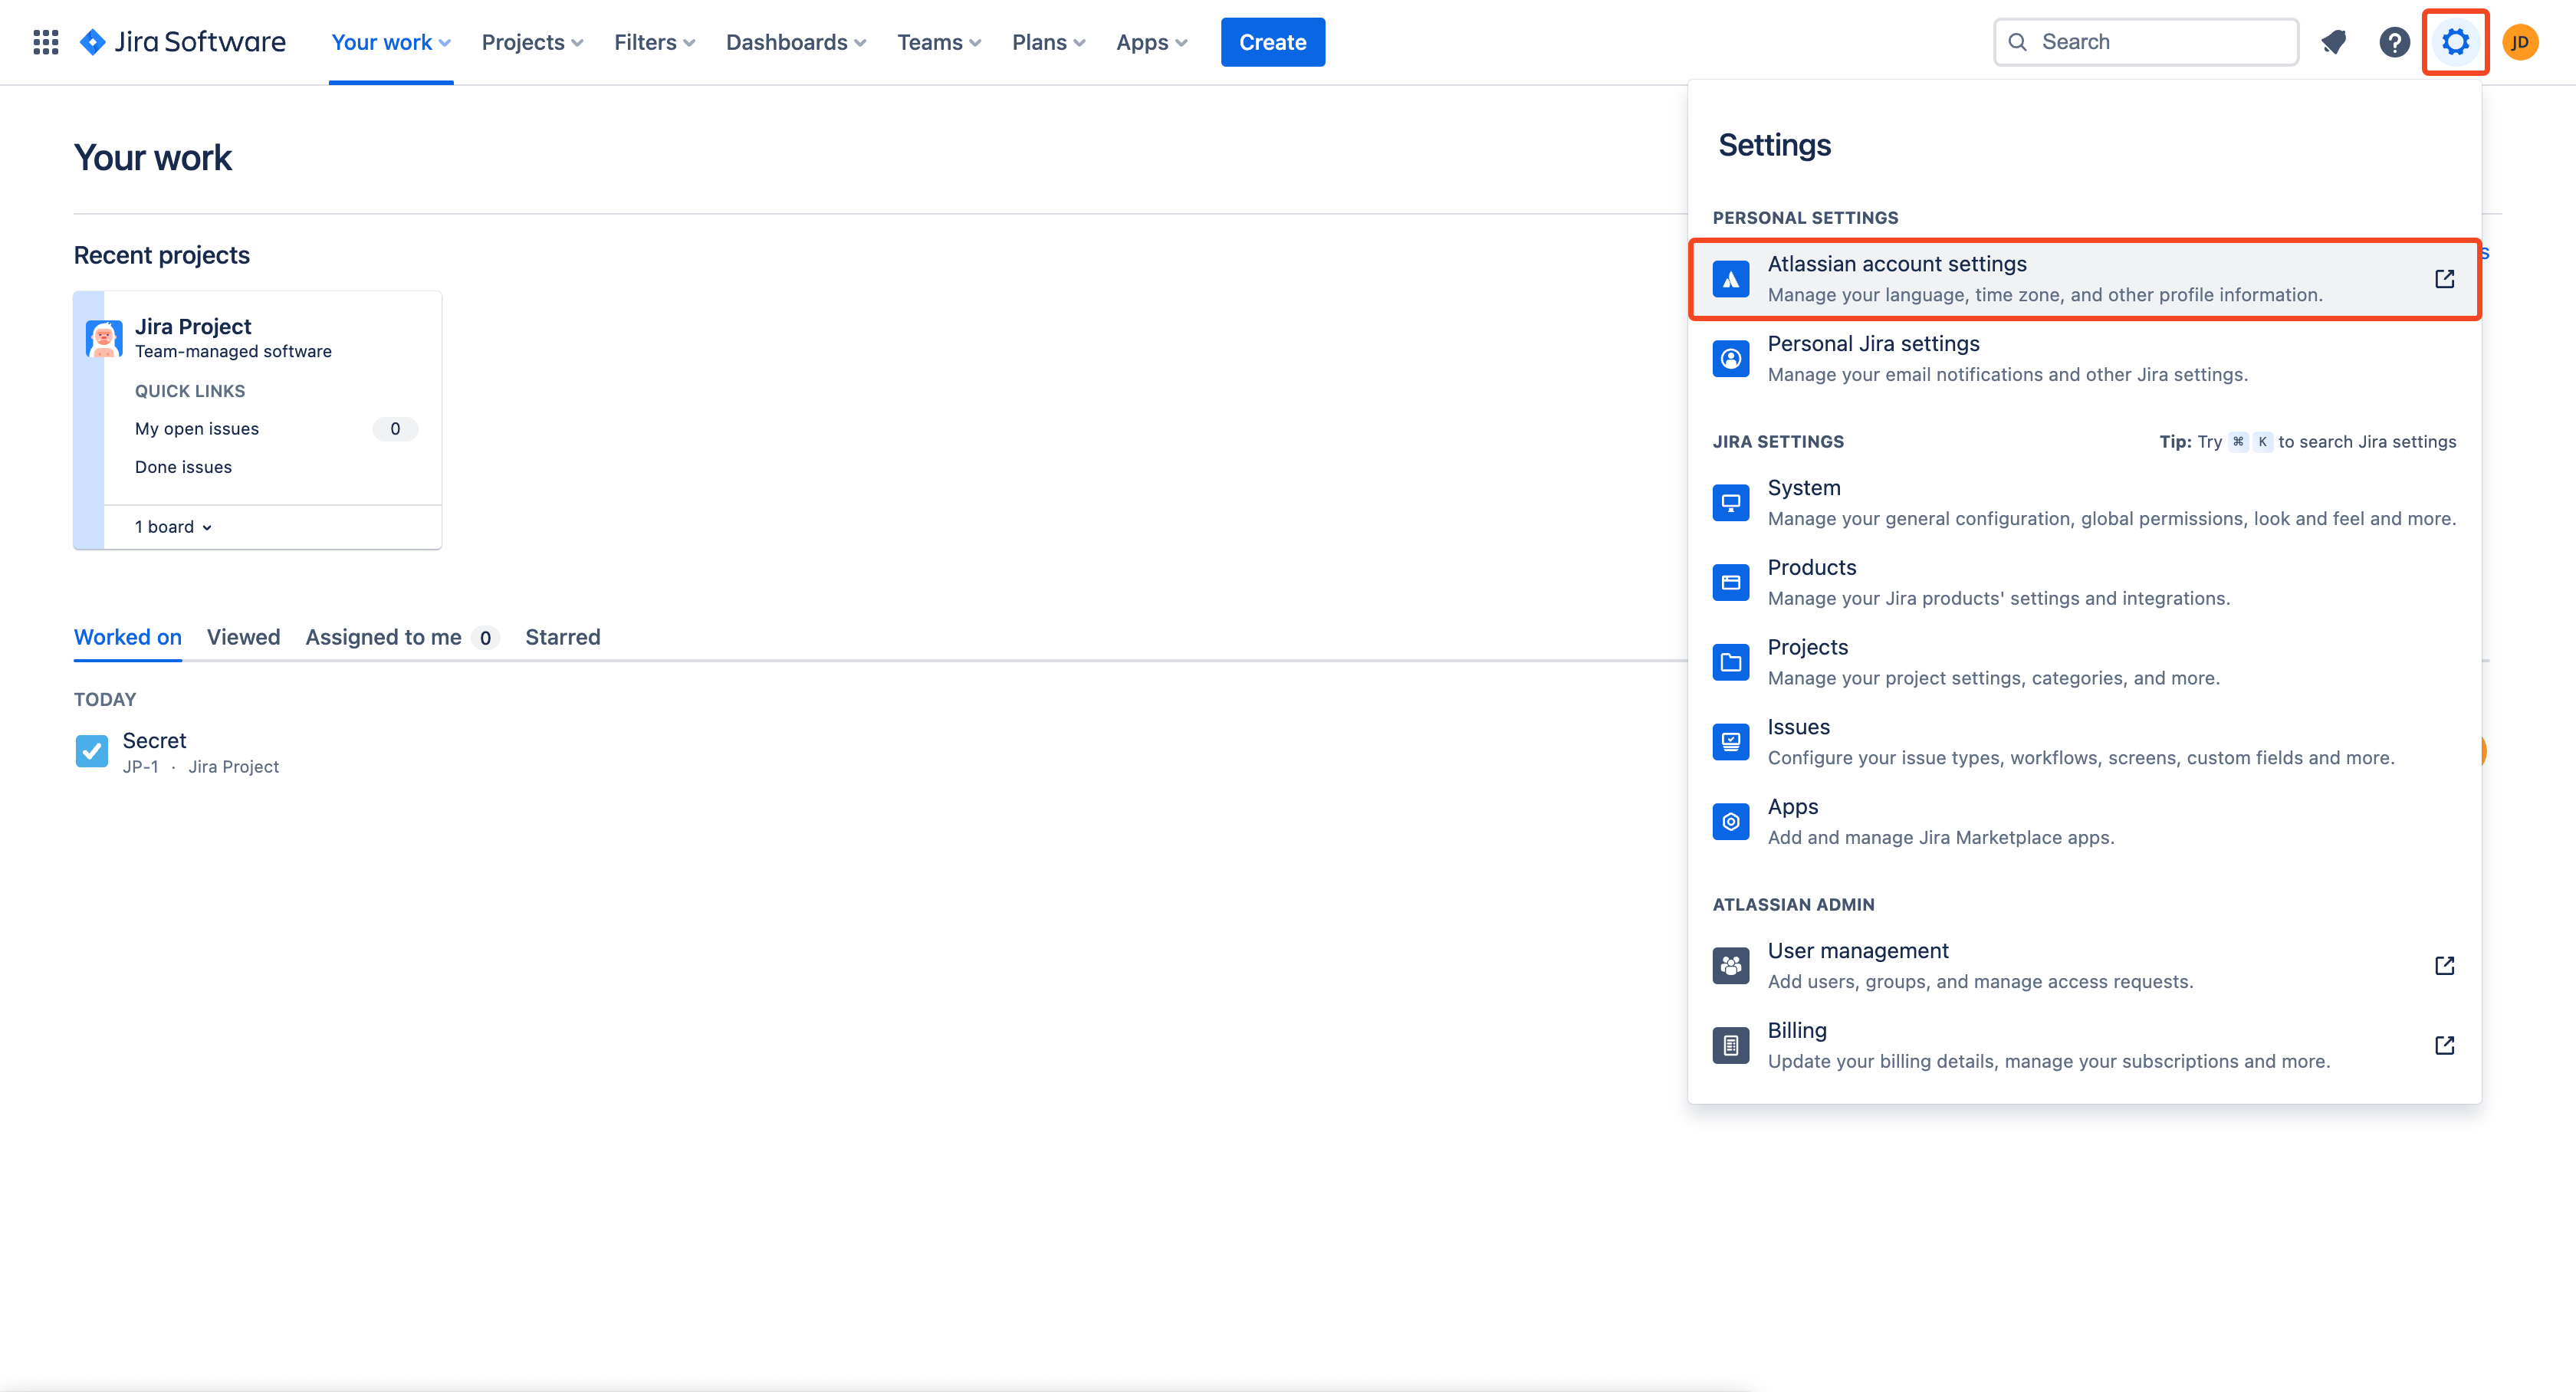
- Go to your Jira Cloud site
- Select Settings > Atlassian account settings
- Go to the Connected apps tab
- Click Remove access next to the GitGuardian app
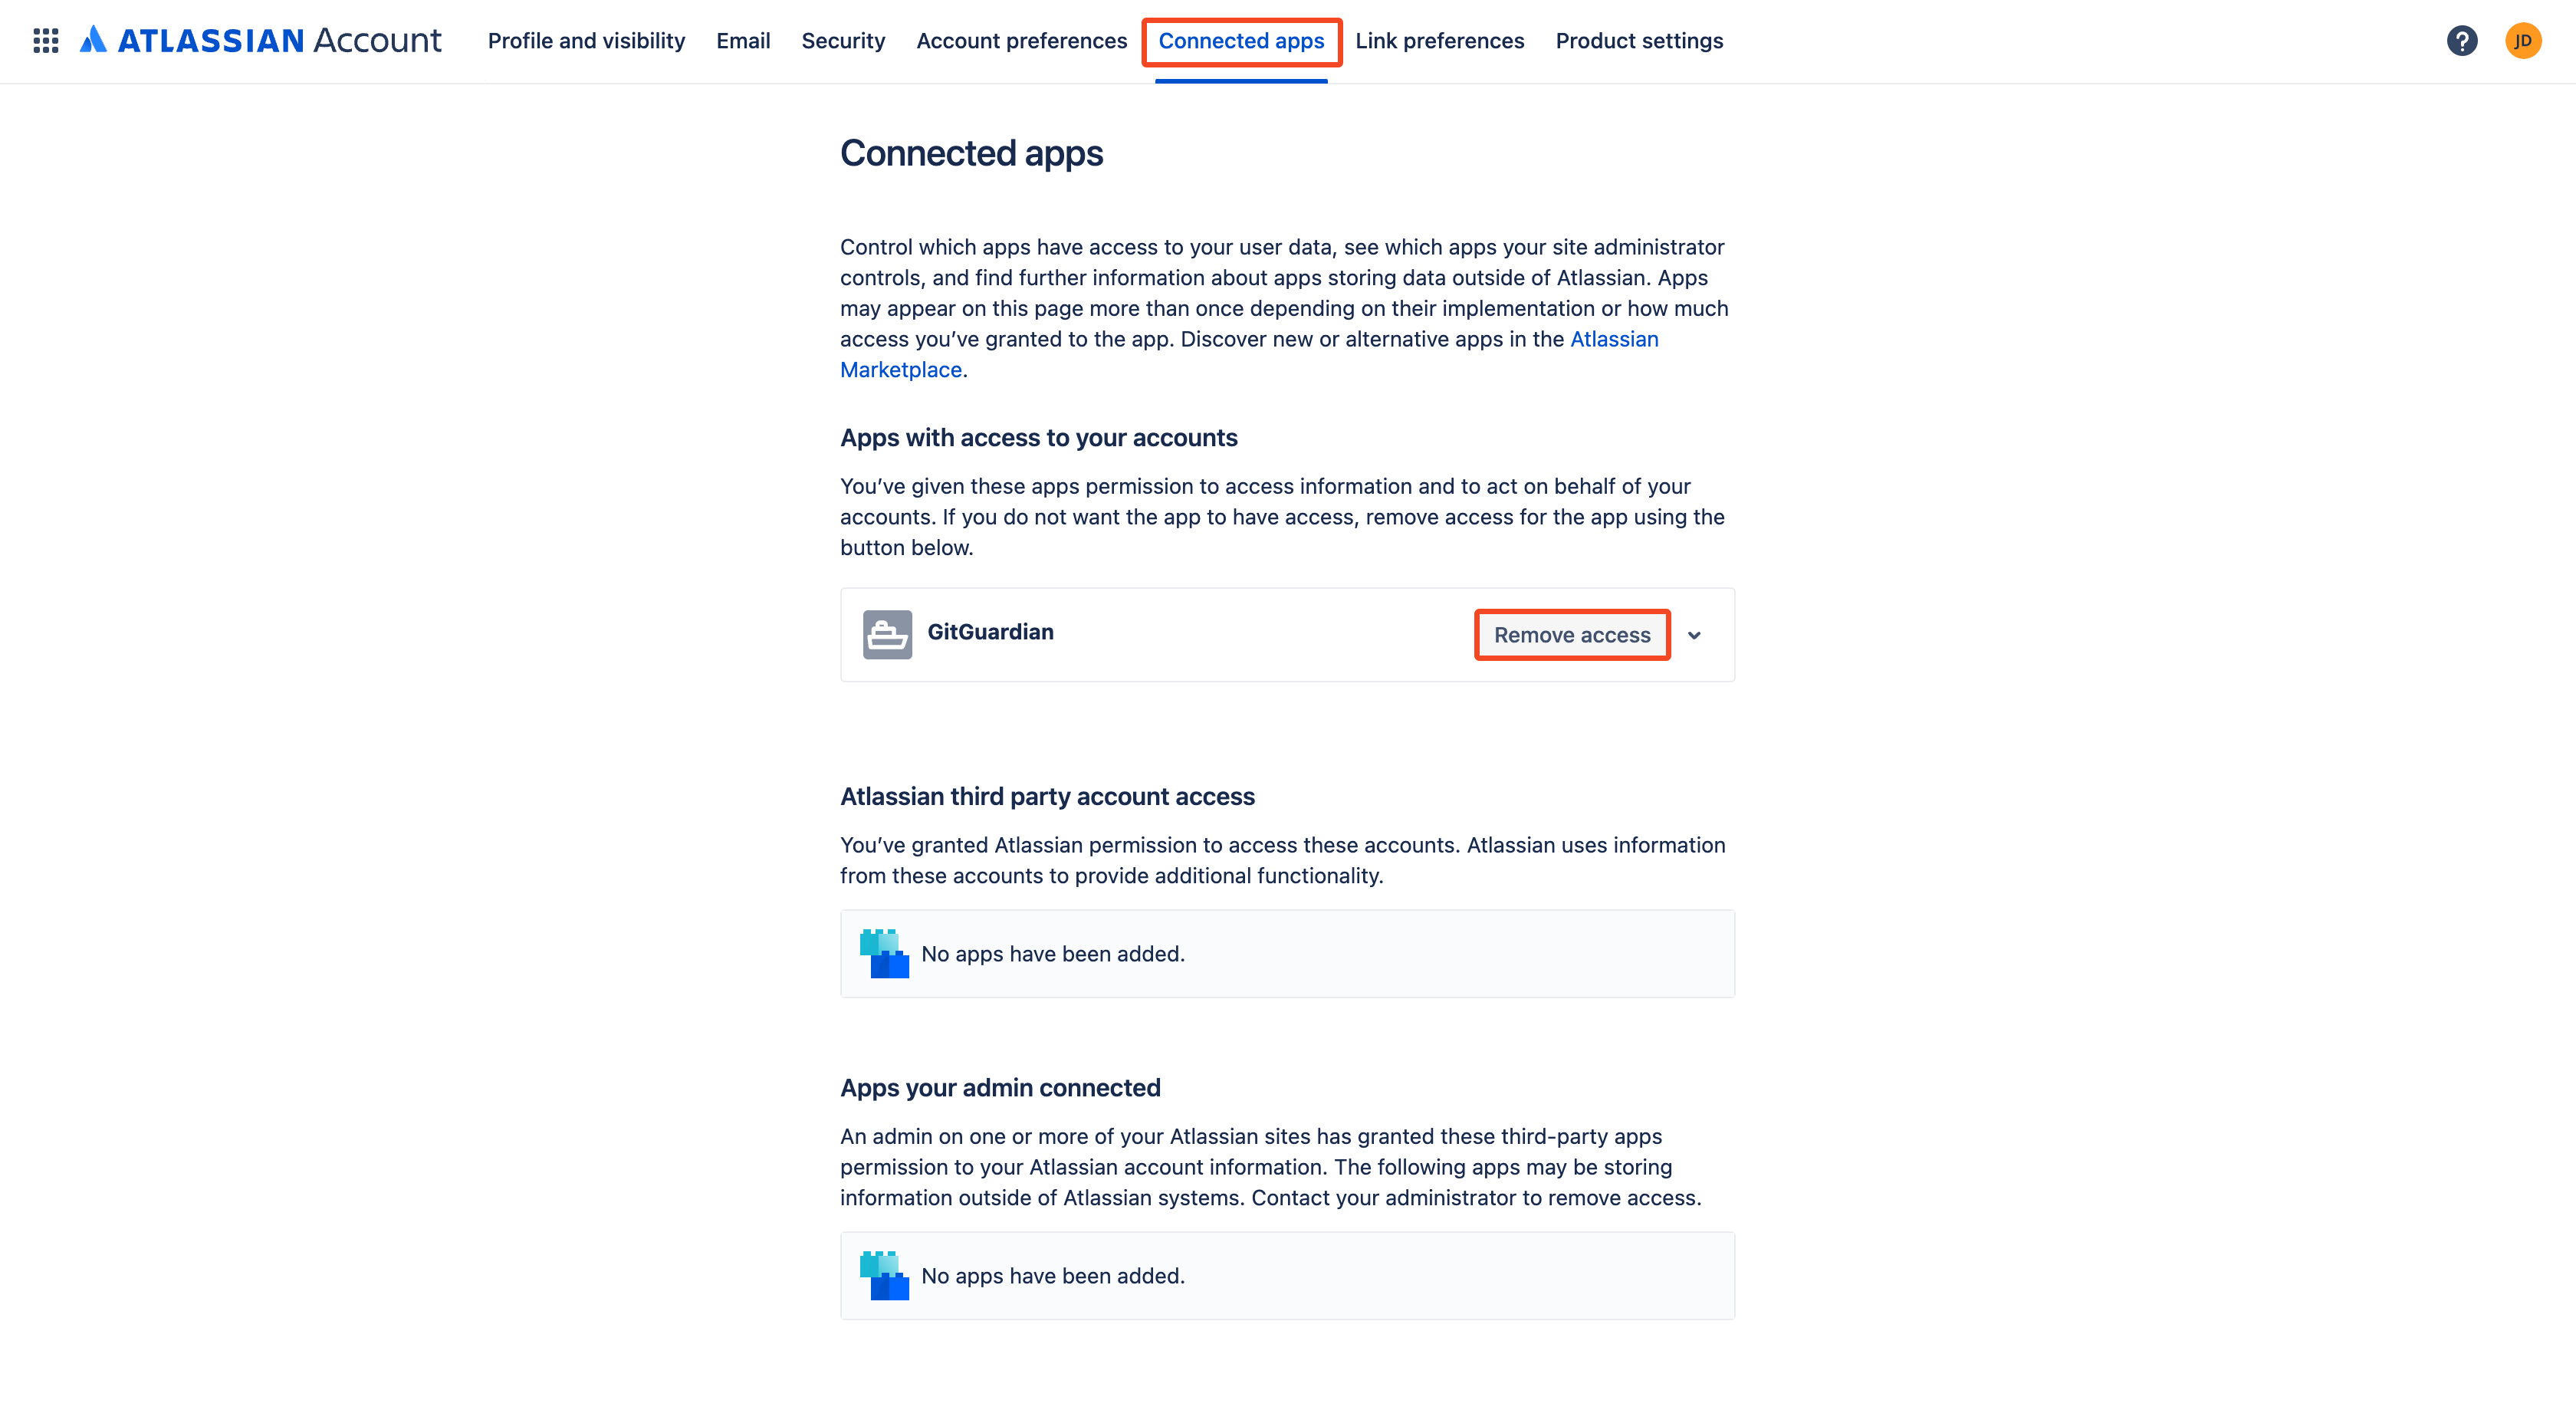
- Click Remove in the confirmation modal
That's it! The GitGuardian app is now removed from your Jira Cloud site.
Privacy and compliance
Data handling
GitGuardian processes your data solely to detect exposed secrets:
- Read-only access: We never require write access unless scoped to creating webhooks to receive and process real-time events
- Minimal data retention: We store only data and metadata necessary for incident management
- Encryption: All data in transit and at rest is encrypted
- Compliance: We follow the same data protection standards as our other integrations
Regional considerations
GitGuardian hosts its services in two AWS regions: eu-central-1 (Frankfurt) and us-west-2 (Oregon). Ensure your GitGuardian deployment region aligns with your data residency requirements. Contact support if you need guidance on compliance with local regulations.
User notification
Country-specific laws and regulations may require you to inform your Jira Cloud users that your projects are being scanned for secrets. Here is a suggestion for a message you may want to use:
As part of our internal information security process, the company scans the Jira Cloud projects for potential secrets leaks using GitGuardian. All data collected will be processed for the purpose of detecting potential leaks. To find out more about how we manage your personal data and to exercise your rights, please refer to our employee/partner privacy notice.
Please note that only projects relating to the company's activity and business may be monitored and that users shall refrain from sharing personal or sensitive data not relevant to the project's purpose.

