Prioritize incidents
Overview
With potentially hundreds or thousands of public secret incidents to review, effective prioritization is crucial for focusing your remediation efforts on the secrets that pose the greatest risk to your organization.
This guide explains the capacities available to help you identify which incidents require immediate attention and create an efficient remediation workflow.
Severity and severity rules
Severity is the primary prioritization tool, designed to consolidate multiple risk factors into a single, actionable priority level.
The possible severity levels are: Critical, High, Medium, Low, Info, Unknown.
Since severity consolidates the key prioritization principles into a single metric, sorting by severity is often the most effective starting point for incident review.
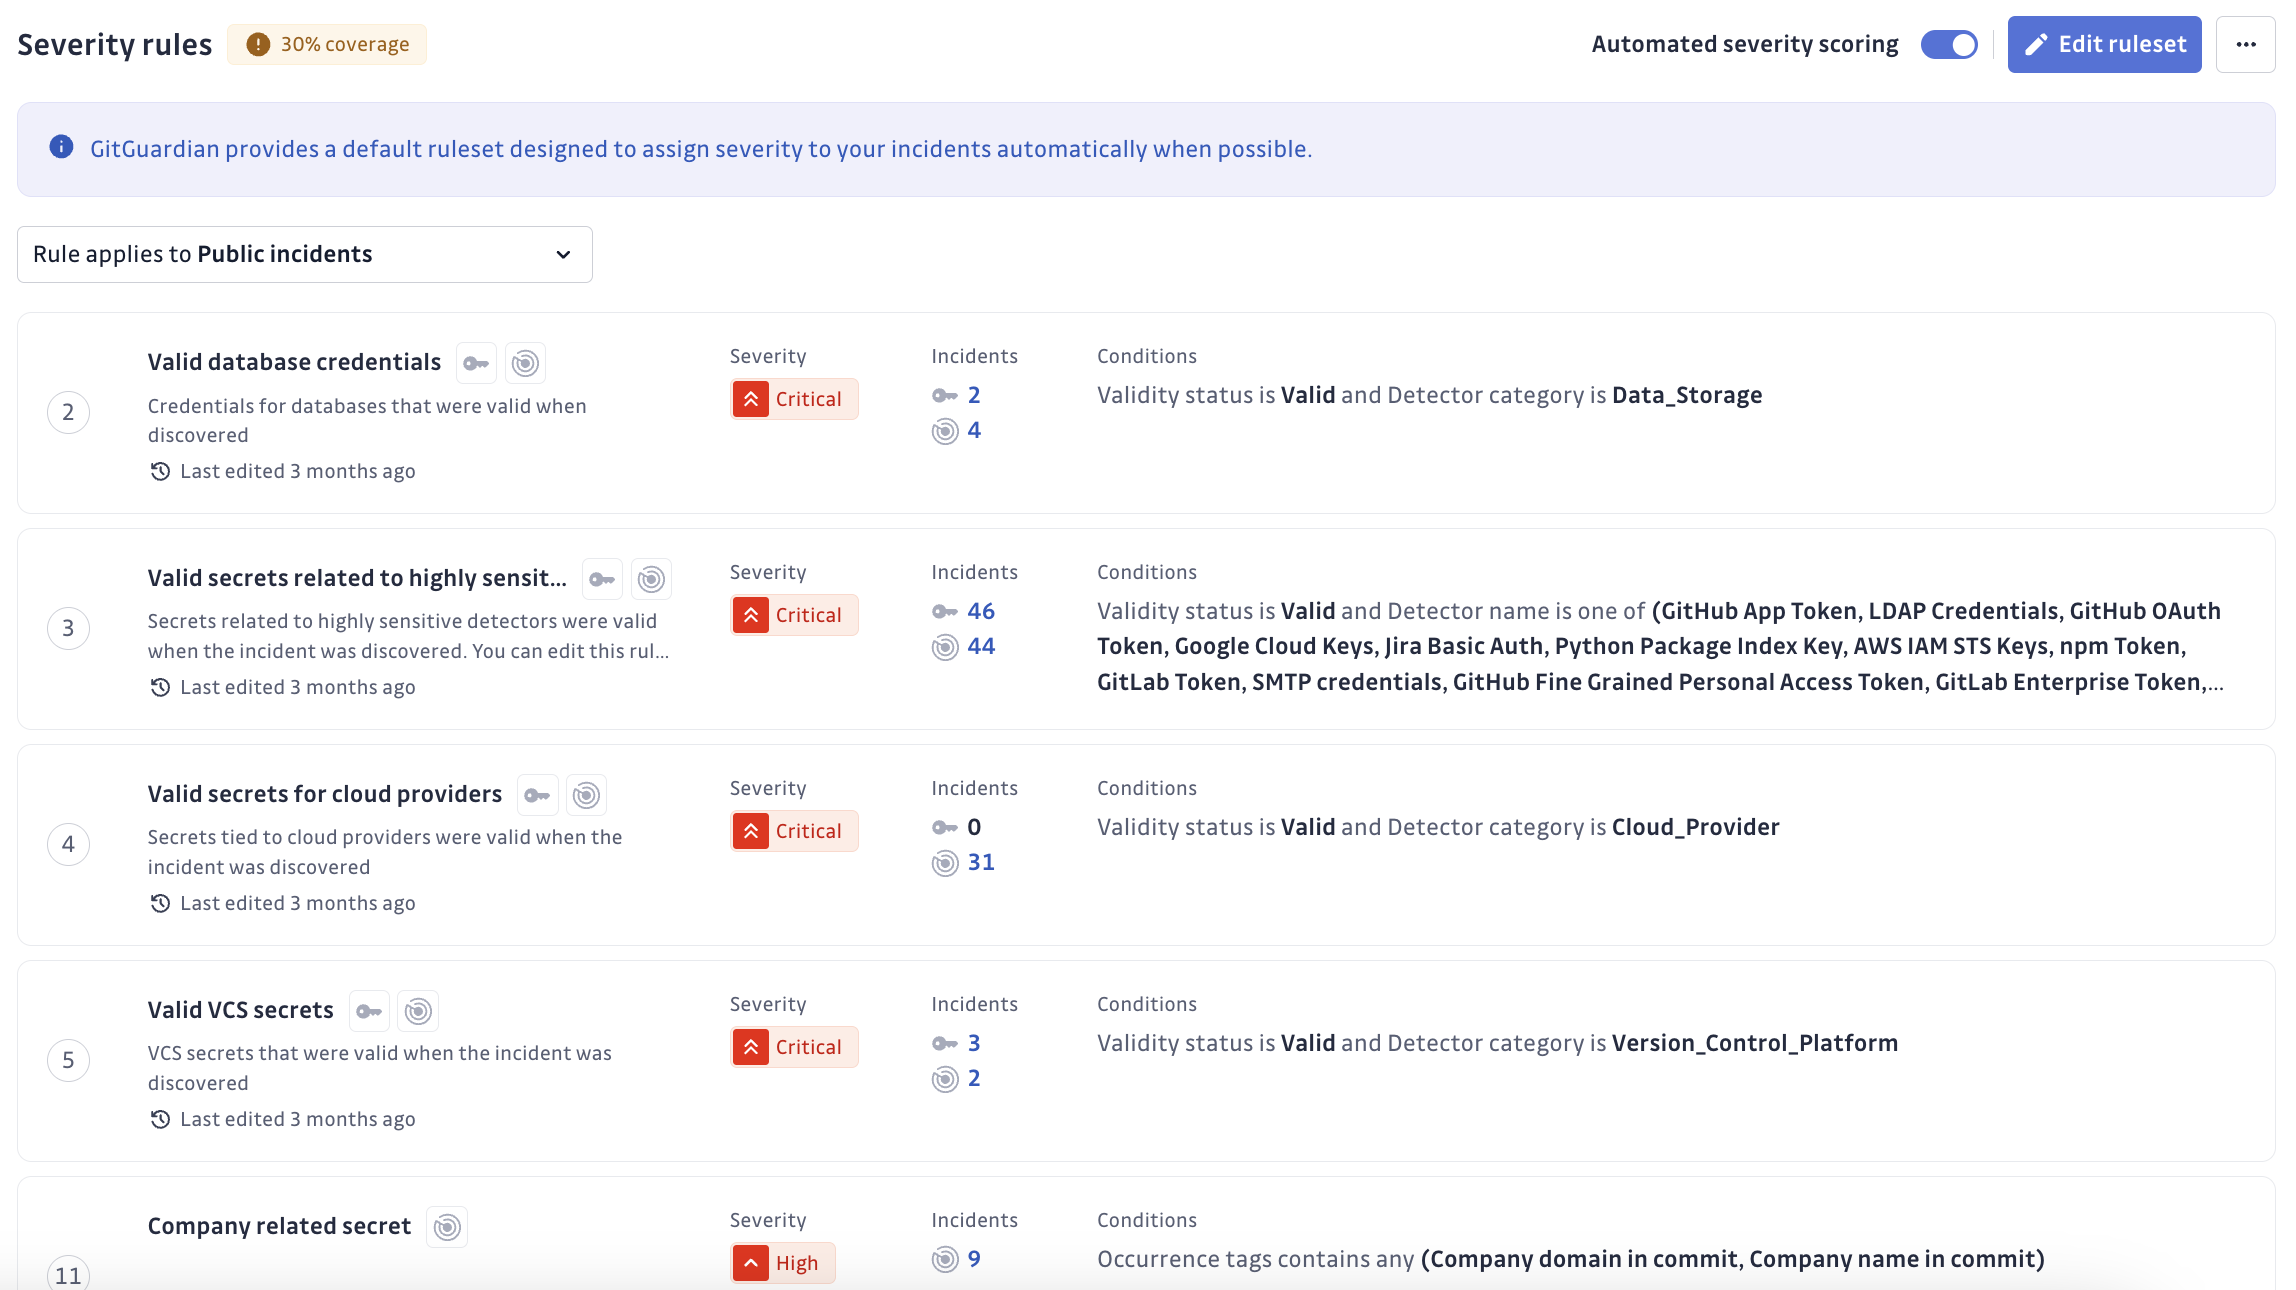
Severity rules
Severity rules automatically evaluate incidents based on various factors (secret type, organizational relevance, validity, company indicators) and assign priority levels accordingly.
Your workspace comes with GitGuardian's default severity rules, which you can customize in Settings > Severity rules to match your organization's specific risk priorities.
When creating or editing a severity rule, you can specify whether it applies to public incidents, internal incidents (from Internal Monitoring), or both.
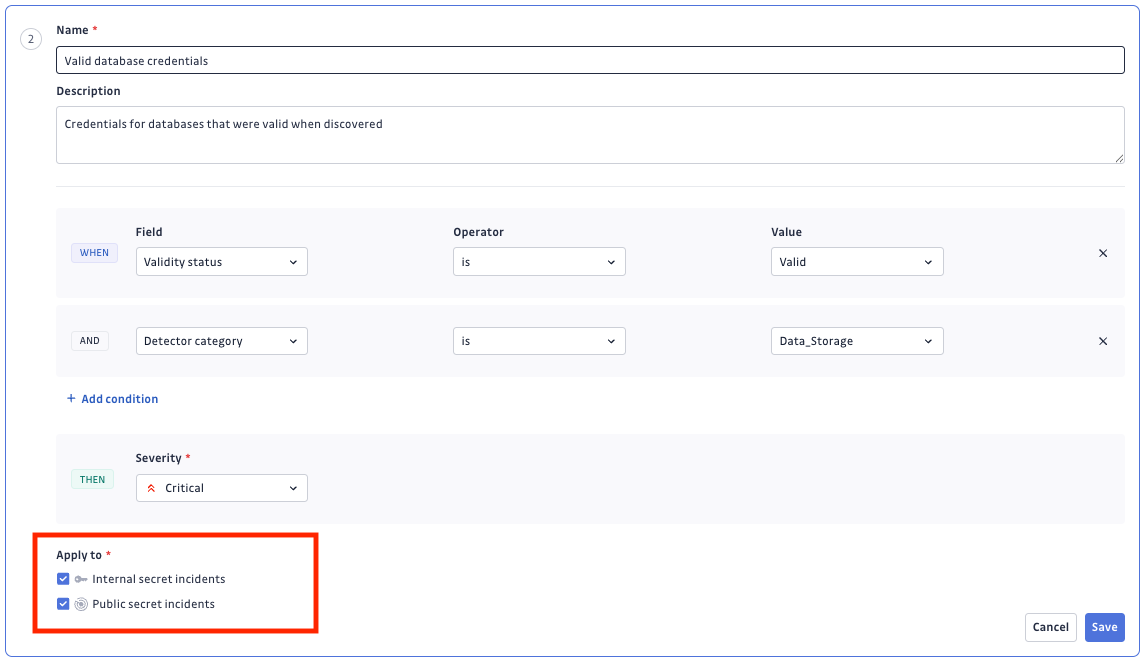
Some rule criteria only apply to specific incident types. For example, company-related tags are unique to Public Monitoring, so rules using these criteria will automatically disable the "internal incidents" option.
Incidents with "Unknown" severity indicate they haven't matched any configured severity rules—these may require manual review or additional rule configuration.
Manual severity override
You can manually edit any incident's severity to override the automatic assignment when you have additional context or disagree with the automated assessment.
Complementary prioritization tools
While severity provides a first automated prioritization, the additional tools below help you fine-tune your approach and handle specific scenarios that benefit from more granular control.
Risk score (ML-powered prioritization)
The risk score is an ML-powered feature that automatically assesses the risk level of each incident on a scale of 0-100, where 100 indicates the highest risk requiring immediate attention and 0 indicates the lowest risk. It provides an additional layer of prioritization by analyzing multiple risk signals to help you focus on the incidents that pose the greatest threat.
The risk score complements severity scoring by providing a more granular, continuously updated risk assessment.
How it works
The risk score is calculated using machine learning models that consider various factors including:
- Secret type
- Validity (past or present)
- Detection context (test files, sensitive files, production environment, etc.)
- Secret exposure patterns
- Additional contextual signals
The score is dynamic and recalculates regularly to reflect changes in the incident's risk profile.
Using risk score in your workflow
The risk score uses machine learning models that are continuously improved based on user feedback. If you notice incidents with unexpected scores or explanations, we encourage you to share feedback directly through the dashboard — your input helps us refine the scoring model.
In the incidents table
The risk score can be used to prioritize incidents in multiple ways:
Filtering and sorting:
- Filter by risk score range: Use the "Risk score" filter to focus on specific risk levels (e.g., Risk score ≥ 80 for highest priority)
- Sort by risk score: Select "Sort by Risk score" to order incidents by priority
- Use the "Critical" saved view: This pre-configured view displays all open incidents with a risk score above 80/100, giving you quick access to the highest-priority incidents
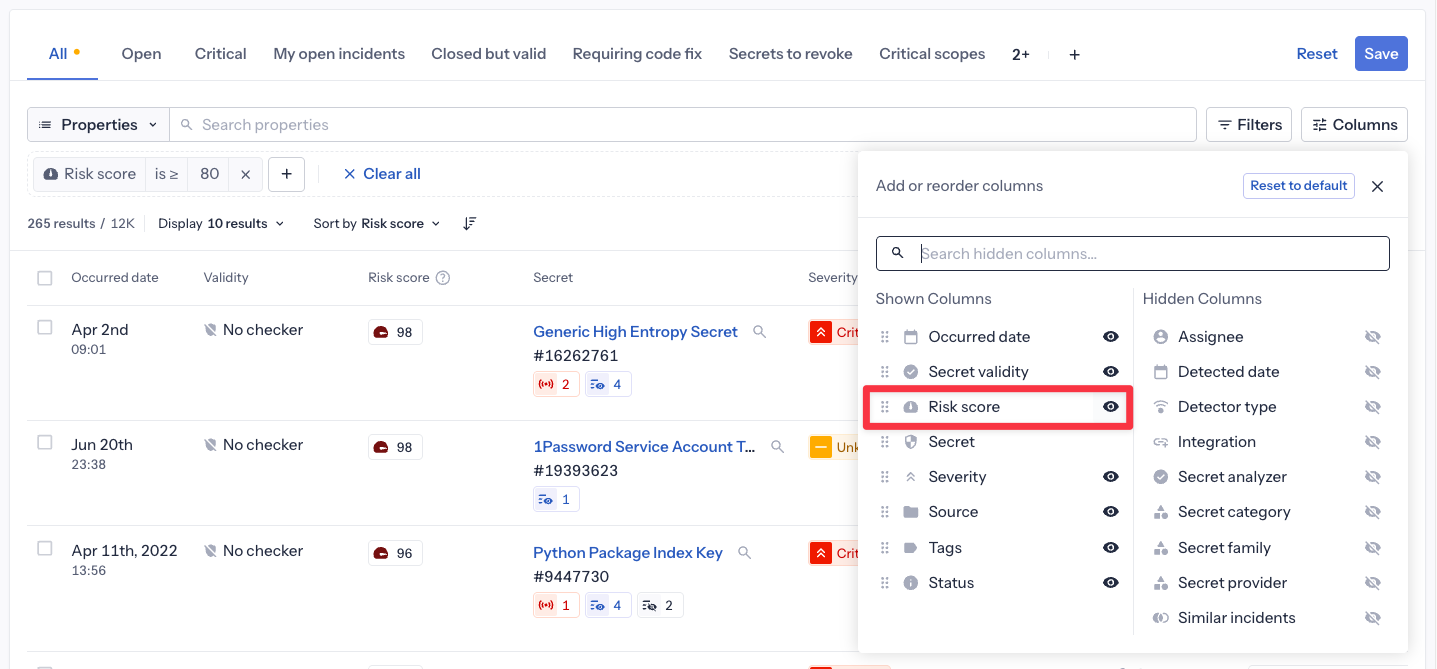
Adding the Risk score column:
By default, the risk score column is not displayed in the incidents table. To view the actual score values:
- Click the Columns button in the top-right of the incidents table
- Find "Risk score" in the list of available columns
- Click the eye icon to make it visible
- The column will now appear in your table, showing the 0-100 score for each incident
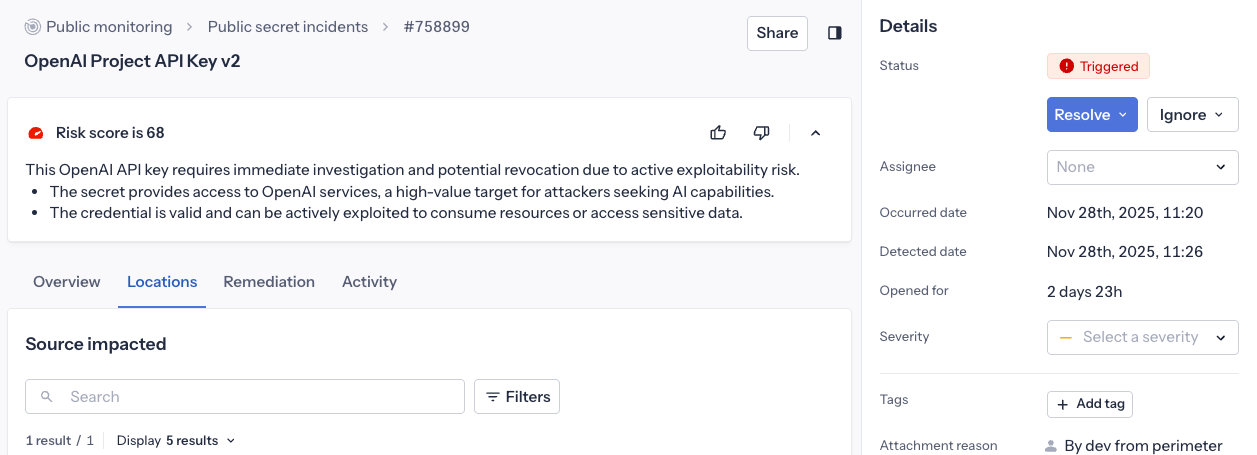
In the incident detail page
When investigating an incident, you'll find the risk score at the top of the incident detail page showing:
- The current risk score (0-100) with a visual indicator
- A detailed explanation of what drives the score, based on the incident's context and characteristics, so you know what to prioritize.
- Feedback buttons to help us improve the feature (thumbs up/down)
Note for Public incidents:
For Public incidents, the risk score reflects the technical risk of the secret itself, not whether it's relevant to your company. To assess the real risk to your organization, combine the risk score with company-relation indicators (such as author email domain or repository ownership).
Score evolution:
The risk score is dynamic and recalculates regularly as the incident context evolves. Changes in detection context, exposure patterns, or other risk signals may cause the score to adjust over time. Additionally, our ML model is continuously improved, which may lead to score refinements.
Providing feedback:
Your feedback helps us continuously improve the ML model. In the incident detail page, you can:
- Review the risk score and its explanation
- Use the thumbs up button if the score accurately reflects the risk, or the thumbs down button if the score doesn't match your assessment
- Expand/collapse the explanation using the arrow button
Feedback is reviewed by our team to regularly refine the scoring algorithm.
Risk score vs. Severity
Both tools help with prioritization but serve different purposes:
| Feature | Risk Score | Severity |
|---|---|---|
| Calculation | ML-powered, automatic | Rule-based, can be manual |
| Granularity | 0-100 scale | 6 levels (Critical to Unknown) |
| Updates | Dynamic, recalculates automatically | Static unless manually changed or rules recomputed |
| Best for | Granular risk assessment | Policy-based categorization |
Incidents table
The Public secret incidents table is where you'll apply these severity-based prioritization strategies, along with additional filtering and sorting capabilities. The table comes with several tools to help you have a clearer view on your incident list.
Filtering and sorting
Beyond severity, use additional filters for more targeted prioritization:
- Organizational relevance: Attachment reasons, company-related tags, vault properties
- Risk indicators: Secret validity, secret type
- Other tags of contextual information.
Saved views
Create and save filter combinations for quick access to specific incident sets. GitGuardian provides default views to help you get started, but you can build custom saved views based on your most frequently used filtering strategies.
Custom tags
Create and assign your own custom tags to mark incidents for your specific workflows. These custom tags can then be used in filters and saved views to support your organization's unique prioritization needs.
Additional capabilities for Generic secrets
Generic incidents—high-entropy strings that couldn't be matched to a specific detector—can be challenging to assess at first glance. It's often difficult to determine how critical they might be.
To address this challenge, GitGuardian uses a specialized machine learning model that analyzes the context surrounding generic secrets. This analysis can often determine the category, family, and provider of the secret, providing valuable insights for prioritization.
Learn more about generic secret enricher.
These enhanced insights provide additional columns and filters specifically designed for prioritizing generic secret incidents more effectively.
Next Steps: From Prioritization to Remediation
Once you've identified and prioritized your most critical public incidents, you're ready to begin systematic remediation.
What You Should Have After Prioritization:
- A focused list of high-priority incidents that clearly belong to your organization
- Risk assessment - Understanding which secrets pose the greatest threat
- Workflow organization - Critical incidents first, with less urgent ones planned for later
- Clear criteria - Established rules for what constitutes immediate vs. standard priority
Move to the Remediation phase to:
- Distinguish between incidents requiring immediate action vs. those that can be ignored
- Engage with developers and stakeholders for confirmed threats
- Follow structured remediation procedures for public exposures
- Implement proper cleanup and monitoring procedures

