Create and manage teams
Teams allow you to organize security responsibilities by ensuring team members only receive alerts and access incidents from sources within their area of responsibility.
Only workspaces under Business plan can create and use teams.
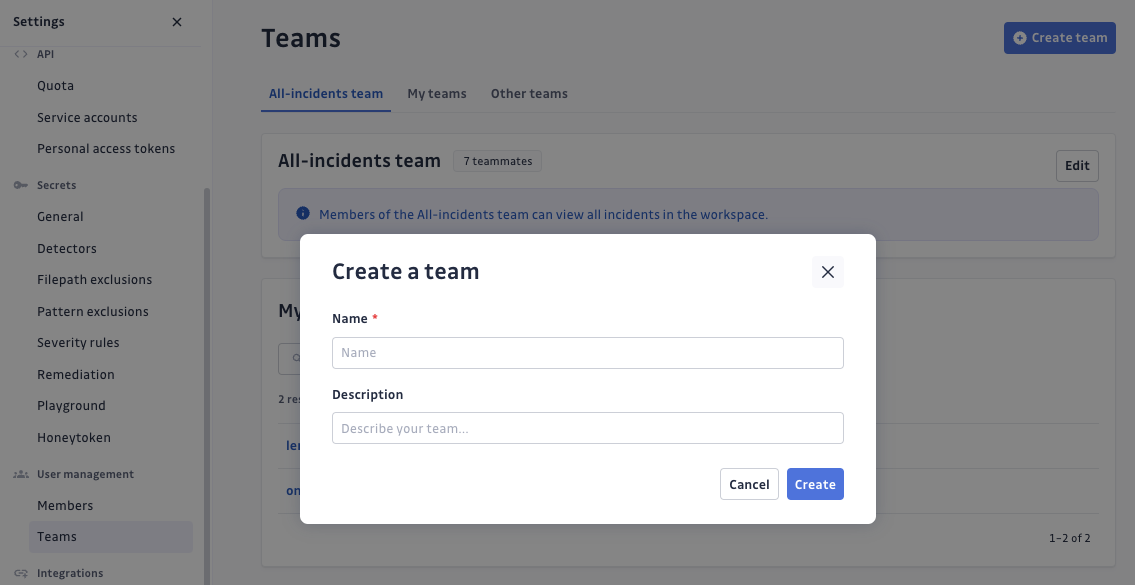
Creating a team
Only Managers can create teams within the workspace.
- Navigate to Settings > User management > Teams.
- In the top-right corner of the page, click Create team.
- Enter the team name and description.
Add teammates to your team
You can add as many teammates as you want to a team. Note that users with Restricted access level cannot be added to teams.
- On your team page, go to the Teammates section.
- Click Add teammates.

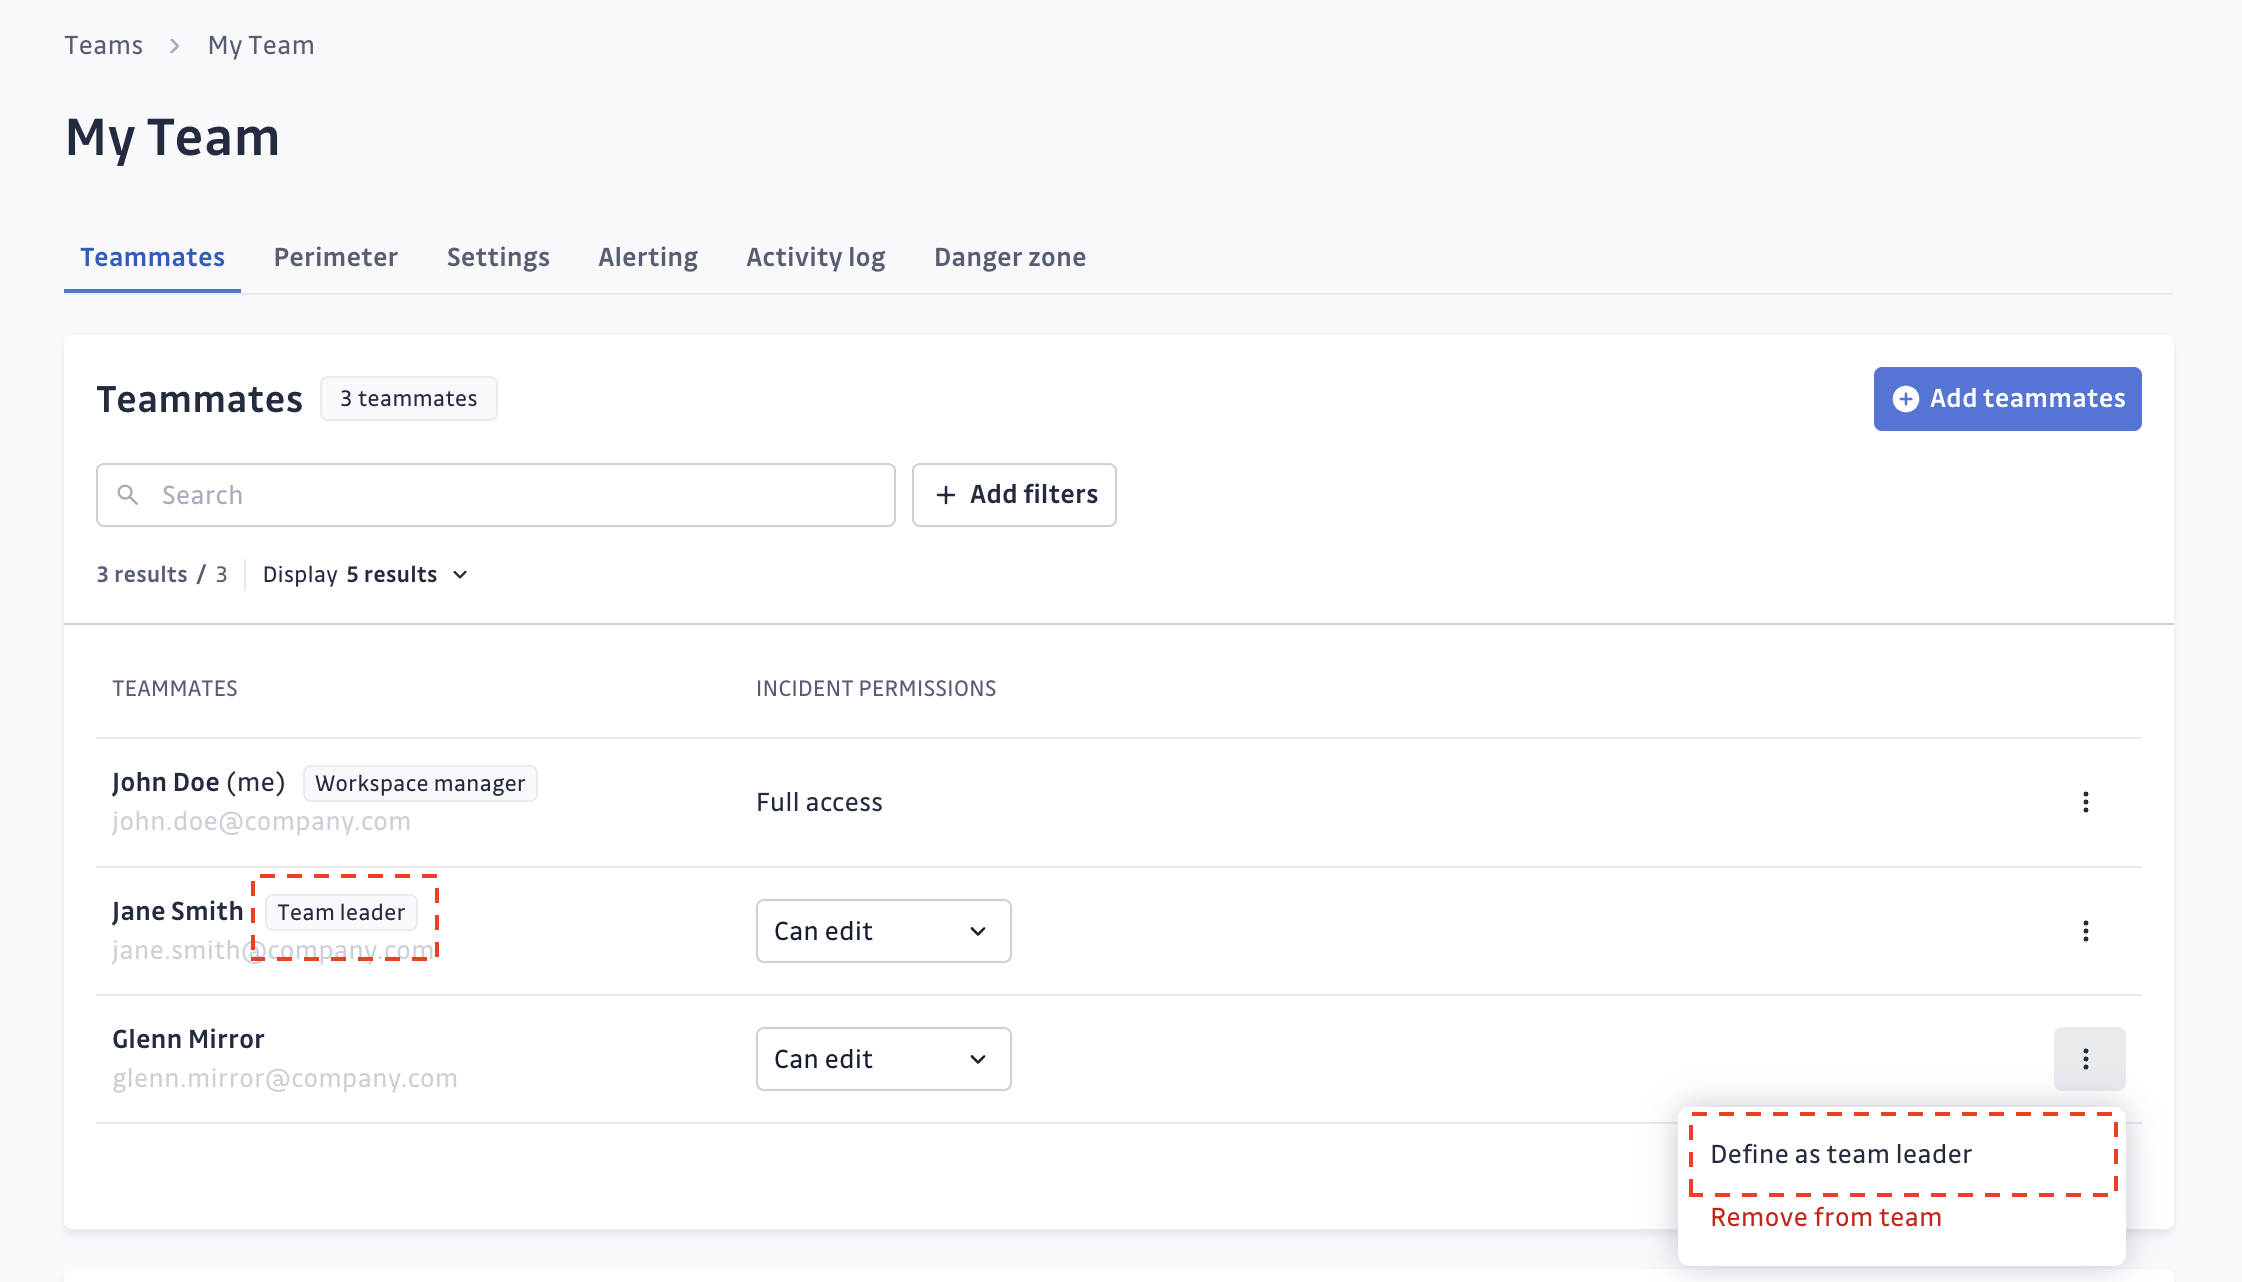
Define their incident permissions
For each teammate, you can set their default incident permissions. These permissions automatically apply to all incidents (past and future) within the team's perimeter.
- Can view: they can view the incident and be assigned to it. When enabled by workspace settings, they can also comment and provide feedback on an incident.
- Can edit: they have the "Can edit" permissions, plus the ability to resolve, ignore, change severity and custom tags, comment and provide feedback on an incident.
- Full access: they have the "Can edit" permissions, plus the ability to share the incident within the workspace or publicly.
When added to a team, workspace Managers automatically receive unmodifiable Full access incident permissions by default.

For more details about incident permissions, read the dedicated documentation.
Define team leaders
You can designate team leaders for each team. Team leaders can:
- Manage team members (add/remove/accept or decline requests)
- Rename the team and update its description
- Configure alert settings
- Delete the team
Workspace Managers added to a team automatically have the same rights as team leaders.
By default, team leaders can invite new users to the workspace by adding them to their team. This behavior can be disabled via workspace settings. For more details, refer to this page.
Team leaders cannot configure the team perimeter. For security reasons, only workspace Managers can configure team perimeters.
Configure team perimeter
The team perimeter defines the products and sources that the team can access. Team members will have access to all incidents (past and future) from these sources.
For workspaces with access to Public Monitoring, sources are distributed across both products: Internal Monitoring and Public Monitoring.
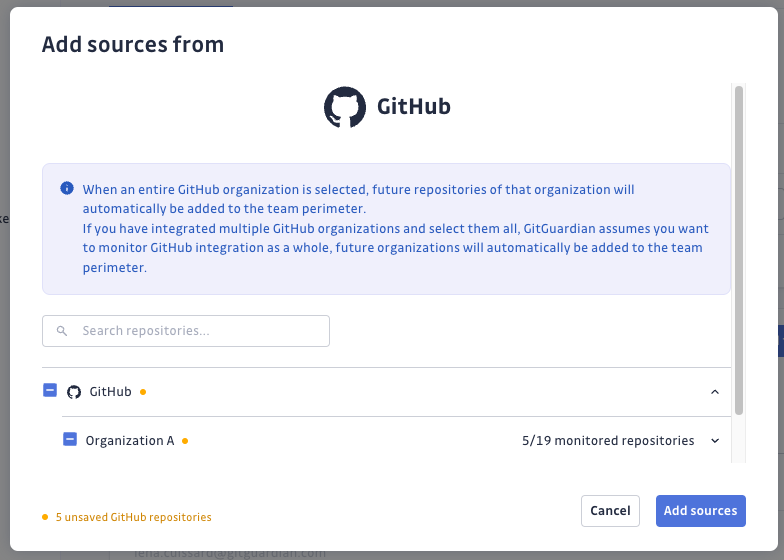
Adding sources to the perimeter
On your team page, go to the Perimeter section and click Add sources.
For Internal Monitoring access:
- Select the integration you want to add sources from.
- Choose the sources you want to add to the team perimeter and click Add sources.
- Repeat these steps to add sources from different integrations if needed.
For Public Monitoring access: (only for workspaces with access to Public Monitoring) In the Public Monitoring section, click Public GitHub.

For security reasons, configuration of the team perimeter can only be done by a workspace Manager.
Indeed, the addition of new sources to the perimeter of the team has very significant implications since it allows access to all the incidents that have occurred on these new sources. This is why only people with the highest privileges, workspace managers, can perform this action.
About source nodes addition and other important things to know
Keep these key points in mind when configuring your team perimeter:
- Selecting an entire node (e.g., a GitHub organization, GitLab group, or Bitbucket project):
- All existing sources within the node are added to the team perimeter
- Future sources within this node are automatically added to the team perimeter
- Selecting all nodes of a VCS integration (e.g., all GitHub organizations you have integrated):
- GitGuardian assumes you want to monitor the entire VCS integration
- Future nodes are automatically added to the team perimeter (e.g., future GitHub organizations you integrate)
- A source can belong to multiple teams
Removing sources from the perimeter
- On your team page, go to the Perimeter section.
- Click the bin icon and confirm your action.

For more granular control on Internal Monitoring sources, click the ![]() menu to open the configuration modal. Here you can add or remove specific sources by checking or unchecking them, then confirm your changes.
menu to open the configuration modal. Here you can add or remove specific sources by checking or unchecking them, then confirm your changes.
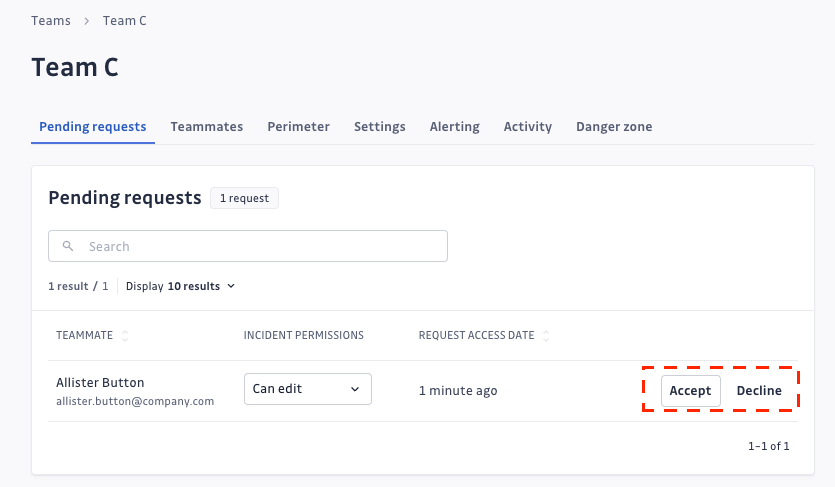
Requesting access to a team
People with the Member access level must request access to join a team. In order to request access:
- Navigate to Settings > User management > Teams.
- To the right of the team's name, click Request access.
- An email is then sent to teammates with
Can manageteam permissions notifying this new request. If there are no teammates withCan manageteam permissions, the email is sent to workspace managers.
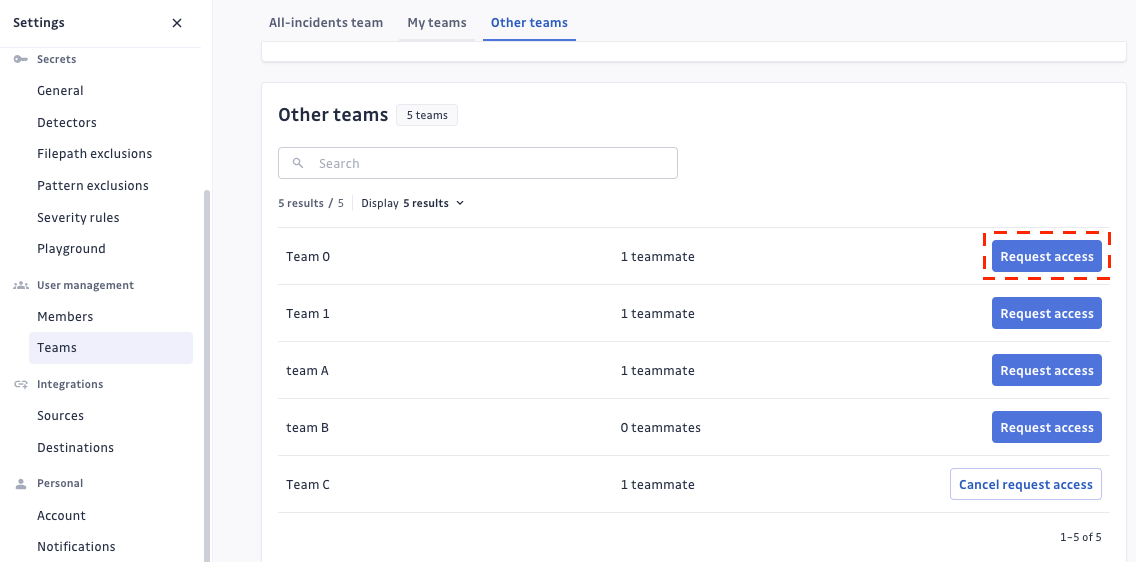
Members can cancel their own team requests at any time.
Teammates with Can manage team permissions can review team requests on the team page and decide whether to accept or decline them. The Member who made the request will be informed by email of the decision.
Workspace Managers have the ability to visit, join, accept or decline team requests, and leave any teams present on the Workspace, even if they are not part of it.
Add alerting integrations to a team
As a workspace Manager you can manage alerting integrations for any team from the Integration section.
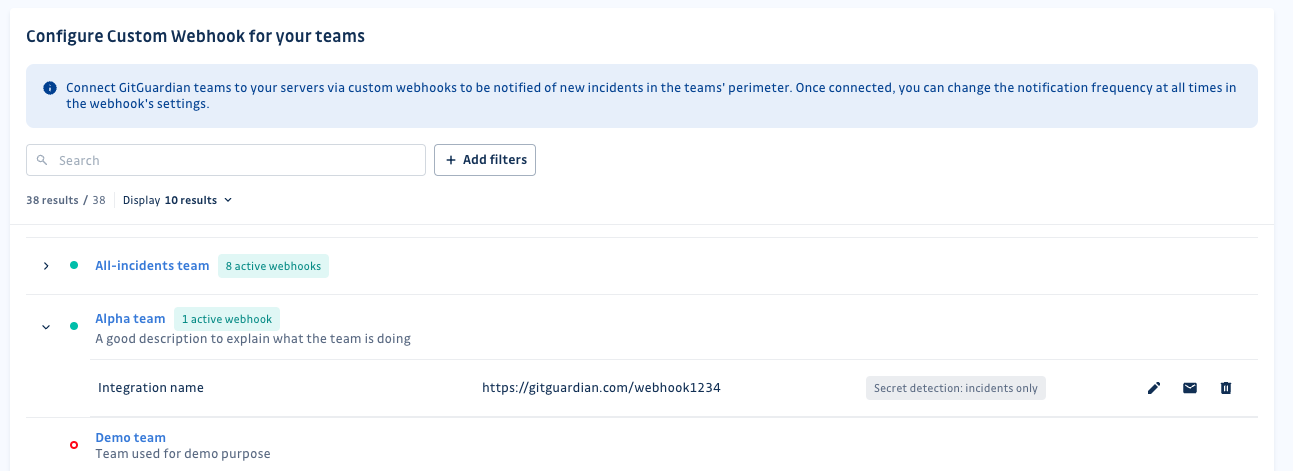
As a Member with Can manage team permissions, you can create and modify alerting integration for your specific team.

Team-level alerting enables you to send alerts directly to each team's preferred communication channel, reducing unnecessary distractions for other team members. Team members will only receive alerts for incidents that require their attention and remediation.
If an incident already exists in another team, and a new occurrence of this incident occurs in a repository attached to your team, you'll receive an alert - even if you've asked to be alerted only by new incident and not occurrences. This ensures you won't overlook any incident.
Each workspace has a default limitation of 1000 integrations for all the teams. If you need to increase this quota, please get in touch with your account manager.
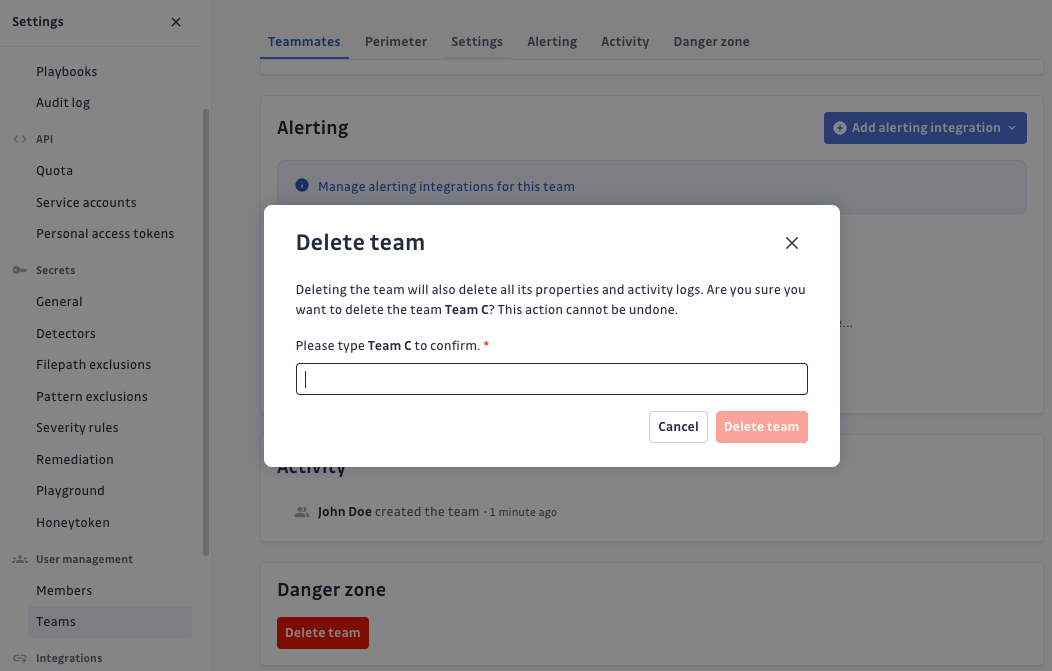
Deleting a team
As a workspace Manager or a teammate with Can manage team permission, you can delete a team.
- Navigate to Settings > User management > Teams.
- Visit the page of the team you want to delete and scroll down to the "Danger zone".
- Click Delete team and confirm your action by typing the name of the team.
This action cannot be undone. All teammates will instantly lose access to incidents they were able to access because those incidents occurred within the team perimeter.
A specific team: The "All-incidents" team
What is the "All-incidents" team
In the team management feature within a GitGuardian workspace there is a particularity: the "All-incidents" team.
The "All-incidents" team is a team that exists by default on the workspace and which gives access to all the incidents of the workspace to the people who compose it. Consequently, there is no notion of perimeter within the "All-Incidents" team.
This team will usually bring together the people responsible for security at the global level of your organization (eg: CISOs).
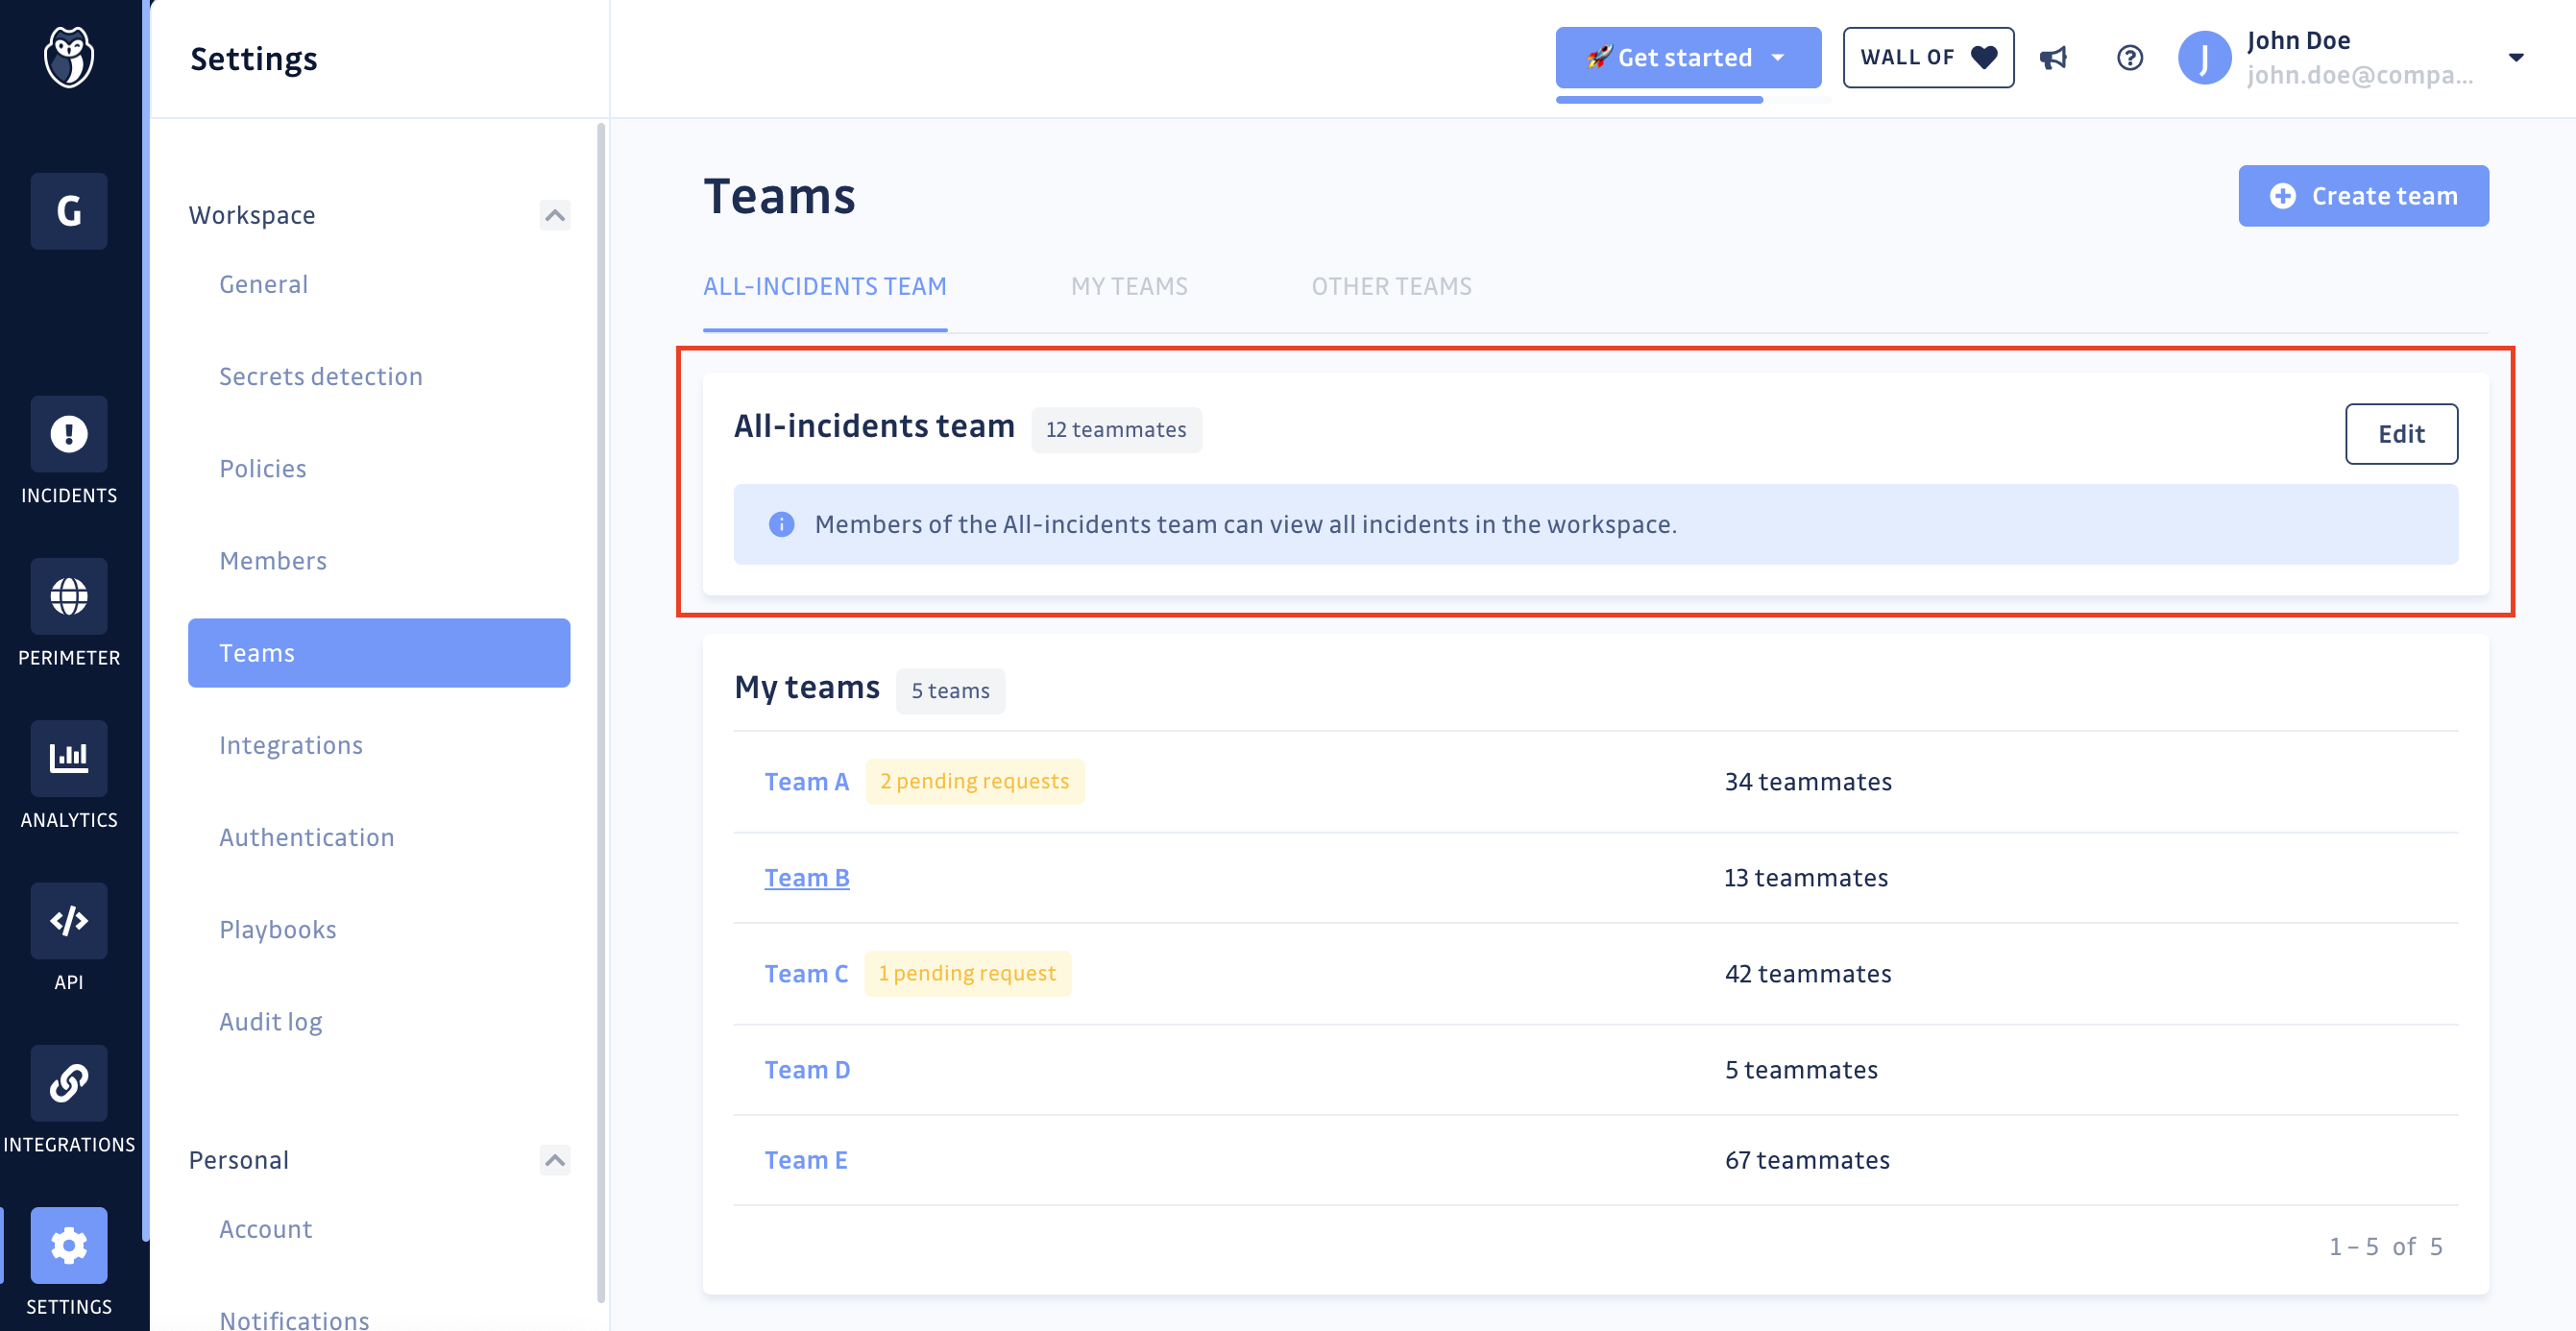
The "All-incidents" team cannot be deleted.
How the "All-incidents" team articulates in with access levels and plans
About access levels:
- By default, all Managers in your workspace are part of the "All-incidents" team and cannot be withdrawn from it.
- That said, people with the Member access level can also be part of the "All-Incidents" team (ex: security auditors).
- People with the Member access level who are not part of the "All incidents" team cannot see it in the list of teams and therefore cannot request access to it. A Member can only be part of the "All-incident" team if added manually by a Manager.
About plans:
- As the team management feature - and therefore the ability to have siloed views on incidents - is only allowed in the Business plan, any workspace under the Free plan works as if only the team "All-Incidents" was present.
- Thus, when switching from the Business plan to the Free plan (eg: end of contract or end of business trial), all people who are not part of the "All-incidents" team are considered deactivated.

