Investigate incidents
Investigation overview
Proper investigation is crucial for effective secret remediation. Understanding the full context of a secret exposure helps you make informed decisions about remediation priority and approach.
Before remediating incidents, leverage all GitGuardian context and insights for safe and effective remediation.
Risk score
Only workspaces with a Business plan can access risk score.
Each incident includes a risk score (0-100) that provides ML-powered prioritization insights, where 100 indicates the highest risk and 0 the lowest. The score is displayed prominently in the incident detail page with a detailed explanation of contributing factors.
Key features:
- Dynamic scoring that updates as incident context evolves
- Natural language explanation of main risk factors
- Feedback mechanism to help improve the feature The risk score helps you quickly assess whether an incident requires immediate attention or can be addressed through standard workflows.
→ Learn more about the Risk Score and how to use it
What GitGuardian provides for investigation
For every incident, GitGuardian will provide you with the following metadata about the secret and its occurrences:
- Type of secret (raised by the detector)
- Date (at which the occurrence of the secret was committed)
- Commit author email (involved developer)
- Repository name
- File name and extension
- Commit SHA-1 hash
- Git history presence (when possible)
- Validity (when possible - see dedicated section)
- Additional tags (e.g., Default branch, From historical scan, Publicly leaked, Vaulted, Regression, Test file, Revocable by GitGuardian, etc.)
Secret presence checks
With the presence check, it is possible to verify the presence (and thus reachability) of every occurrence of the secret in your repositories. For each incident, GitGuardian will display the dates at which each occurrence was first and last seen and if it is still present in the repository.
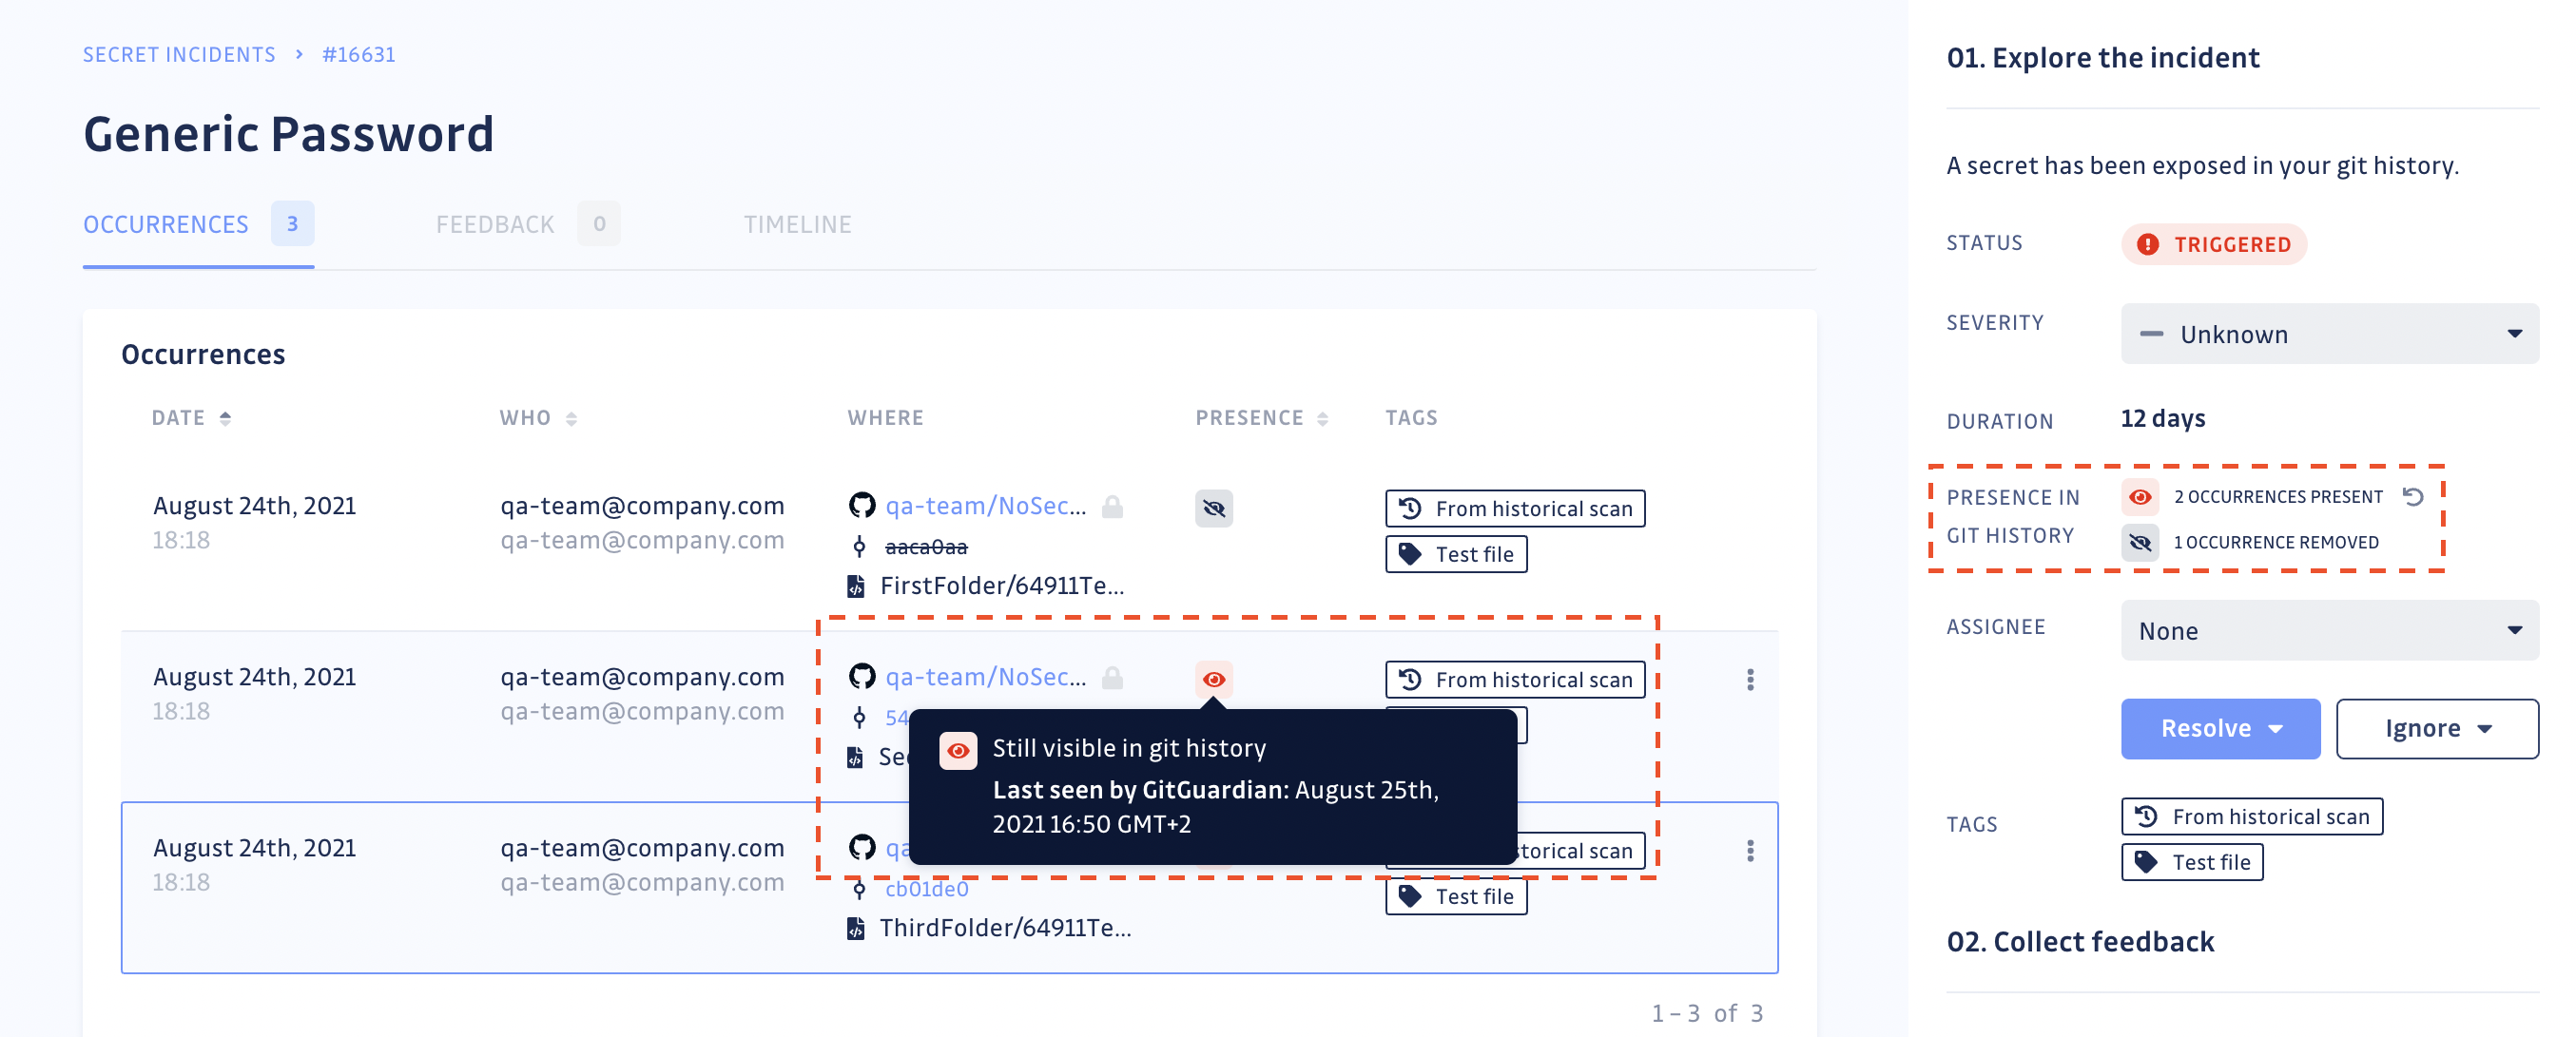
Once you have fully deleted the repository or rewritten the git history, return to your incident's page to obtain the secret's occurrence proof of deletion (see screenshot below). Once an occurrence is no longer visible in the git history, GitGuardian will stop checking for its presence.

GitGuardian will regularly check for the presence of occurrences, to the best of its ability and considering existing VCS API rate limits, to mirror the state of your git repository. You can also manually run the presence check should you need to force update the status of the occurrences of an incident.
The frequency of these automated checks depends on your plan and the status and age of secret incidents:
| Plan | Incident status | Incident age | Frequency |
|---|---|---|---|
| Business | Open | Less than a year old | Daily |
| Free | Open | Less than a year old | Weekly |
| Business | Open | More than a year old | Weekly |
| Free | Open | More than a year old | Monthly |
| Business | Ignored | Less than a year old | Half-yearly |
| Free | Ignored | Less than a year old | Never |
| Business | Ignored | More than a year old | Never |
| Free | Ignored | More than a year old | Never |
| Business | Resolved | Less than a year old | Monthly |
| Free | Resolved | Less than a year old | Half-yearly |
| Business | Resolved | More than a year old | Half-yearly |
| Free | Resolved | More than a year old | Never |
If you host GitGuardian on-premise, you can change these frequencies in your admin area.
⚠️ Presence checks and orphan commits
When you delete a repository, all its commits are permanently deleted. However, using
git push --forceto remove a specific commit in a repository does not permanently delete it. It becomes an orphan commit, still existing but no longer referenced by any branch. It's impossible to see orphan commits in a pull request or in an existing branch unless you have access to the unique id (sha) of the commit. GitGuardian considers a secret's occurrence in an orphan commit as present. VCSs provide garbage collection, completely emptying the bin of orphan commits. In the case of:
- GitHub, contacting the support to run the garbage collection is necessary
- GitLab, the frequency of garbage collection is decided by the VCS admin
When you decide to unmonitor a repository, GitGuardian consequently loses access to that repository, which in turn prompts the presence check to lose its ability to update values with regards to its corresponding occurrences. GitGuardian will display an icon to indicate that the repository is no longer monitored.
For incidents containing occurrences related to more than one repository, the presence check will continue to work for the rest of the occurrences linked to the monitored sources until the last monitored source gets removed from the perimeter.
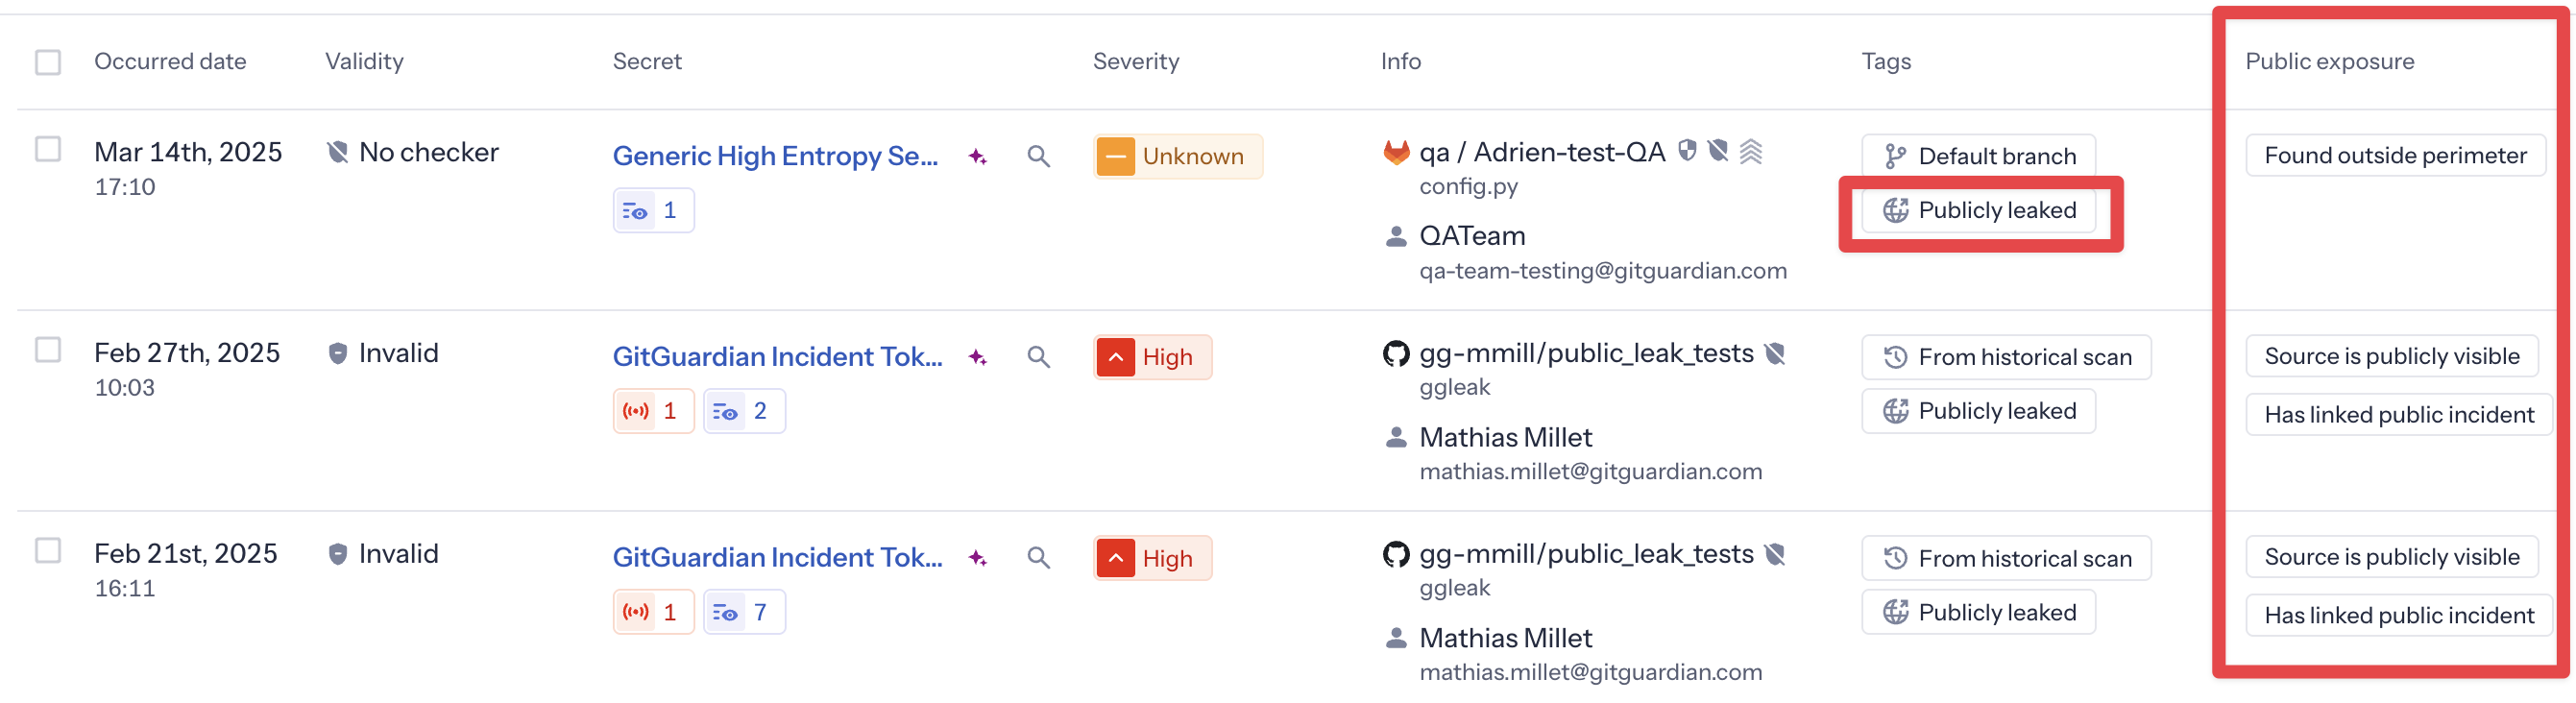
Public exposure information
When a secret has been found in public locations, GitGuardian marks it with the Publicly leaked tag and provides detailed exposure information. Understanding the nature and scope of public exposure is important for effective remediation.
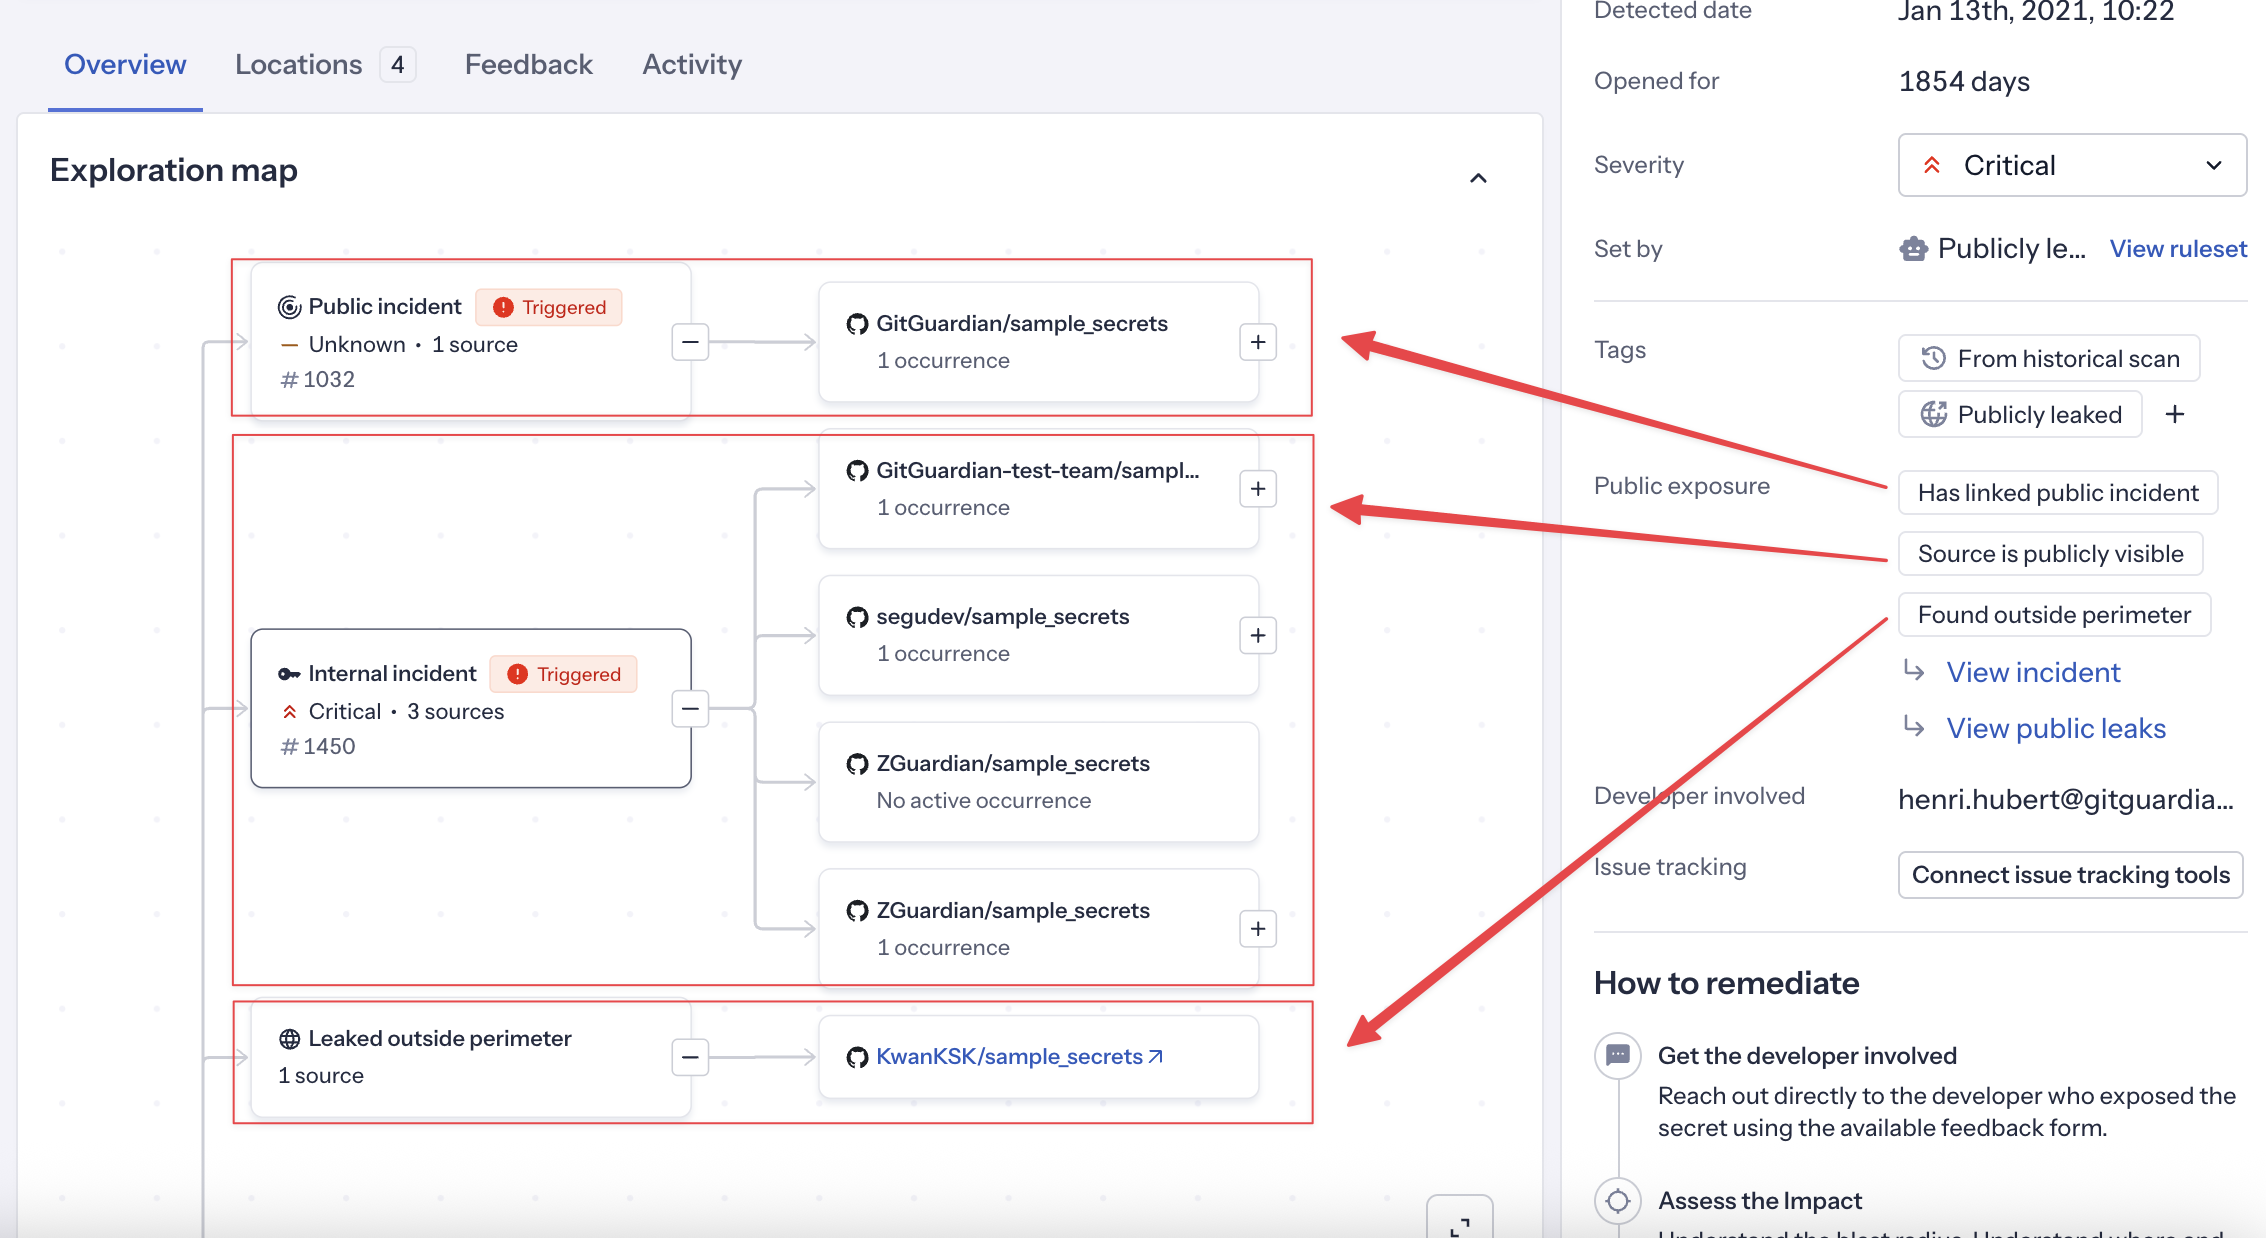
Public exposure types
GitGuardian categorizes public exposure into three types:
Source is publicly visible
This exposure type indicates that the incident has at least one occurrence in a monitored source that is publicly visible.
What this means:
- The secret was committed to a source that your organization integrated with GitGuardian Internal Monitoring
- That source is publicly visible
Has linked public incident
The same secret also appears in one or more public incidents detected by GitGuardian Public Monitoring.
What this means: The secret has been found in your company's public perimeter (monitored developer activity or public repositories tracked by Public Monitoring)
All SaaS customers can see this exposure type; full details (linked incidents) require Public Monitoring subscription. In Public Monitoring, these incidents show the reciprocal Internally leaked tag
Found outside perimeter
The secret has been found in public locations completely outside your company's monitored perimeter.
What this means:
- GitGuardian's HMSL (Has My Secret Leaked) capability detected the secret in public GitHub
- The secret appears in repositories or locations not owned or monitored by your organization
- This may indicate the secret was copied, shared, or leaked by external parties
Information provided:
For each place where the secret was found (up to 10), GitGuardian provides:
- The type of place (GitHub repository)
- A link to the original source
Automated check frequency:
GitGuardian regularly checks for new occurrences outside your perimeter. The frequency depends on your plan, incident status, and secret validity:
| Plan | Incident status | Secret validity | Incident age | Frequency |
|---|---|---|---|---|
| Business | Opened | Not invalid | Less than a year old | Daily |
| Business | Opened | Not invalid | More than a year old | Weekly |
| Business | Resolved | Not invalid | Any | Monthly |
| Business | Ignored | Not invalid | Any | Never |
| Business | Opened | Invalid | Any | Never |
| Business | Resolved | Invalid | Any | Never |
| Business | Ignored | Invalid | Any | Never |
The "Found outside perimeter" check is not supported for multi-match secrets. Secrets detected outside your perimeter in more than 10 places are considered false positives (e.g., standard test credentials) and will not show this exposure type.
You may encounter two fields, secret_hash and hmsl_hash, when working with secret incidents, for instance.
- The
secret_hashfield is an internal identifier for each detected secret. - The
hmsl_hashis associated with GitGuardian's Has My Secret Leaked service. GitGuardian uses the HMSL hashing algorithm to compare your secret—securely and privately—with secrets previously found on public GitHub. This allows GitGuardian to check if your secret has appeared publicly, without exposing the actual secret value. The same hash algorithm is also used with ggscout to identify vaulted secrets.
Working with public exposure
Use the default saved view "Public exposure" to focus on incidents that have been publicly exposed. This view shows only publicly leaked open incidents and includes the "Public exposure" column for quick visibility.
You can also filter by the Publicly leaked tag or by specific exposure types, and add the Public exposure column to any custom view.
Details for each exposure type are displayed in the side panel of the incident detail page.
For self-hosted installations, only the Source publicly visible exposure type is available. The Public incident linked and Outside perimeter exposure types are not available at all on self-hosted, as they require GitGuardian's Public Monitoring infrastructure.
Secret Manager integration insights
Understanding your secret management landscape is crucial for effective remediation planning. GitGuardian's integration with Secret Managers through ggscout provides valuable context during investigation.
Vaulted secrets identification
When investigating incidents, GitGuardian can identify if the exposed secret is already stored in one of your connected Secret Managers:
- Vaulted tag: Incidents are automatically tagged when the secret is found in your Secret Manager.
- Storage location: See which Secret Manager contains the secret and its path.
This information helps you:
- Increase confidence the incident is a true positive, when the associated secret is vaulted. This is particularly useful when GitGuardian cannot assess the validity of the secret.
- Determine whether applications are using both hardcoded and vaulted versions.
- Understand what which steps should be considered for the remediation.
Push-to-vault readiness assessment
During investigation, evaluate if the secret is ready for Secret Manager integration:
- Application architecture: Can the affected applications retrieve secrets from your Secrets Managers?
- Access patterns: How frequently is the secret accessed and by which services?
- Environment considerations: Are there different secrets needed for dev/staging/prod?
These questions should help you identify where the secrets should be moved to, in which secret manager instance and in which location?
Secret Manager workflow implications
Your investigation should consider how Secret Manager integration affects remediation:
- Existing infrastructure: What Secret Manager setup is already in place?
- Access controls: Who has permissions to manage secrets in your Secret Manager?
- Rotation capabilities: Does your Secret Manager support automatic rotation for this secret type?
- Deployment dependencies: How will applications be updated to use the Secret Manager?
Learn more about Secret Manager integrations
ML-powered similar incident grouping
ML-Powered Similar Incident Grouping is currently only available for incidents detected from Version Control Systems (VCS) sources. Non-VCS sources (such as messaging, ticketing, or documentation integrations) are not yet supported.
ML-Powered Similar Incident Grouping is available for Business and Enterprise plans.
GitGuardian's ML-powered similar incident grouping helps you identify and manage related incidents more efficiently by automatically detecting incidents that share similar characteristics and context.
How it works
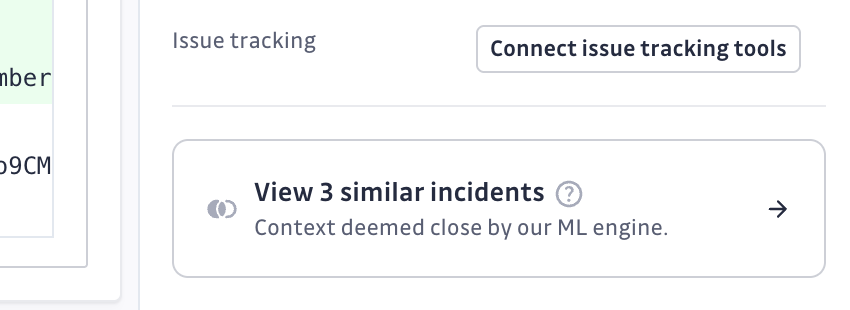
When viewing an incident detail page, you'll see a Similar Incidents section in the sidebar that displays incidents with similar patterns detected by our machine learning algorithms. This feature analyzes the code context in the patch to identify meaningful relationships between incidents.
Common grouping scenarios
The ML algorithm identifies various types of similar incidents:
- Rotating tokens in automated files: Same file continuously leaking different tokens through automation
- QA test credentials: Test keys (Slack bots, Postman API keys) appearing across similar contexts
- Database connection strings: Multiple connection strings to the same environment with different credentials
- Repeated false positives: High-entropy strings in logs or test scripts that are likely system-generated
- Templating code leaks: Multiple developers using shared tutorials or templates with similar leaked secrets
- Known noisy patterns: Consistent false positives from specific file types or internal services
Using similar incidents for investigation
- From incident details: View similar incidents in the sidebar and click on "View X similar incidents" to see them in the main incidents list
- Filter by similarity: In the search box, use
similar_toto show only incidents similar to a specific incident - Sort by similarity count: Use the "Similar incidents" column to sort incidents by highest or lowest number of similar incidents
This feature is particularly useful for:
- Identifying false positives: Spot patterns that indicate false positive incidents
- Consistent remediation: Apply the same remediation approach to incidents that require similar fixes
- Understanding incident patterns: Discover recurring issues in your codebase
Once you've identified similar incidents, you can use bulk actions to resolve, assign, or tag them together efficiently.
The similar incident grouping uses machine learning models that are continuously improved based on user feedback. If you notice incidents with unexpected groupings, we encourage you to share feedback directly through the dashboard — your input helps us refine the grouping model.
Next steps: moving to remediation
Once you've completed your investigation and understand the context of the secret exposure, you're ready to begin remediation. Your investigation should have helped you determine:
- What the secret accesses - Which systems, services, or resources
- Privilege level - Administrative, read-only, or limited scope access
- Dependencies - What applications or services rely on this secret
- Exposure timeline - When the secret was first exposed and for how long
- Public visibility - Whether the secret is exposed publicly
Choose your remediation approach
Based on your investigation findings:
- For most internal incidents: Follow a real-time or historical workflow depending on when the secret was detected
- For high-risk secrets needing immediate action: Use the emergency response scenario
- For complex multi-team scenarios: Consider the bulk remediation approach
- For new detections with available developers: Use the real-time incident workflow
Ready to start remediation?
- Remediation Overview - Understand GitGuardian's remediation philosophy and approach
- Remediation Scenarios - Comprehensive workflows for different situations
- Platform Features - GitGuardian tools for collaboration and automation
Remember: The time spent on thorough investigation will save you time and reduce risk during remediation. Don't rush into remediation without understanding the full impact.

