Integrate GitHub
Protect your source code by monitoring GitHub repositories for exposed secrets in commits, branches, and pull requests.
Why Monitor GitHub?
Developers frequently commit API keys, database credentials, and private tokens directly into GitHub repositories. These hardcoded secrets become accessible to anyone with repository access and remain permanently stored in git history, creating lasting security vulnerabilities that can compromise your entire infrastructure.
Capabilities
| Feature | Support | Details |
|---|---|---|
| Historical Scanning | ✅ (Supported) | Complete repository history analysis |
| Real-time Detection | ✅ (Supported) | Instant detection via webhooks |
| Monitored Perimeter | ✅ (Supported) | Granular monitoring of your Orgs and repos |
| Team Perimeter | ✅ (Supported) | Team-based access control |
| Presence Check | ✅ (Supported) | Verify if secrets are still accessible |
| File Attachments | ❌ (Not Supported) | Not applicable for code repositories |
What we scan:
- Source code files, configuration files, and raw text files
- All repository branches and commit history
Setup your GitHub integration
Prerequisites:
- Owner or Manager account on your GitGuardian Dashboard
- GitHub organization admin or repository owner permissions
GitGuardian integrates natively with GitHub via a GitHub app that you can install on your personal GitHub repositories and on the repositories of your GitHub organizations. You can refer to the GitHub documentation for more information on GitHub apps.
Scan for incidents with the GitGuardian GitHub app
The GitGuardian GitHub app has only read access to your code.
Optionally, it is possible to grant GitGuardian write access to benefit from specific business features. See dedicated section for more detail.
You will need Owner or Manager rights in GitGuardian to set up an integration or customize your settings.
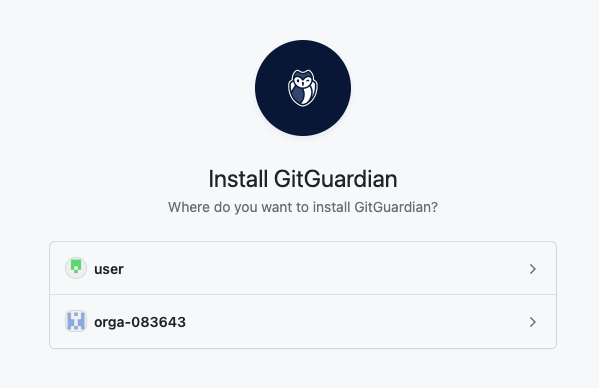
You can install GitGuardian on:
- your personal GitHub account to monitor your personal repositories,
- a GitHub organization that you own.
- Navigate to Settings > Integrations > Sources.
- Click on Install for GitHub.
- Click on Install to start the GitHub app installation process (you will then be redirected to GitHub).
- Authenticate on GitHub if you are not already logged in.
- Choose where to install the GitHub app (either for your personal GitHub account or for the GitHub organization of which you are an admin)
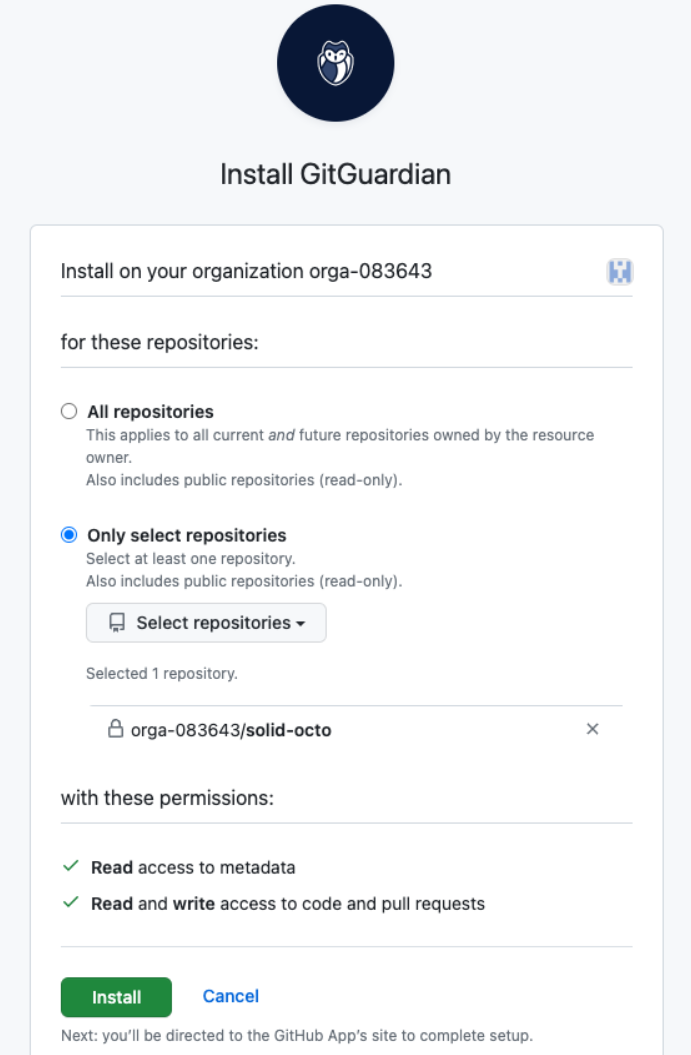
- Choose your preferred installation mode: All repositories or Only select repositories.
- All repositories: GitGuardian will be installed on all existing repositories.
New repositories will be integrated to GitGuardian automatically.
- Only select repositories: GitGuardian will only be installed on the repositories you select.
New repositories will not automatically be integrated with GitGuardian - the installation process will need to be run again in order to integrate new repositories.
We recommend choosing All repositories since you can then manually deselect these via the GitGuardian dashboard.
- All repositories: GitGuardian will be installed on all existing repositories.
New repositories will be integrated to GitGuardian automatically.
- Follow the prompts and your chosen GitHub repositories will be added to your workspace.

If you attempt to install GitGuardian on a GitHub organization where you are only a member, and not the owner, GitHub will prompt you to use a "Request installation" flow.
We highly recommend inviting the owner to your GitGuardian workspace to perform the integration, thus attaching the GitHub organization to your workspace.
Grant code write permissions with the GitGuardian:write GitHub app
Some business features require write permissions to your repositories in order to open pull requests.
Currently, this concerns the Honeytoken Deployment jobs feature.
Granting write permissions to GitGuardian is done through the installation of a second GitHub app “GitGuardian:write”.
- Navigate to GitHub settings section where your integration is already configured with the main app.
- Click on Manage sources > Configure write permissions.
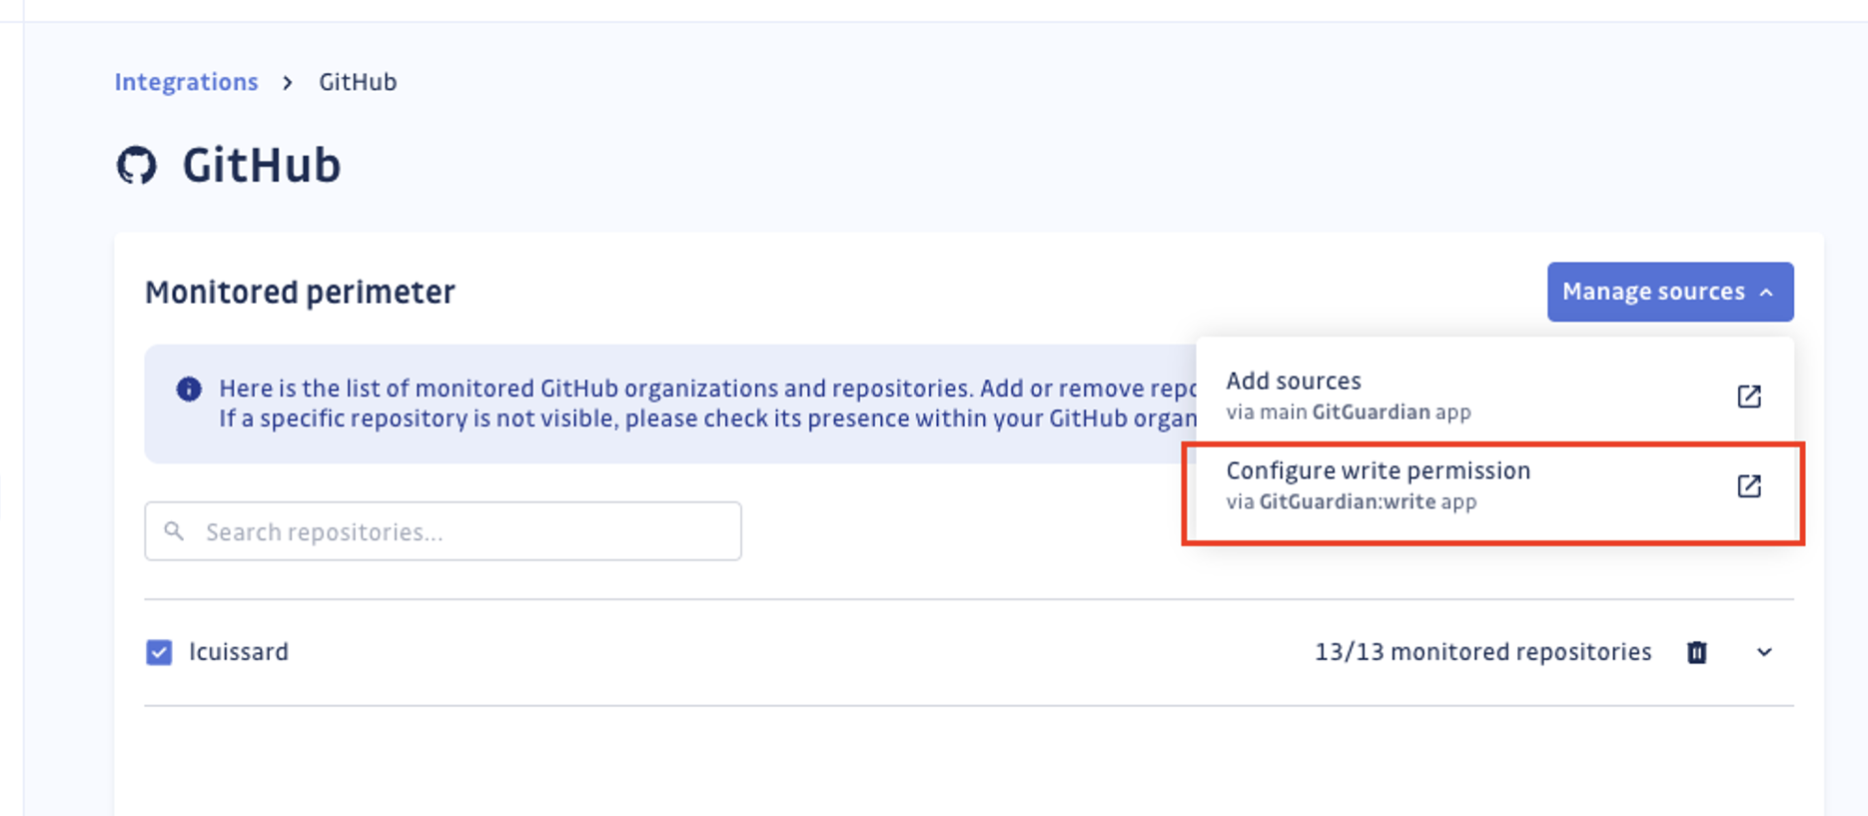
- Choose on which organization you want to install the GitHub app, then choose your preferred installation mode (all organization or selected repositories). Note that you must install it on repositories where the main GitHub is already installed if you want to see them in the GitGuardian dashboard.
Integration with GitGuardian Self-Hosted
We recommend using dedicated workers for this integration. For more detailed information on scaling and configuration, please visit our scaling page.
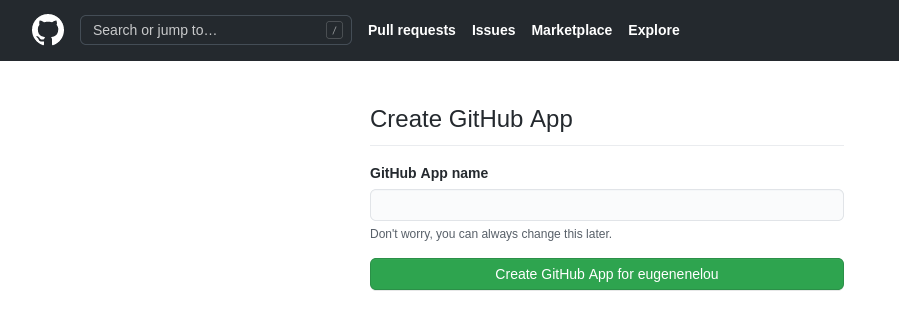
If you are using a self-hosted GitGuardian instance, you must first create a dedicated GitHub App so that you own the entire data stream. GitGuardian handles it for you programmatically via GitHub manifest. This will ensure that your GitHub App is created with all the appropriate rights.
By default, the GitGuardian GitHub app has only read access to your code.
Optionally, it is possible to grant GitGuardian write access to benefit from specific business features (more detail in this dedicated section).
You will need Owner or Manager rights in GitGuardian to set up an integration or customize your settings.
- Navigate to Settings > Integrations > Sources.
- Click on Configure for GitHub.
- Click on Install to start the GitHub app creation and installation process.
- Choose a name and validate the GitHub App creation.
- Once the GitHub app is created, you can now follow the SAAS installation steps from step 5 above and choose the GitHub organizations to integrate with GitGuardian.
The GitHub App belongs to the user who created it. We recommend that you transfer the ownership to an organization in case the user is later deactivated.
IMPORTANT: GitGuardian cannot monitor repositories whose owner has not installed the GitHub App. If the repo is owned by a GitHub organization, the owner of the organization must install the GitHub App.
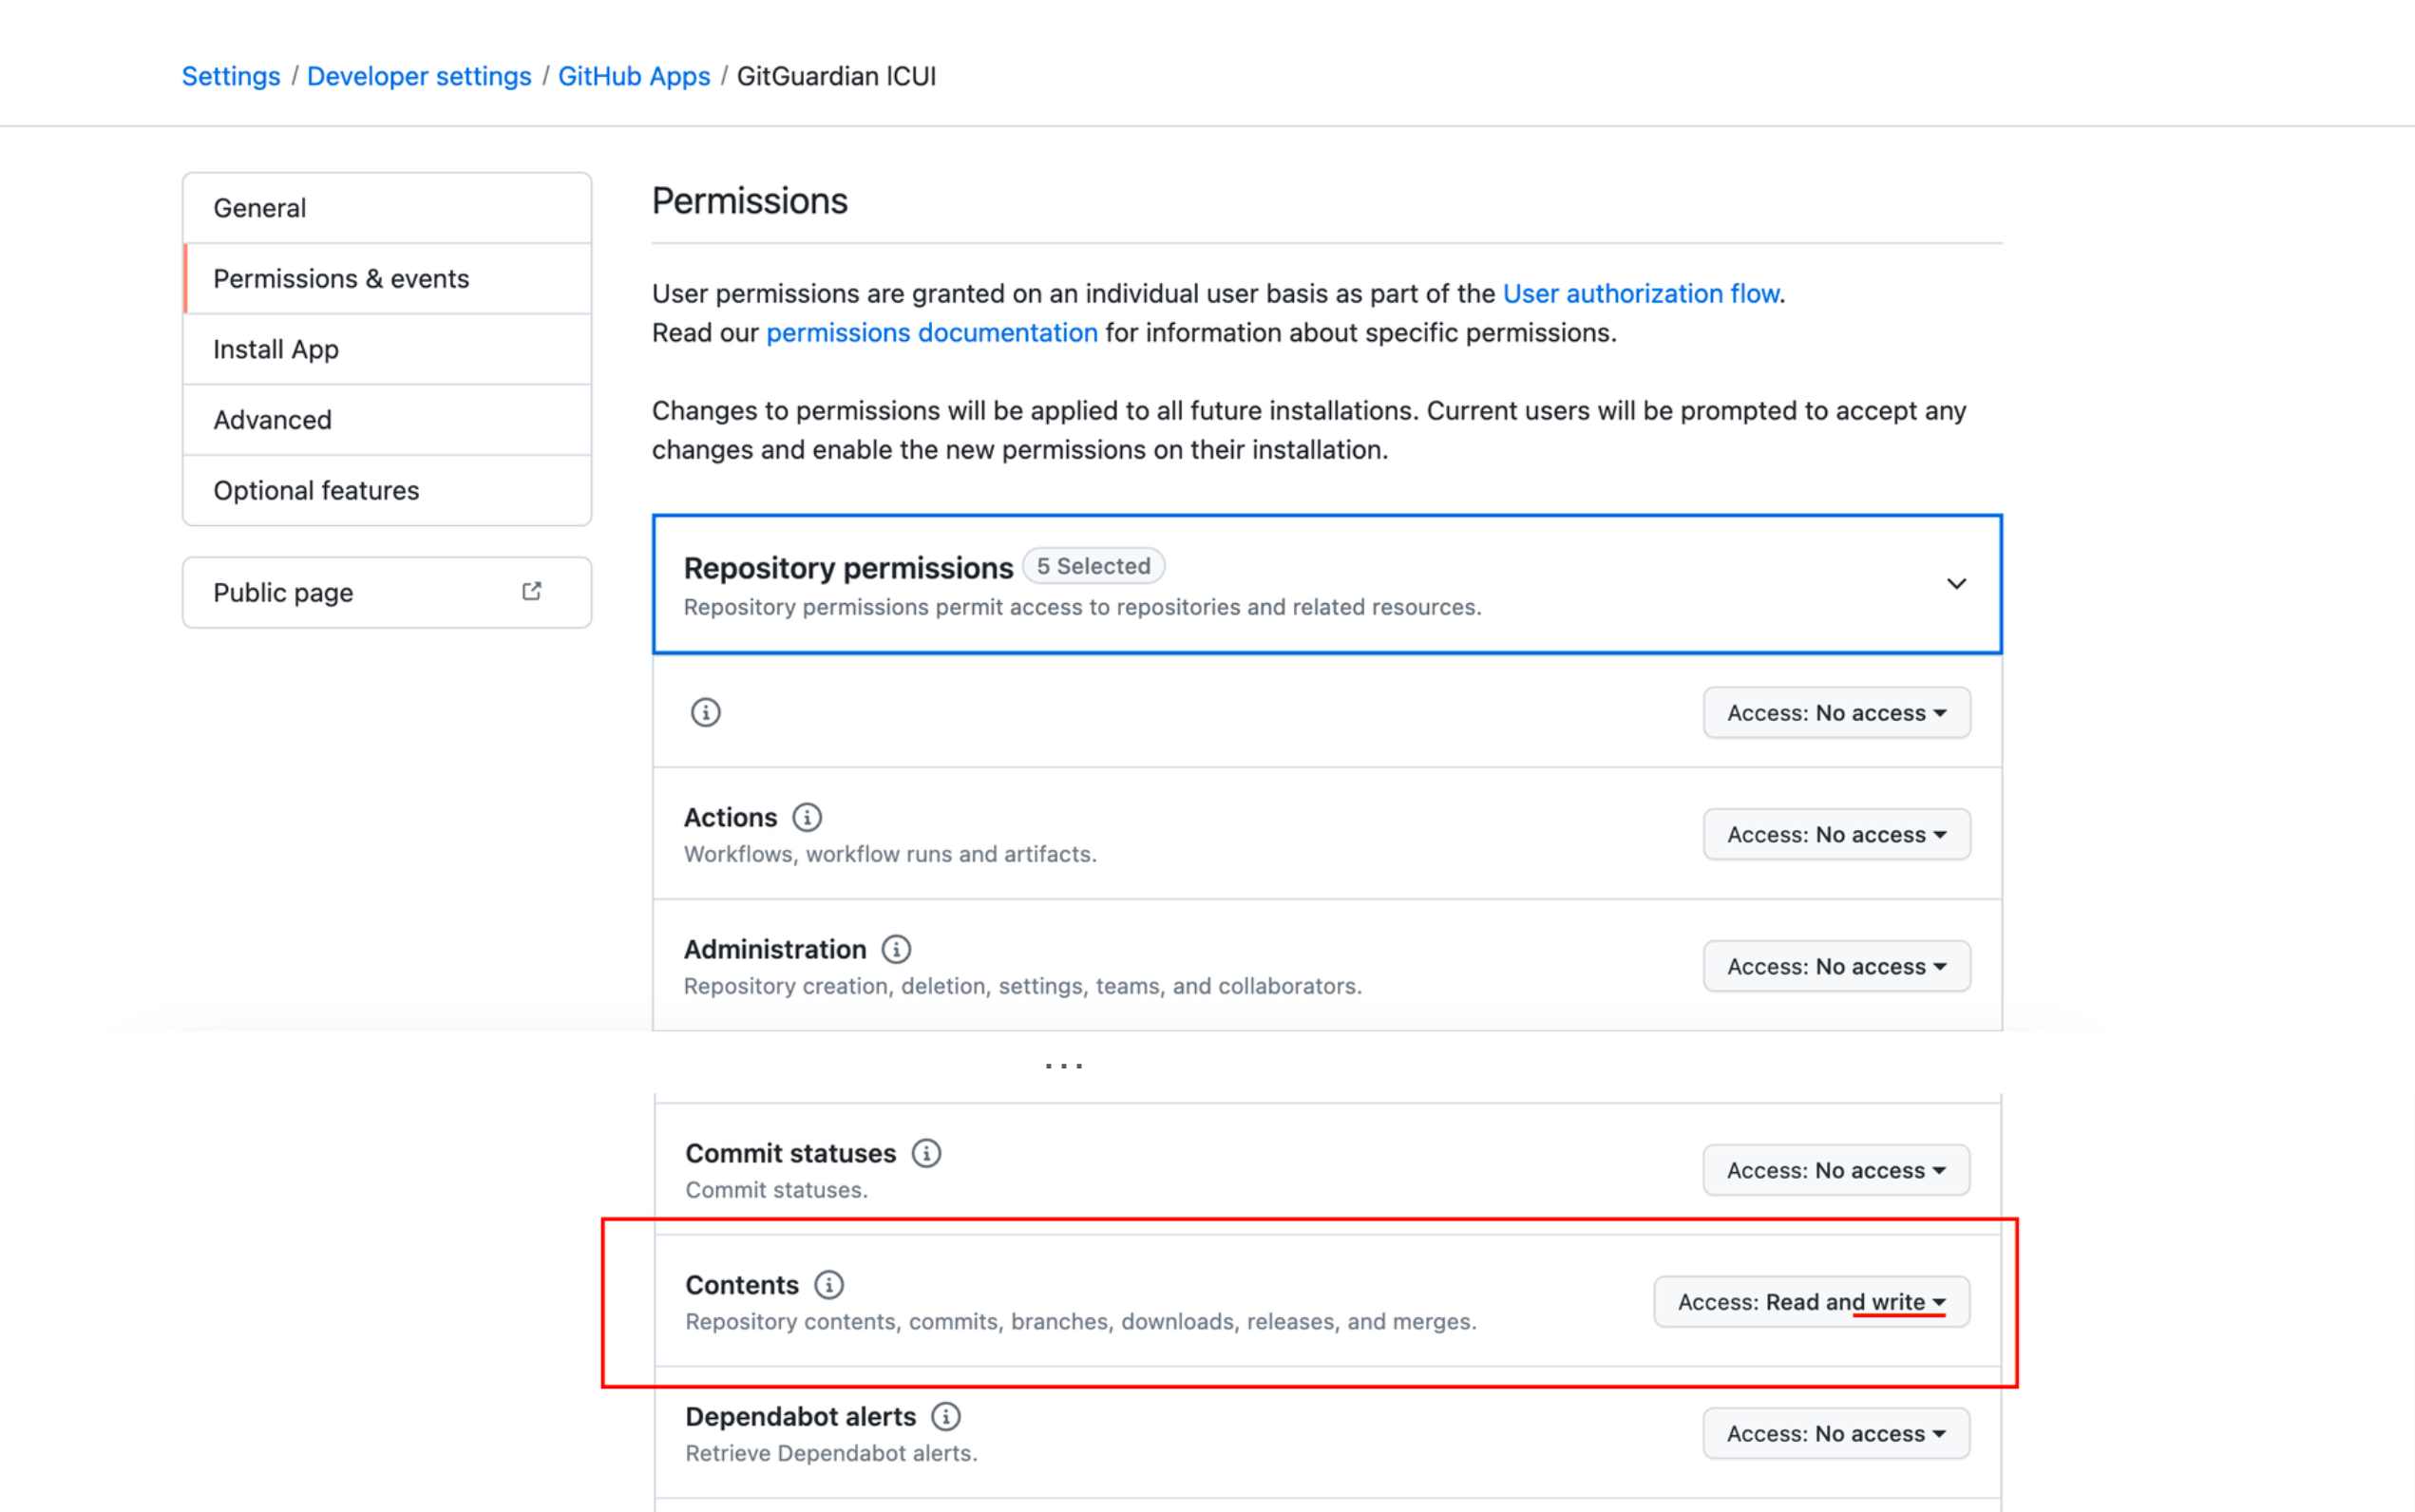
Grant GitGuardian code write permissions
Some business features require write permissions to your repositories in order to open pull requests.
Currently, this concerns the Honeytoken Deployment jobs feature.
To allow GitGuardian to open pull requests on the repositories of your instance, go to the app settings page in GitHub, in the tab "Permissions & events". Under the "Repository permissions" section, change permissions on Contents to "Read and write":
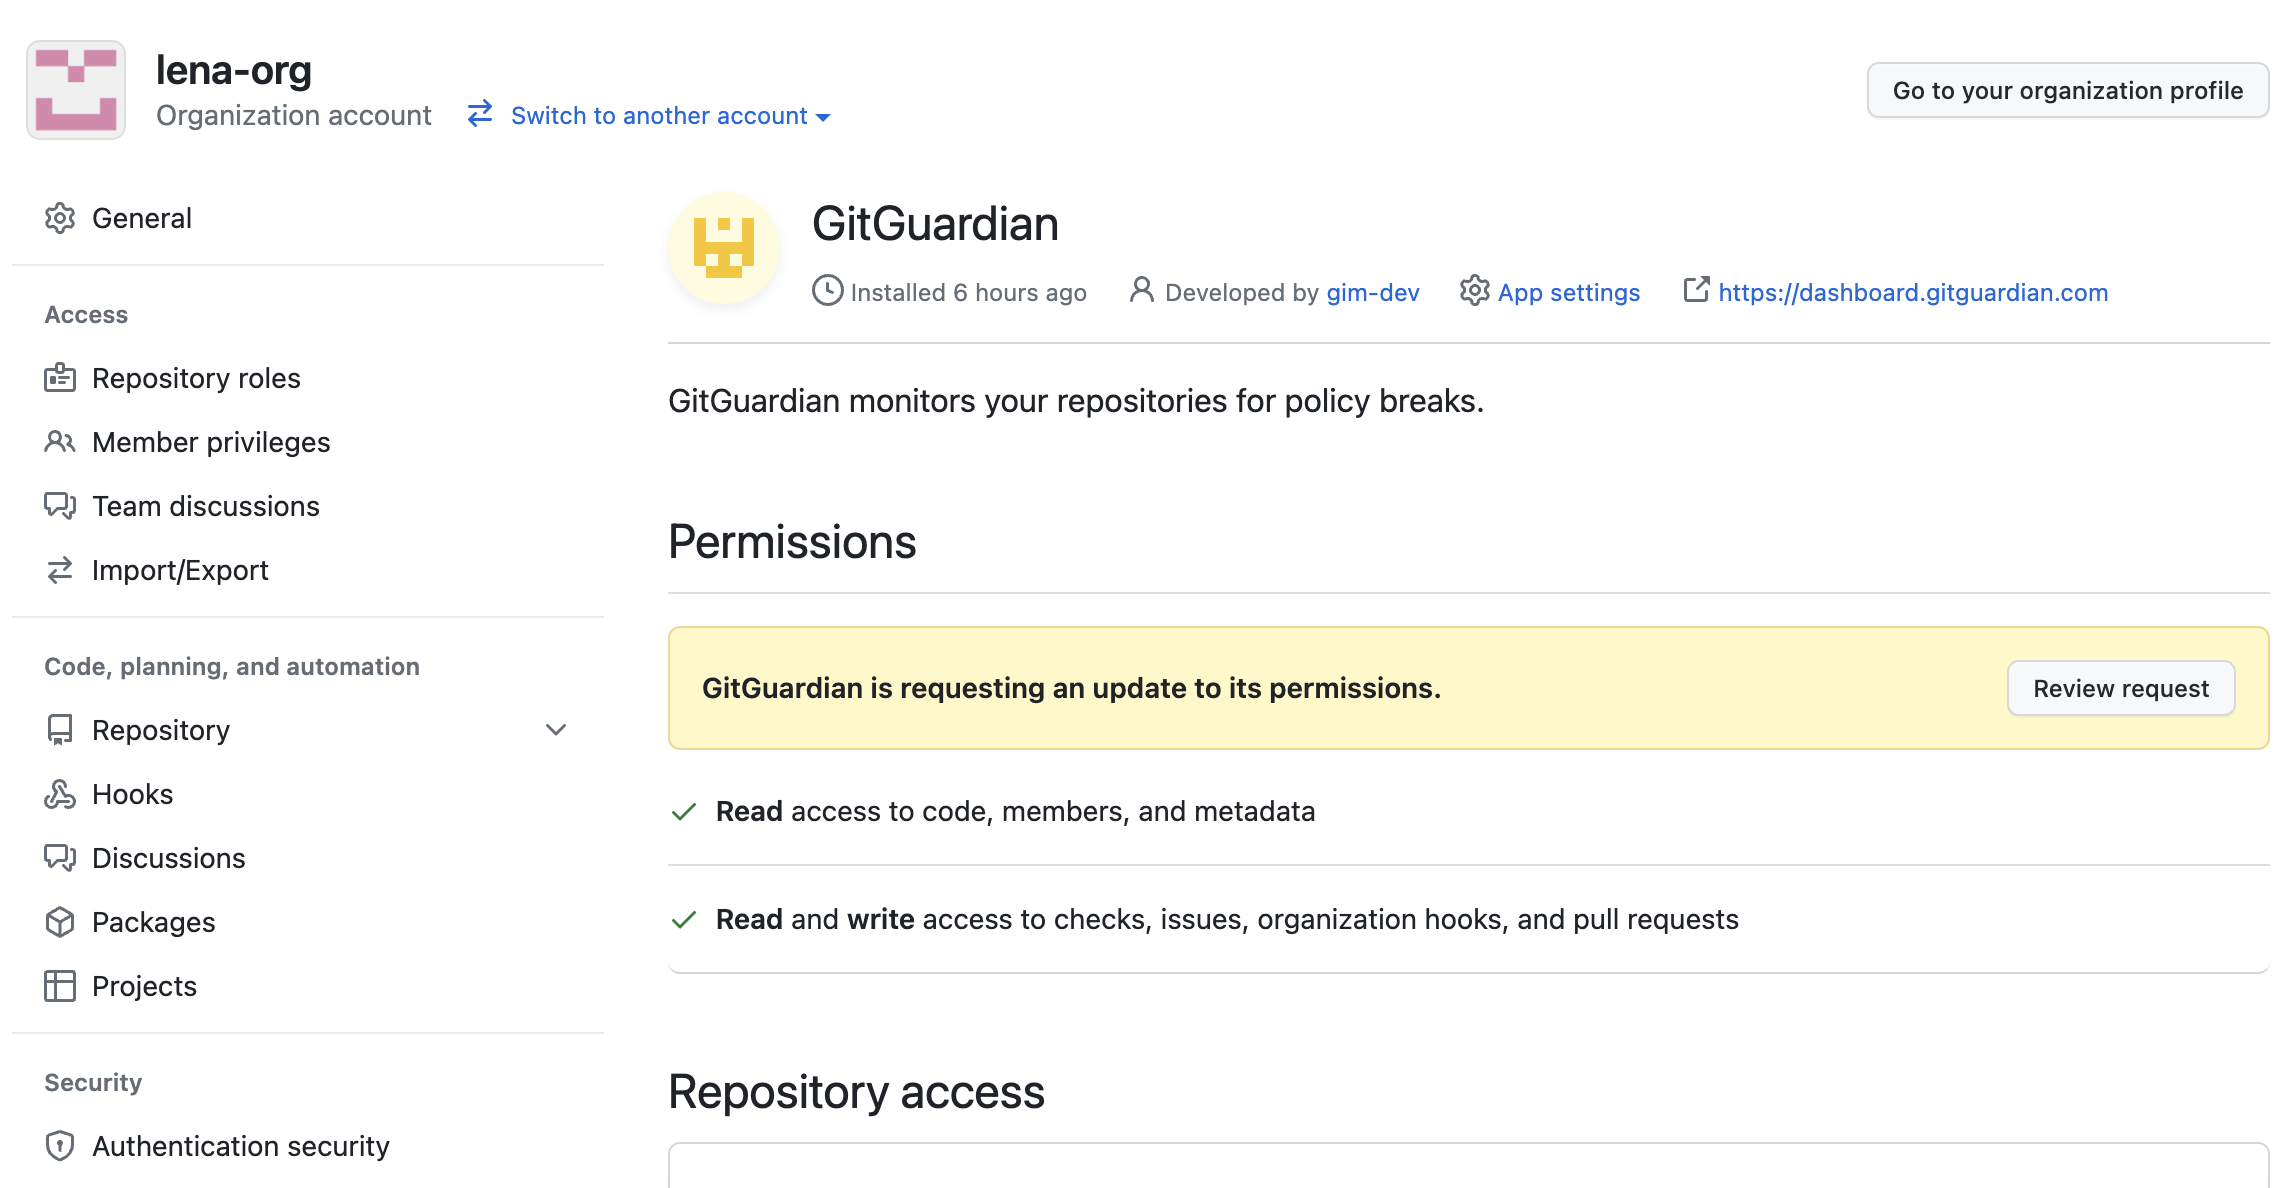
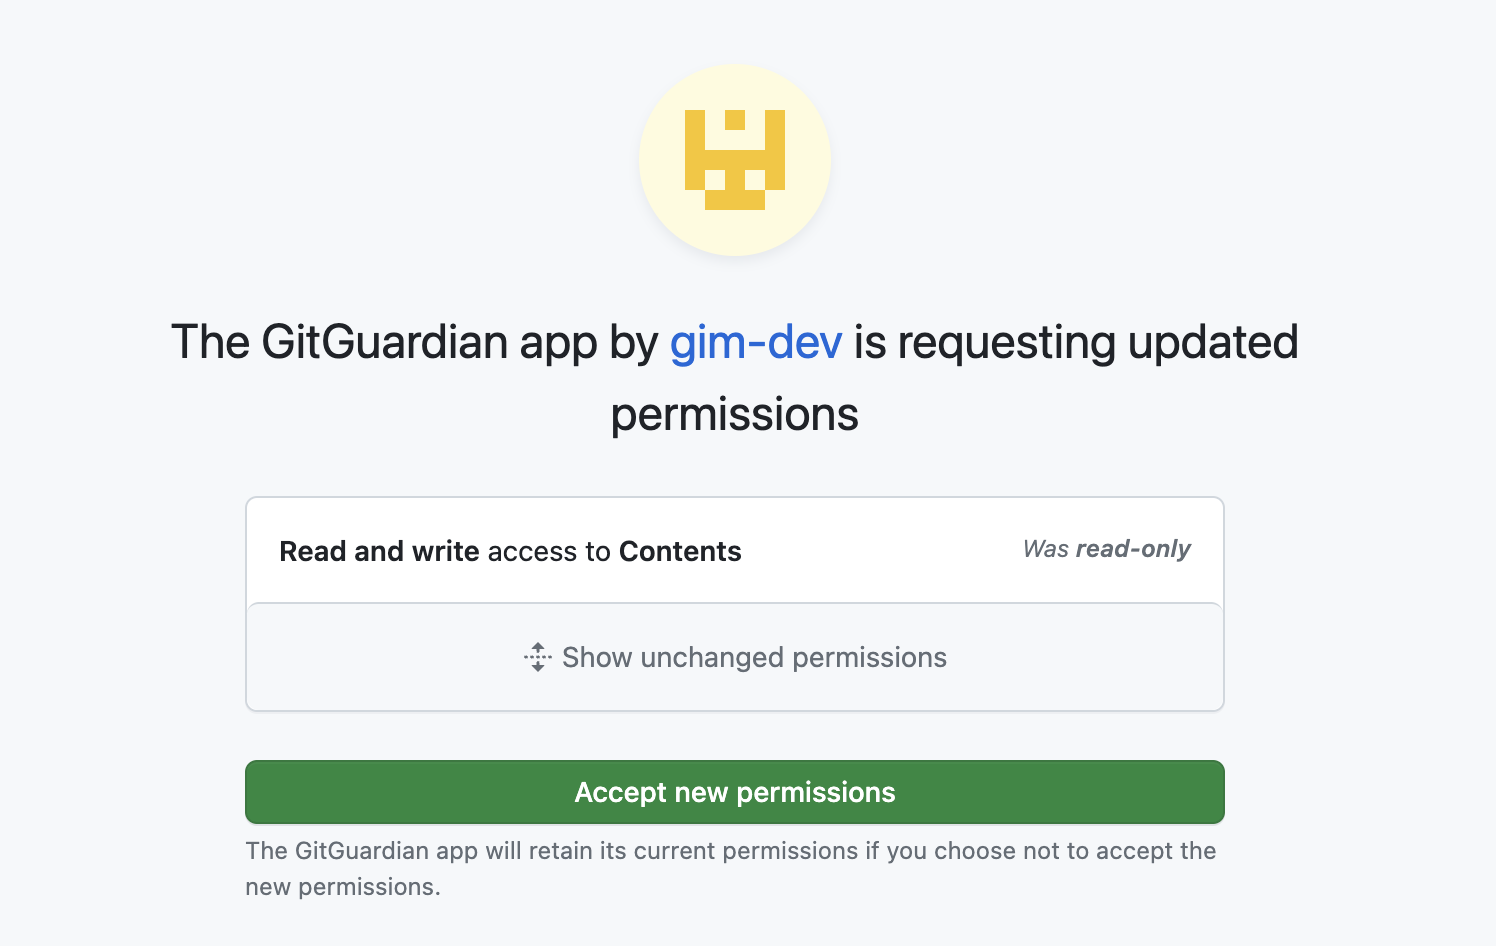
This change then needs to be propagated to the organizations where this app is installed, by accepting the permission update request:
Adding new repositories
You can add new organizations or repositories by clicking on add another on either the list of integrations page or the GitHub integration page.
You can also re-configure a previously installed personal GitHub account / GitHub organization and change the installation mode to All repositories or Only select repositories.
Automatic historical scan
By default, GitGuardian performs a historical scan for each newly created GitHub repository added to your perimeter.
You can deactivate this behavior in your GitHub settings if you are a Manager of the workspace.

Automatic repository monitoring
By default, GitGuardian automatically monitors repositories added to your perimeter.
You can deactivate this behavior in your GitHub settings if you are a Manager of the workspace.
Understanding scanning capabilities
Historical scanning
Uncover your secret debt: When you first integrate this source, GitGuardian performs a comprehensive scan of your entire content history, based on your customized perimeter. This reveals secrets that may have been exposed weeks, months, or even years ago - helping you address your existing security debt.
How to trigger a historical scan: Go to your perimeter page, select the sources you want to scan, and click Scan in the bulk actions bar. See Manage your monitored perimeter for plan-based size limits, error handling, and full details.
Real-time scanning
Catch new exposures instantly: Once integrated, GitGuardian continuously monitors your content through event-based detection. Any new or modified content containing secrets are detected immediately, allowing you to respond quickly to new exposures.
Customize your monitored perimeter
Once you have set up your GitHub integration, you can configure which repositories to monitor in the GitHub settings section of your workspace.
If you unselect a repository from your monitored perimeter:
- GitGuardian will no longer fetch the content of its commits, and therefore alerts won't be raised for this repository.
- The GitGuardian GitHub app will remain installed on this repository, therefore you can easily turn the monitoring back on.

