Integrate GitLab
Protect your source code by monitoring GitLab repositories for exposed secrets in commits, merge requests, and project files.
Why Monitor GitLab?
GitLab repositories serve as the backbone of modern DevOps workflows, making them prime targets for secret exposure. When developers commit credentials, API tokens, or configuration secrets, they create permanent vulnerabilities in git history that can be exploited by anyone gaining repository access, potentially compromising entire development and production environments.
Capabilities
| Feature | Support | Details |
|---|---|---|
| Historical Scanning | ✅ (Supported) | Complete repository history analysis |
| Real-time Detection | ✅ (Supported) | Instant detection via webhooks |
| Monitored Perimeter | ✅ (Supported) | Granular monitoring of your Orgs and repos |
| Team Perimeter | ✅ (Supported) | Team-based access control |
| Presence Check | ✅ (Supported) | Verify if secrets are still accessible |
| File Attachments | ❌ (Not Supported) | Not applicable for code repositories |
What we scan:
- Source code files, configuration files, and raw text files
- All repository branches and commit history
Setup
Prerequisites:
- Owner or Manager account on your GitGuardian Dashboard
- For system hooks integration: GitLab admin permissions, or a non-admin token
- For group hooks integration: group owner permissions
- Personal access token with appropriate scopes
- Network connectivity between GitGuardian and your self-hosted services. Check out GitGuardian Bridge to enable secure connections between GitGuardian SaaS and your self-hosted services in private networks.
If your instance enforces API rate limits, the default values may be too low and can slow down GitGuardian's scanning. To scan in a reasonable time, raise the limits or exempt the account, token, or service account that GitGuardian uses from rate limiting. See Rate limits on self-hosted sources.
GitGuardian integrates with GitLab in two ways: instance-level with system hooks or group-level with group hooks. Please refer to the GitLab documentation for more information on system hooks and group hooks.
Create a Personal Access Token
We highly recommend that you use a bot user in order to generate personal access tokens.
As mentioned above, only personal access tokens are currently supported. Other types of tokens (like group access tokens) are not supported.
- Navigate to your GitLab user settings
- Go to Access Tokens section
- Create a personal access token with a simple name such as "GitGuardian" and
apiscope.
The personal token enables GitGuardian to create webhooks through your GitLab permissions.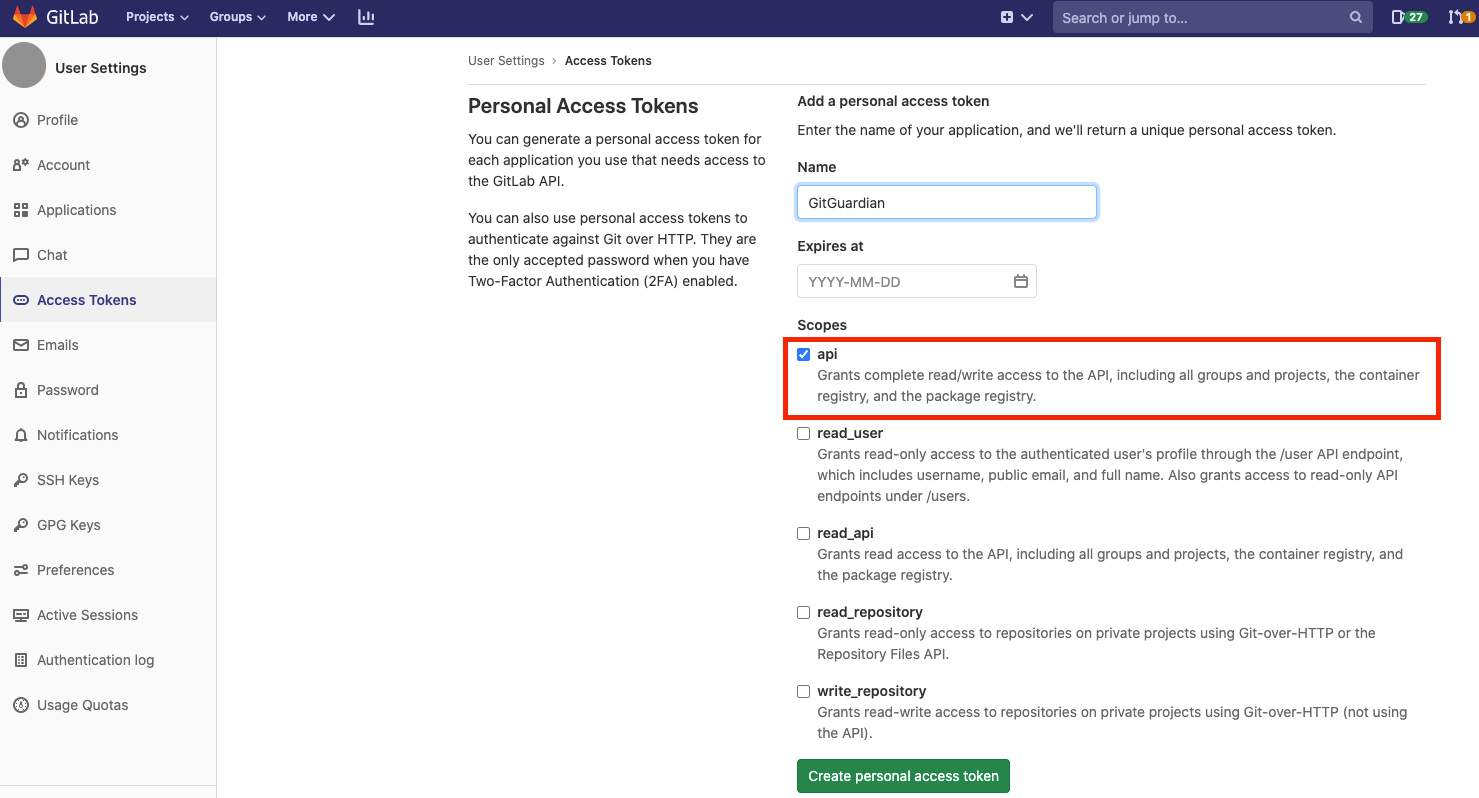
Please refer to the GitLab documentation for more information about personal access tokens.
It's also possible to use a personal access token with the read_api scope. In this case, a hook URL and a secret token will be displayed once you submit the form. Use this hook URL and secret token to add a new system hook on your GitLab instance (or with Admin API). Once this is done, your GitLab integration will be functional.
If "Admin mode" is enabled on your GitLab instance, you'll need the admin_mode scope in addition to the api or read_api scope.
Integrate your GitLab instance with system hooks
System hooks can only be created by an Administrator of the instance, they provide access to projects belonging to all users and groups. The system hook integration is only available for the on-premise version of GitLab (such an integration is not possible on GitLab.com).
We recommend that you leverage a bot user when integrating with GitGuardian.
Requirements
- Self-managed GitLab: GitLab Community Edition or any plan of GitLab Enterprise Edition. v11.0+
- GitLab.com (SaaS): IMPORTANT GitGuardian cannot integrate with GitLab.com (SaaS) via System hooks.
Guidelines
- Navigate to Settings > Integrations > Sources.
- Click on Configure for GitLab.
- Click on Start for the system hook option: "Monitor the entire GitLab instance"
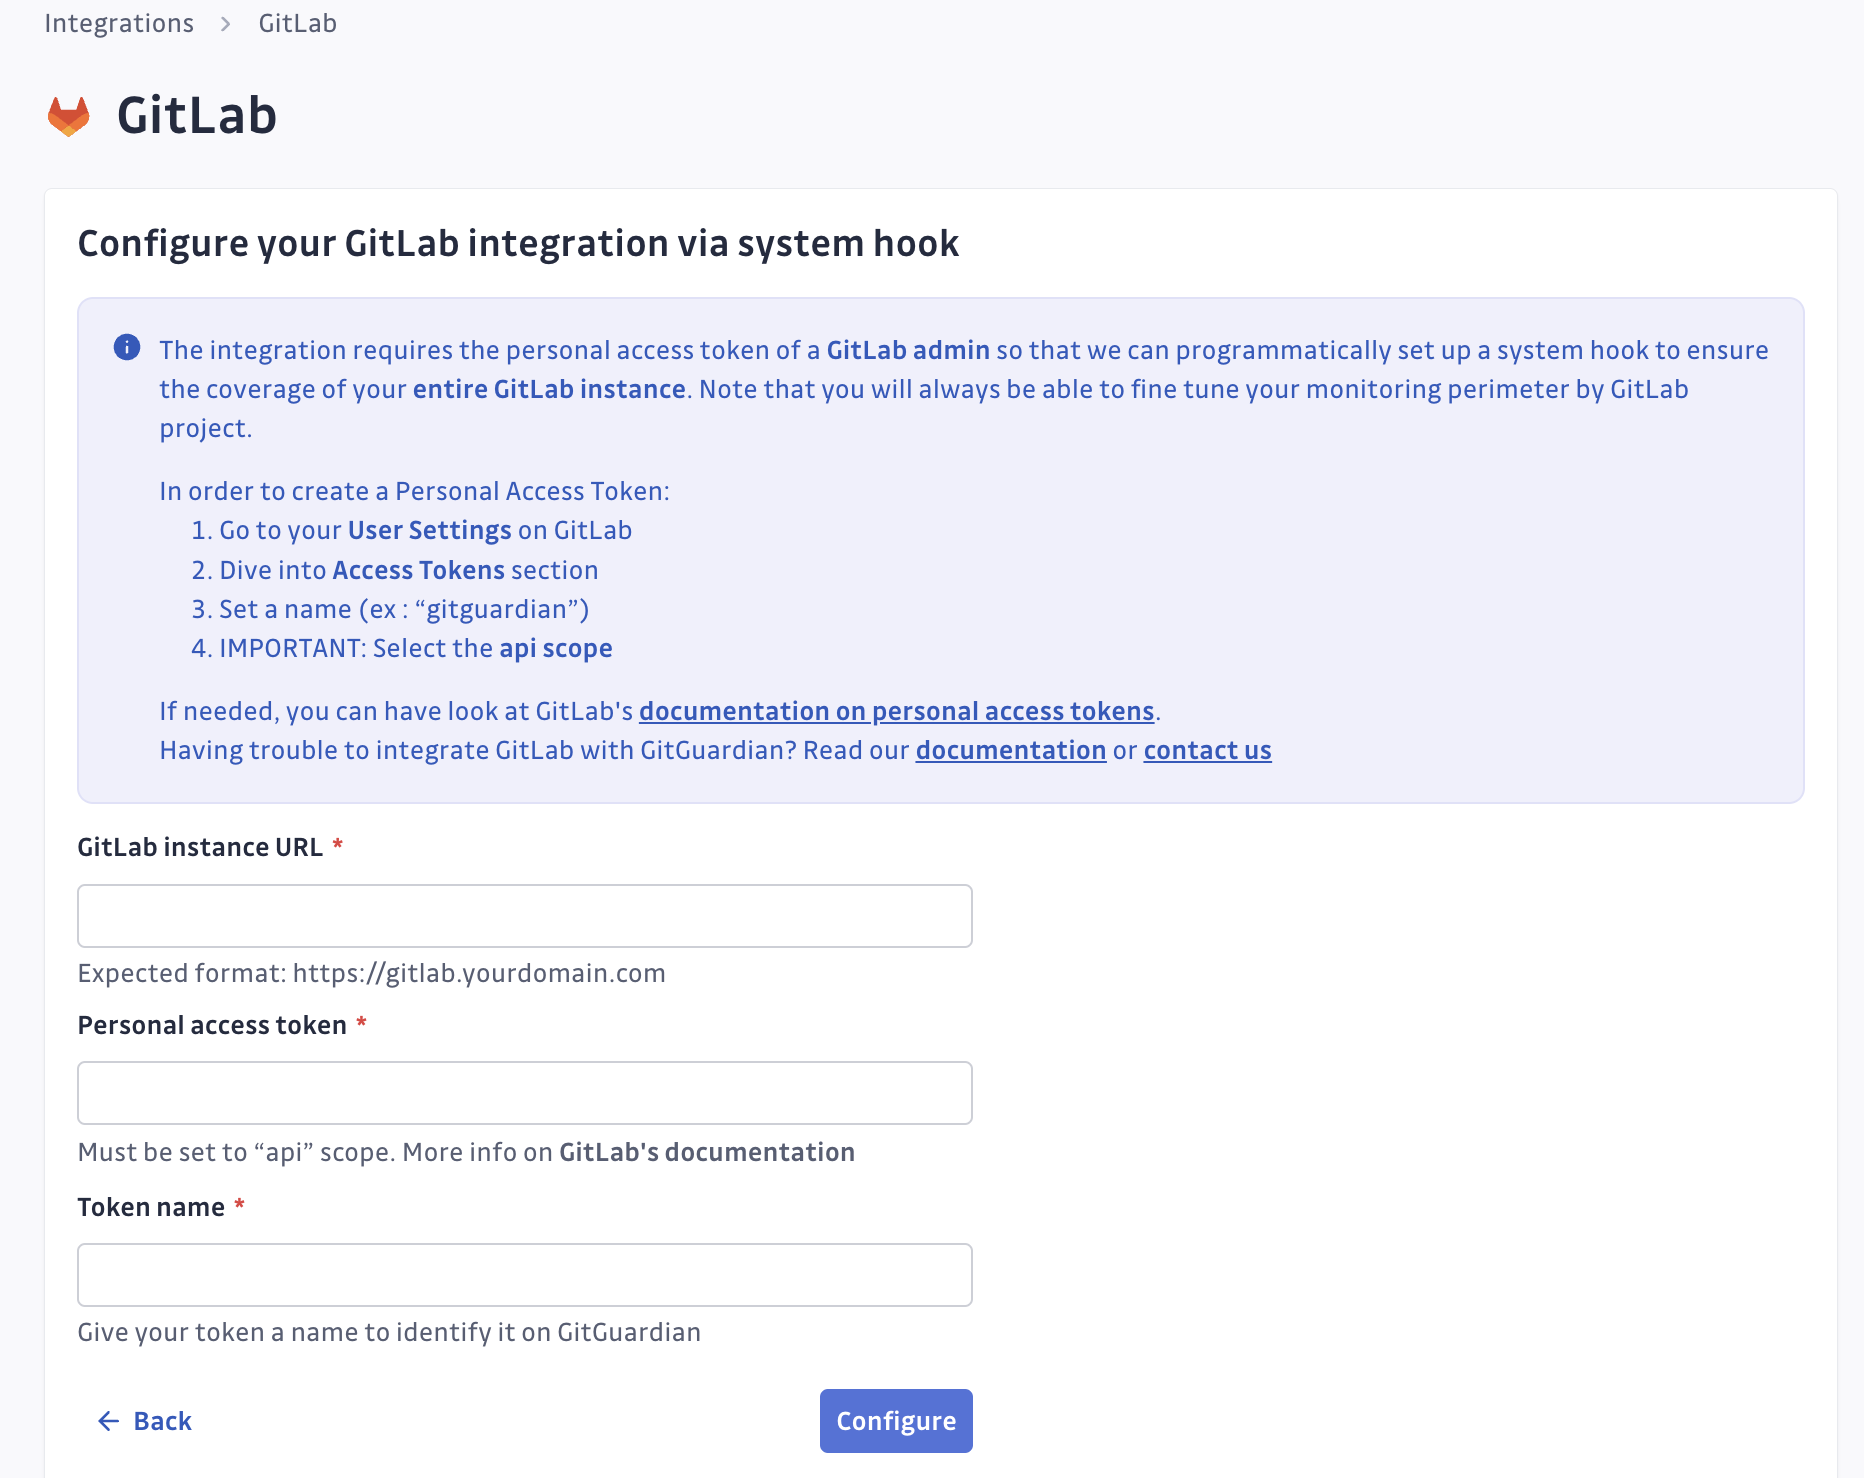
- Submit your GitLab instance url and the personal access token created.
 caution
GitLab instance URL must be prefixed with
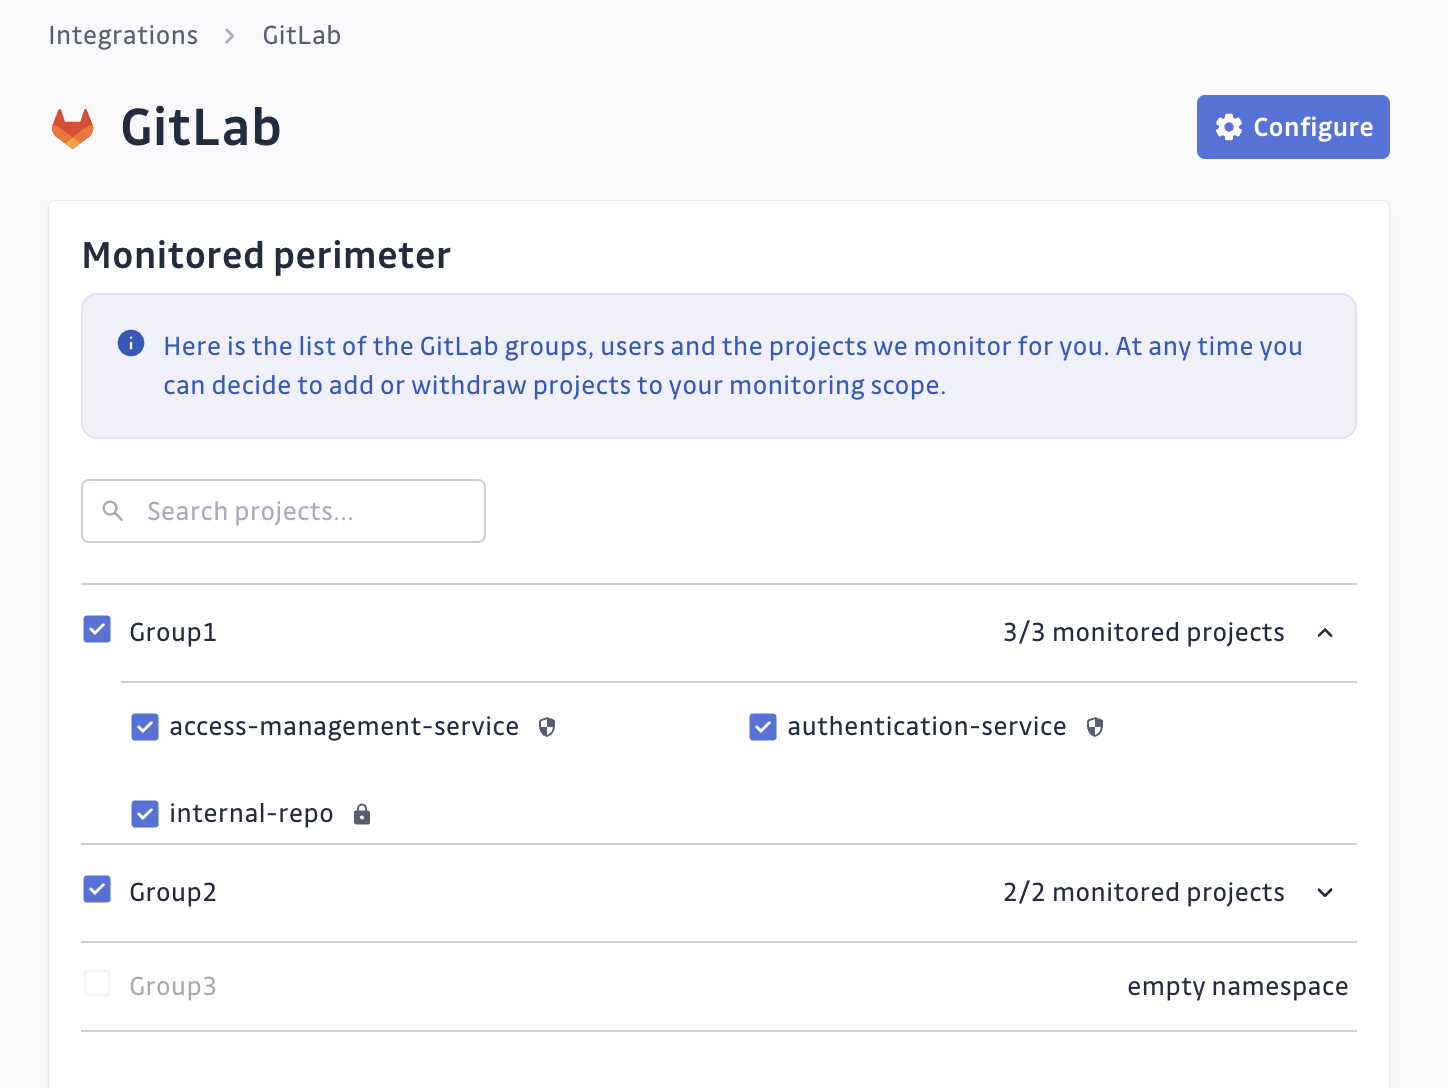
https://, instances without a secure connection won't be monitored. - GitGuardian will instantly start monitoring your GitLab instance. You can see the projects and groups monitored in
your GitLab settings page by clicking on See my GitLab perimeter:
Monitor an instance with a non-admin token (system hooks integration)
System hook integration with a non-admin token is not enabled by default. If your security policy forbids an admin token, contact GitGuardian support to activate this option for your workspace.
In this mode, the token GitGuardian uses is a regular user token, granted access project by project. The system hook itself will be created manually by an instance administrator:
- Create the personal access token on a bot user with the
read_apiscope. - Give that user at least the Reporter role on each project or group to monitor. Membership on a group also covers its subgroups.
- Submit your GitLab instance URL and this token in the system hook form, then use the hook URL and the secret token displayed to create the system hook on your instance.
GitGuardian refreshes the perimeter every three hours and monitors every project the token can read: projects in the groups the user belongs to and in their subgroups, projects in a group the user reaches through a project membership alone, and projects in a personal namespace.
GitLab accepts no member on a personal namespace, so give the user access to the personal project itself. GitGuardian then monitors it like any other project.
Events subscription details
Our system hook will subscribe to the following events:
Repository update eventsPush eventsMerge request events
and SSL verification will be enabled.
Troubleshooting
- GitGuardian automatically detects if the system hook is deleted from GitLab side or if the Personal access token becomes invalid (by expiring or being revoked). We will send an email to notify you. All of your existing data will remain accessible.
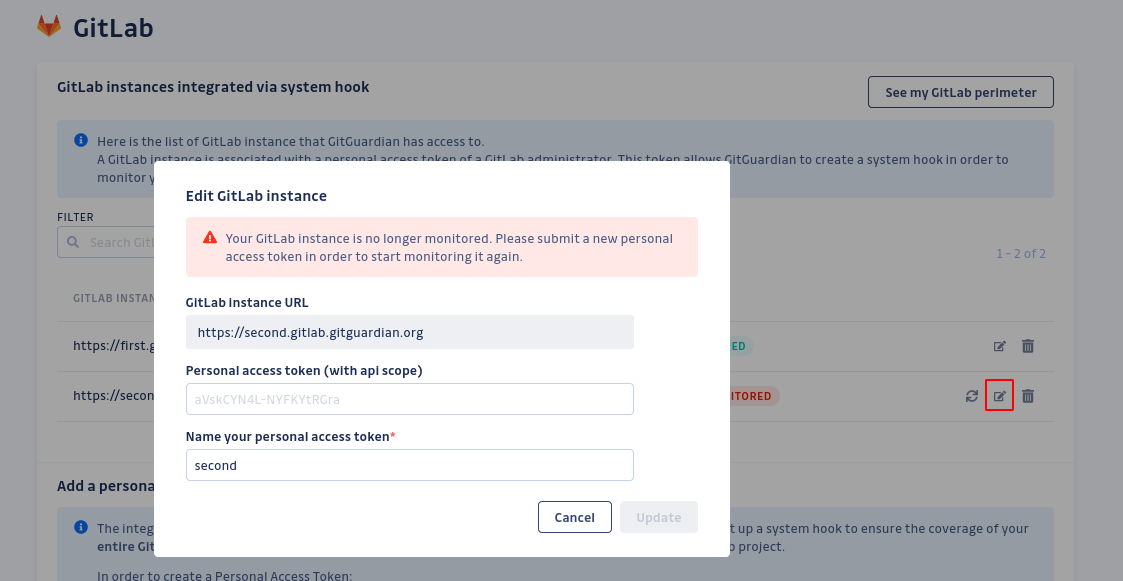
- If your GitLab instance is marked as “not monitored" but the personal access token associated is still active, you can reactivate it by clicking on the synchronize button. It will recreate a system hook programmatically.
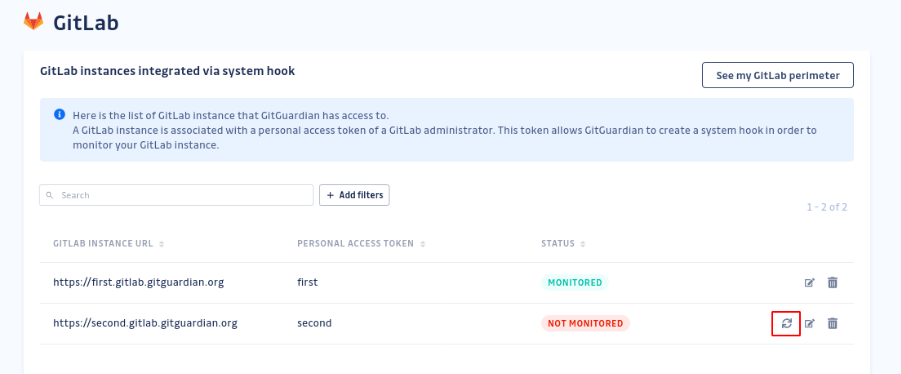
- If the token is invalid you can set a new personal access token by editing it:
- If the admin token is revoked, GitGuardian will detect it and automatically deactivate your GitLab integration if no other active token is present. If another token suitable for monitoring exists, the GitLab integration will use that token. All your existing data will remain accessible.
IMPORTANT: Do not change the URL or the Personal access token of the system hook from the GitLab admin interface or this will break the integration.
Integrate your GitLab groups with group hooks
Group hooks require the user to have Owner role on the GitLab groups to be monitored. Group hooks do not support the monitoring of GitLab users personal projects. The group hook integration works for both GitLab on-premise and Gitlab.com. Note that you can only monitor up to 50,000 projects per group for a group hook integration.
We recommend that you leverage a bot user when integrating with GitGuardian.
Note that you can't have a system hook integration and a group hook integration at the same time.
Requirements
- Self-managed GitLab: Starter plan and higher tiers. v13.5+
- GitLab.com (SaaS): Premium plan
Guidelines
- Navigate to Settings > Integrations > Sources.
- Click on Configure for GitLab.
- Click on Start for the group hook option: "Monitor only certain GitLab groups"
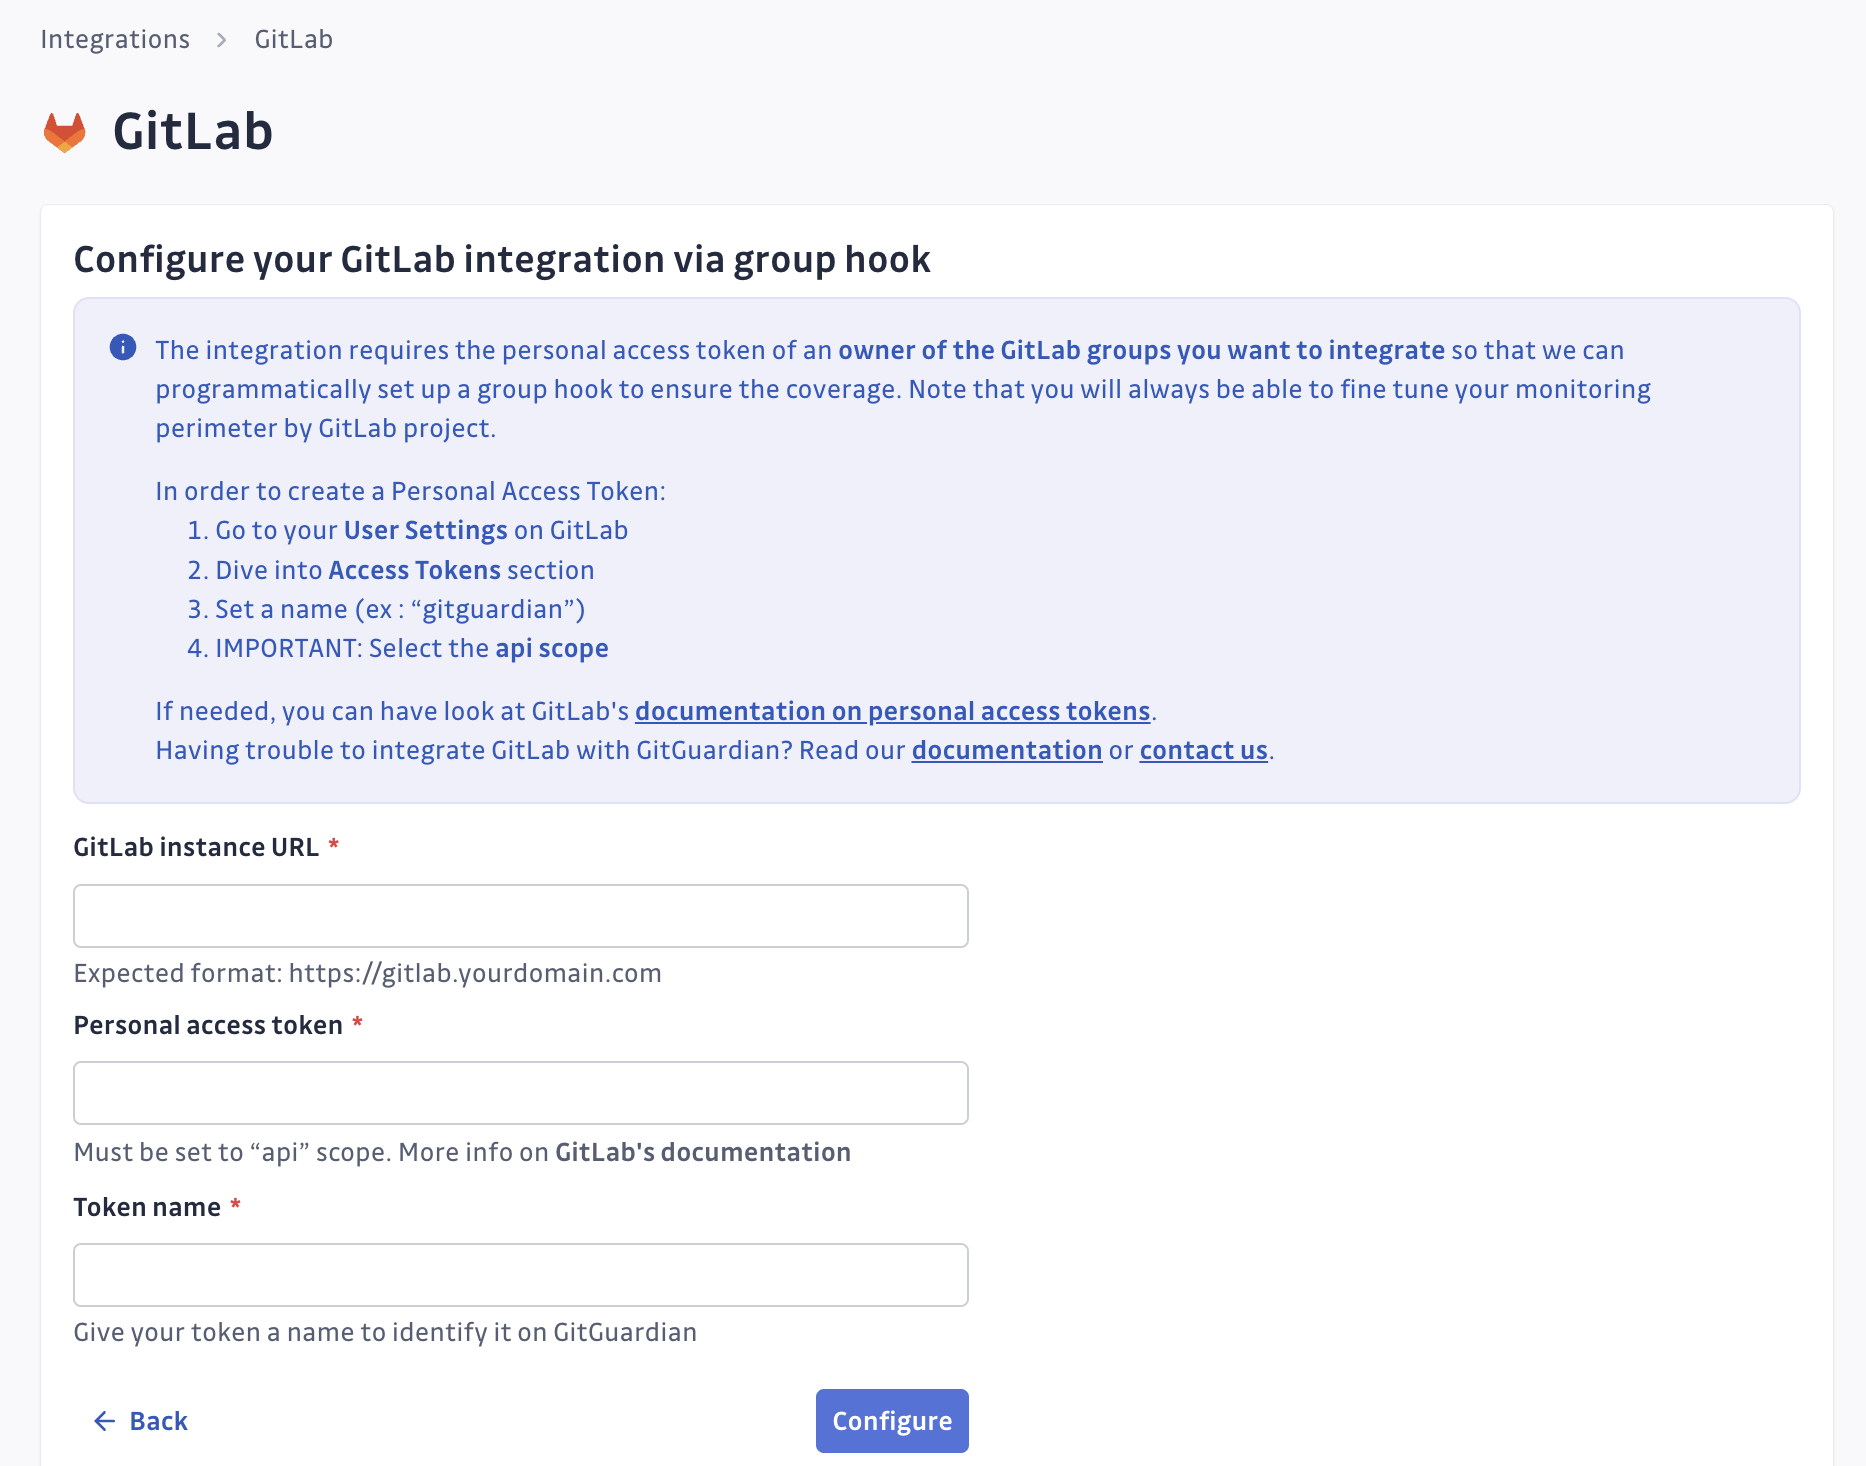
- Submit your GitLab instance url and the personal access token, and make sure to name this personal access token as you might use several
of them in the future to integrate more GitLab groups.
 caution
GitLab instance URL must be prefixed with
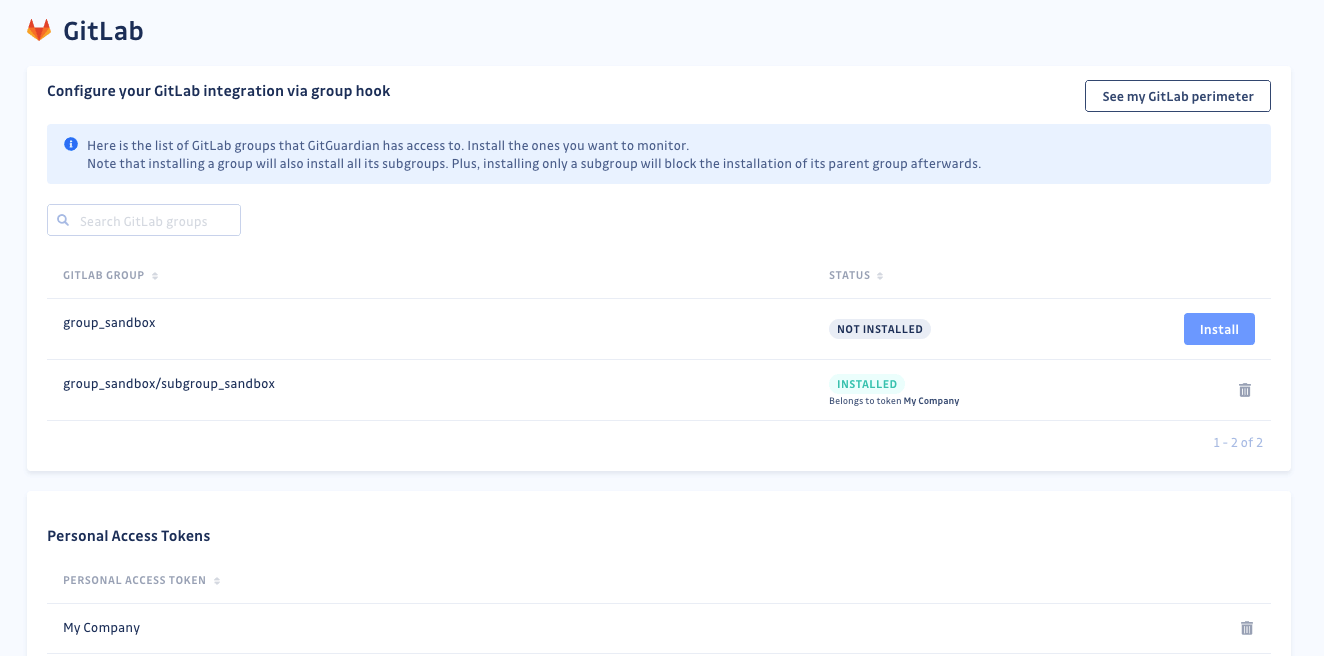
https://, instances without a secure connection won't be monitored. - You are then brought to the configuration page of your GitLab integration where you can see the list of all the GitLab
groups and subgroups that your personal access token gives access to.
Click Install for the GitLab groups and subgroups you want GitGuardian to monitor.
If the token has read_api scope, a hook URL and a secret token will be displayed once you install a new group. Use this hook URL and secret token to add a new group hook (or with Group API). Once this is done, your integration will be functional for this group.
- You can see the projects and groups monitored in your GitLab settings page
Installation remarks
- When you choose to install a GitLab group, all its sub-groups will also be installed automatically. In doing so, the "parent" group and "children" subgroups are linked together and if you only want to uninstall one subgroup, you will need to uninstall the "parent" group first.
- A GitLab group cannot belong to two personal access tokens. Therefore, when you want to install a "parent" group that has an already-installed subgroup you must first uninstall the "child" subgroup.
Events subscription details
Our group hooks will subscribe to the following events:
Repository update eventsPush eventsMerge request events
and SSL verification will be enabled.
Troubleshooting
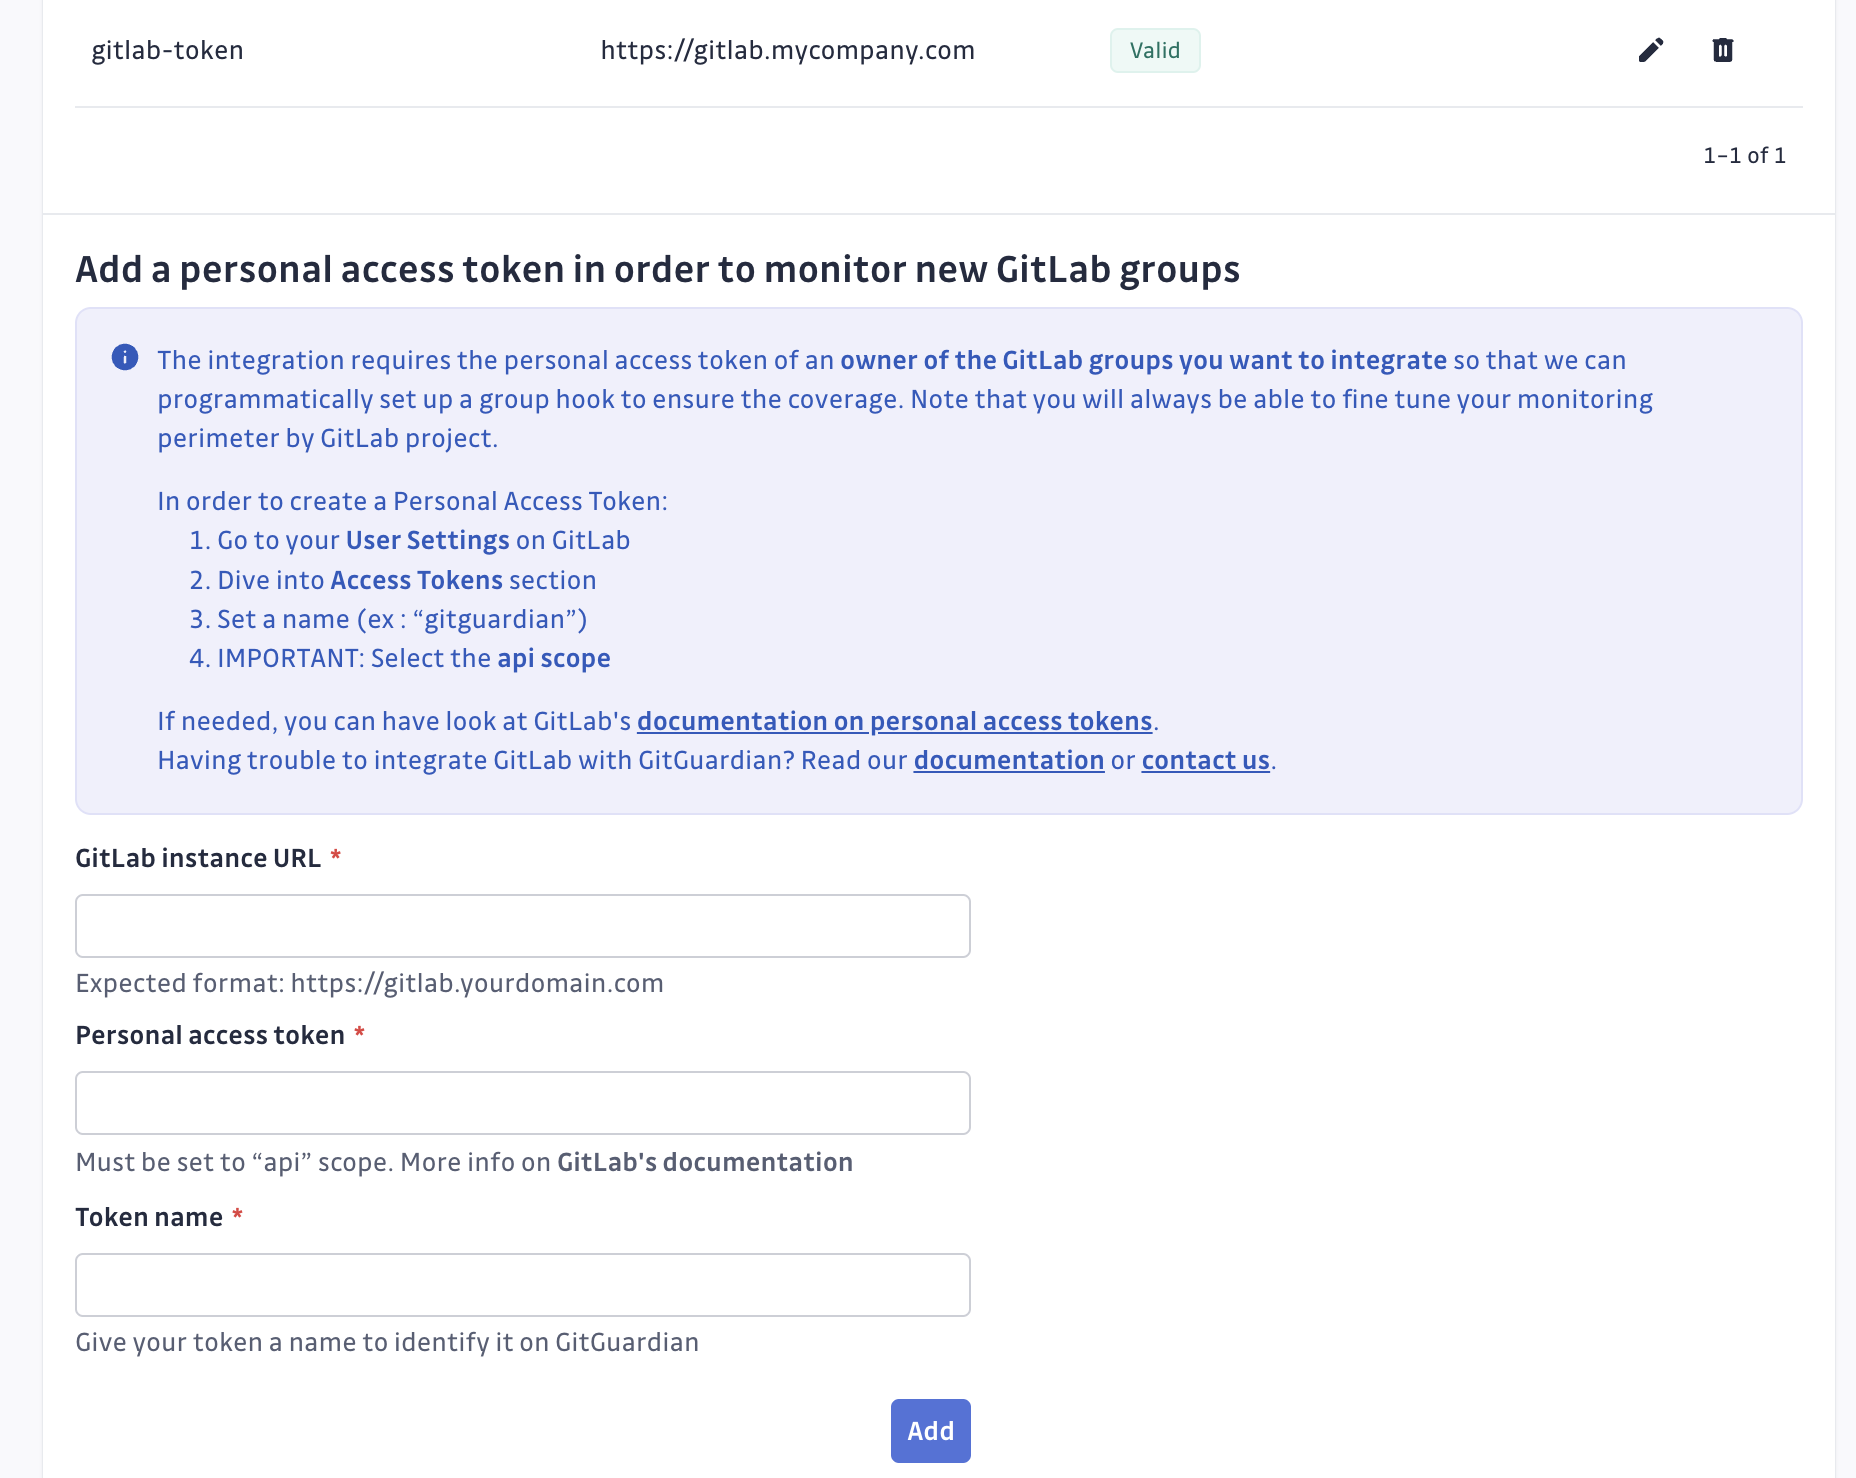
- You can submit new personal access tokens if you want to monitor more GitLab groups. Multiple tokens can be added for group hooks integration.
If several tokens are associated with the same GitLab group, you have to choose which token will be monitoring it.
- If the token is revoked, the group will no longer be monitored (you can install it again with another token, but GitGuardian will not arbitrarily choose another token for you). In this scenario you'll receive an email informing of the unmonitored status of the integration.
Automatic historical scan
By default, GitGuardian performs a historical scan for each newly created GitLab project added to your perimeter.
You can deactivate this behavior in your GitLab settings if you are a Manager of the workspace.

Automatic repository monitoring
By default, GitGuardian automatically monitors repositories added to your perimeter.
You can deactivate this behavior in your GitLab settings if you are a Manager of the workspace.
Understanding scanning capabilities
Historical scanning
Uncover your secret debt: When you first integrate this source, GitGuardian performs a comprehensive scan of your entire content history, based on your customized perimeter. This reveals secrets that may have been exposed weeks, months, or even years ago - helping you address your existing security debt.
How to trigger a historical scan: Go to your perimeter page, select the sources you want to scan, and click Scan in the bulk actions bar. See Manage your monitored perimeter for plan-based size limits, error handling, and full details.
Real-time scanning
Catch new exposures instantly: Once integrated, GitGuardian continuously monitors your content through event-based detection. Any new or modified content containing secrets are detected immediately, allowing you to respond quickly to new exposures.
Customize your monitored perimeter
Once you have set up your GitLab integration, you have the possibility to configure which projects to monitor in the GitLab settings section of your workspace.
If you deselect a project from your monitored perimeter:
- GitGuardian will no longer fetch the content of its commits, therefore you won't receive any alerts related to this project.
- The webhook installed on this project will still exist, therefore you can easily turn the monitoring back on at any moment.
Managing your integration
Monitoring health and Maintenance
If you need to modify your integration settings or troubleshoot connectivity issues, access the management interface through Sources integration.
Uninstalling the integration
While our goal is to help you maintain comprehensive security coverage, you may uninstall the integration whenever necessary:
- Navigate to Sources integration
- Click Edit next to the integration name
- Click Configure
- Click the delete icon next to your resource
- Confirm the removal
Note: Removing the integration preserves your incident history, but stops future scanning and presence checks for the integrations that support it.

