Install using Argo CD
Introduction
Using the GitGuardian Helm repository, you can easily install GitGuardian on your existing Kubernetes cluster with Argo CD.
Add GitGuardian Helm repository
First, you need to add the GitGuardian Helm repository to Argo CD using the following settings:
name: gitguardian
type: helm
enableOCI: 'true'
url: registry.replicated.com/gitguardian
username: <your.name@yourcompany.com>
password: <your.password>
The GitGuardian team will provide you the username and the password.
You can follow the official documentation and choose from the following methods:
Create the following Argo CD repository secret using kubectl:
You need to set the username and the password before.
cat <<EOF | kubectl apply -f -
apiVersion: v1
kind: Secret
metadata:
  name: replicated-repo
  namespace: argocd
  labels:
    argocd.argoproj.io/secret-type: repository
stringData:
  name: replicated
  type: helm
  enableOCI: "true"
  url: registry.replicated.com
  username: <your.name@yourcompany.com>
  password: <your.password>
EOF
You must first authenticate on your Argo CD server by using the command: argocd login <server_url>
Set your username/password and run this command:
argocd repo add registry.replicated.com \
  --name replicated \
  --type helm \
  --enable-oci \
  --username <your.name@yourcompany.com> \
  --password <your.password>
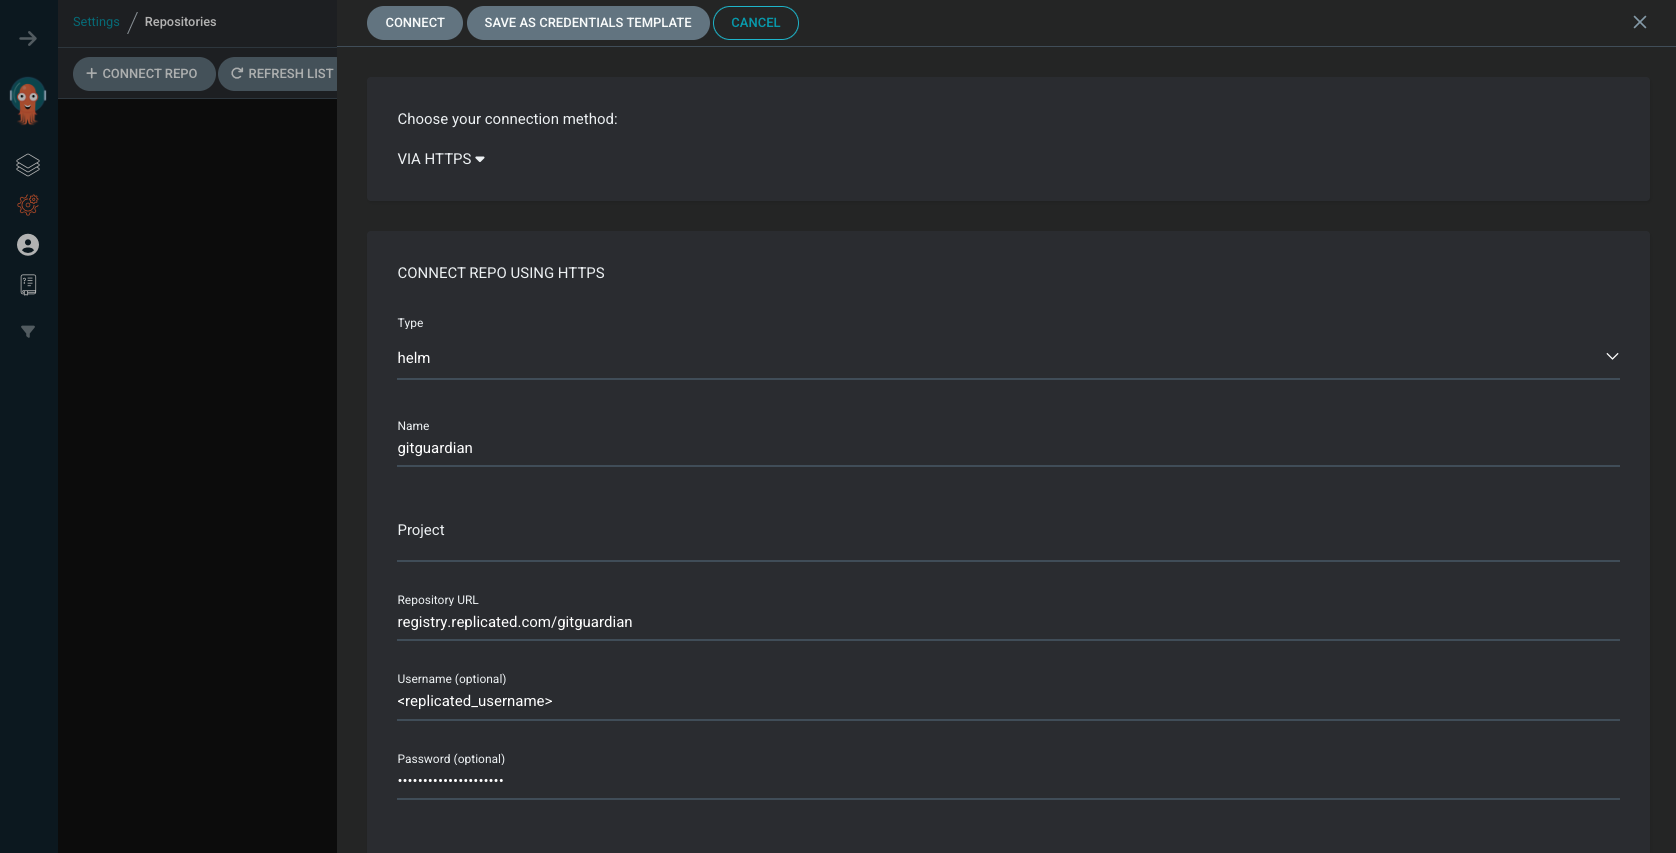
Navigate to Settings/Repositories and add the GitGuardian Helm repository:

Ensure to enable OCI
Once added, you should see the GitGuardian Helm repository:

The connection status must be successful.
Configure GitGuardian Application
You can configure GitGuardian application by providing custom Helm values, follow the Helm instructions to proceed.
We highly recommend managing secrets on your own and referencing them via existingSecret Helm parameters (See Helm Secrets Management page). We also suggest visiting the Argo CD Secret Management page to efficiently manage your secrets.
Install GitGuardian Application
After creating the Helm value file values.yaml following above instructions, you can create the GitGuardian application using Argo CD CLI by running the following command:
argocd app create gitguardian \
  --dest-server <cluster> \
  --dest-namespace <namespace> \
  --repo registry.replicated.com/gitguardian \
  --helm-chart gitguardian \
  --revision 2025.x.y \
  --values-literal-file values.yaml \
  --self-heal \
  --auto-prune \
  --sync-option PruneLast=true
If autoscaling is enabled, you must configure the Argo application to ignore changes made to the number of replicas for all deployments:
argocd app patch gitguardian \
  --patch '{"spec": {"ignoreDifferences": [{"group": "apps", "kind": "Deployment", "jsonPointers": ["/spec/replicas"]}]}}' \
  --type merge
Upgrade GitGuardian Application
Prior to upgrading, ensure you back up your PostgreSQL database. For detailed instructions, refer to the Backup page.
To upgrade GitGuardian, you need first to update the Helm chart version using Argo CD CLI by running the following command:
argocd app patch gitguardian \
  --patch '{"spec": { "source": { "targetRevision": "2024.x.y" } }}' \
  --type merge
Sync the GitGuardian app:
argocd app sync gitguardian

