Database Security
Maintaining the security of your database systems is paramount in protecting sensitive information and ensuring the integrity of your data. This guide provides comprehensive steps for updating the security settings of PostgreSQL and Redis databases, including password changes, encryption key rotation, and client certificate updates. Follow these procedures carefully to enhance the security posture of your databases.
Update PostgreSQL Password
Ensure the security of your PostgreSQL database by setting a new password.
Ensure you back up your database before starting this procedure, which will incur minimal application downtime—from scaling down to full redeployment.
- Scale down the Dashboard, Public API and Webhook receivers.
kubectl --namespace <namespace> get deploy -o name \
   | grep webapp \
   | xargs kubectl --namespace <namespace> scale deploy/% --replicas 0
If needed, specify the Kubernetes namespace with --namespace (default namespace is used if not specified).
- Confirm all asynchronous and scheduled tasks have finished.
kubectl exec --namespace <namespace> -t deploy/worker-scanners \
    -- celery -A ward_run_app inspect active
The output should indicate - empty - for each pod, signaling completion.
app@(...):/app$ celery -A ward_run_app inspect active
(...)
->  workers@worker-worker-(...): OK
    - empty -
->  long_tasks@worker-long-tasks-(...): OK
    - empty -
->  scanner@worker-scanners-(...): OK
    - empty -
->  email@worker-email-(...): OK
    - empty -
->  email@worker-email-(...): OK
    - empty -
->  scanner@worker-scanners-(...): OK
    - empty -
->  long_tasks@worker-long-tasks-(...): OK
    - empty -
->  workers@worker-worker-(...): OK
    - empty -
- Scale down all workers and scheduler pods.
kubectl --namespace <namespace> get deploy -o name \
   | grep worker \
   | xargs kubectl --namespace <namespace> scale deploy/% --replicas 0
If needed, specify the Kubernetes namespace with --namespace (default namespace is used if not specified).
- Configure your environment, update the namespace
gg_namespaceas needed.
gg_namespace=<namespace>
pg_host=$(kubectl -n $gg_namespace get cm gim-config -o jsonpath="{.data.POSTGRES_HOST}")
pg_port=$(kubectl -n $gg_namespace get cm gim-config -o jsonpath="{.data.POSTGRES_PORT}")
pg_user=$(kubectl -n $gg_namespace get cm gim-config -o jsonpath="{.data.POSTGRES_USER}")
pg_passwd=$(kubectl -n $gg_namespace get secret gim-secrets -o jsonpath="{.data.POSTGRES_PASSWORD}" | base64 -d)
pg_db=$(kubectl -n $gg_namespace get cm gim-config -o jsonpath="{.data.POSTGRES_DB}")
- With your environment set, you're ready to launch a PostgreSQL shell.
echo "Connection to $pg_user@$pg_host:$pg_port/$pg_db"
kubectl -n $gg_namespace run postgresql-client --rm -it \
  --restart='Never' --image docker.io/bitnamilegacy/postgresql:13 \
  --env="PGPASSWORD=$pg_passwd" --command \
  -- psql --host $pg_host -U $pg_user -d $pg_db -p $pg_port
- Inside the shell, update your password.
ALTER USER <postgres user> WITH PASSWORD '<new password>';
Replace <postgres user> with your username and <new password> with the desired password.
KOTS-Based Installation
- Navigate to the “Config” tab in the KOTS Admin Console and update the PostgreSQL password.
- Save the configuration.
- Deploy the updated configuration.
Helm-Based Installation
Do not directly modify values within the Kubernetes secret gim-secrets, as such changes will be overridden by subsequent Helm upgrades.
- For secrets management, ensure updates are made in the appropriate location based on your setup. Look at your values file under the
postgresqlsection to find how the password is stored. For further details, see Helm sensitive information management.
- If you use a secret manager, change the required values in it.
- If you use a secret inside the namespace, patch it:
kubectl patch secret -n $gg_namespace gim-secrets \
   -p "{\"data\":{\"POSTGRES_PASSWORD\":\"$(echo '<new_password>' | base64)\"}}"
- Once the new password is set you can redeploy the application:
helm upgrade <release-name> -n <namespace> -f local-values.yaml
Replace <release-name> with the release name you specified during the initial installation (use helm ls to find it). If needed, specify the Kubernetes namespace with -n (default namespace is used if not specified). Stick to the same version using the --version flag.
Update Redis main Password (external cluster)
The process for updating the Redis main password varies by installation method:
- Standard Redis Installation: either create a new instance with identical settings or directly update the password in the existing instance's configuration file.
- AWS Elasticache: use the AWS CLI or API to follow the Rotate AUTH token guidelines.
- GCP Memorystore: modify the AUTH string by toggling AUTH from off to on.
- Bitnami Helm chart: in the Redis Helm Chart value file, change the value
global.redis.passwordwith the new password. Apply changes withhelm upgrade <redis-release> -f <redis-values.yaml>.
KOTS-Based Installation
- Navigate to the “Config” tab in the KOTS Admin Console and update the PostgreSQL password.
- Save the configuration.
- Deploy the updated configuration.
Helm-Based Installation
Do not directly modify values within the Kubernetes secret gim-secrets, as such changes will be overridden by subsequent Helm upgrades.
- For secrets management, ensure updates are made in the appropriate location based on your setup. Look at your values file under the
redis.mainsection to find how the password is stored. For further details, see Helm sensitive information management.
- If you use a secret manager, change the required values in it.
- If you use a secret inside the namespace, patch it:
kubectl patch secret -n <namespace> <secret_name> \
  -p "{\"data\":{\"REDIS_URL\":\"<redis|rediss>://:$(echo -n '<new_password>' | base64)@<redis_host>:<redis_port>\"}}"
- Once the new password is set you can redeploy the application:
helm upgrade <release-name> -n <namespace> -f local-values.yaml
Replace <release-name> with the release name you specified during the initial installation (use helm ls to find it). If needed, specify the Kubernetes namespace with -n (default namespace is used if not specified). Stick to the same version using the --version flag.
Update Redis main Password (embedded cluster)
Replace the value of the key redis-password in the secret redis by your new password.
NEWPASSWORD=$(echo -n '<new password>' | base64)
kubectl patch secret --namespace <namespace> redis \
   -p "{\"data\":{\"redis-password\":\"${NEWPASSWORD}\"}}"
If needed, specify the Kubernetes namespace with --namespace (default namespace is used if not specified).
Update PostgreSQL client certificate (external cluster)
This procedure is intended for PostgreSQL configurations using mTLS (Mutual TLS). Please be aware that configuring PostgreSQL to utilize client certificates is not feasible with AWS RDS.
Ensure you back up your database before starting this procedure, which will incur minimal application downtime—from scaling down to full redeployment.
- Scale down the Dashboard, Public API and Webhook receivers.
kubectl --namespace <namespace> get deploy -o name \
   | grep webapp \
   | xargs kubectl --namespace <namespace> scale deploy/% --replicas 0
If needed, specify the Kubernetes namespace with --namespace (default namespace is used if not specified).
- Confirm all asynchronous and scheduled tasks have finished.
$ kubectl exec --namespace <namespace> -t deploy/worker-scanners \
   -- celery -A ward_run_app inspect active
The output should indicate - empty - for each pod, signaling completion.
app@(...):/app$ celery -A ward_run_app inspect active
(...)
->  workers@worker-worker-(...): OK
    - empty -
->  long_tasks@worker-long-tasks-(...): OK
    - empty -
->  scanner@worker-scanners-(...): OK
    - empty -
->  email@worker-email-(...): OK
    - empty -
->  email@worker-email-(...): OK
    - empty -
->  scanner@worker-scanners-(...): OK
    - empty -
->  long_tasks@worker-long-tasks-(...): OK
    - empty -
->  workers@worker-worker-(...): OK
    - empty -
- Scale down all workers and scheduler pods.
kubectl --namespace <namespace> get deploy -o name \
   | grep worker \
   | xargs kubectl --namespace <namespace> scale deploy/% --replicas 0
If needed, specify the Kubernetes namespace with --namespace (default namespace is used if not specified).
- The process for updating the PostgreSQL client certificate varies by installation method:
- GCP Cloud SQL: Create a new client certificate following the procedure.
KOTS-Based Installation
- Navigate to the “Config” tab in the KOTS Admin Console and update the PostgreSQL password.
- Save the configuration.
- Deploy the updated configuration.
Helm-Based Installation
Do not directly modify values within the Kubernetes secret gim-secrets, as such changes will be overridden by subsequent Helm upgrades.
- For secrets management, ensure updates are made in the appropriate location based on your setup. Look at your values file under the
postgresqlsection to find how the password is stored. For further details, see Helm sensitive information management.
- If you use a secret manager, change the required values in it.
- If you use a secret inside the namespace, patch it:
kubectl patch secret --namespace <namespace> <secret-name>\
   -p "{\"data\": { \"pg_client.key\": \"$(base64 -w0 ./tls.key)\", \"pg_client.crt\": \"$(base64 -w0 ./tls.crt)\"}}"
If needed, specify the Kubernetes namespace with --namespace (default namespace is used if not specified).
- Once the new certificate & key are set you can redeploy the application:
helm upgrade <release-name> -n <namespace> -f local-values.yaml
Replace <release-name> with the release name you specified during the initial installation (use helm ls to find it). If needed, specify the Kubernetes namespace with -n (default namespace is used if not specified). Stick to the same version using the --version flag.
Update PostgreSQL Data Encryption Key
Rotating the encryption key (Django Secret Key) is a critical process that involves several steps.
Encryption key rotation is an intensive process that may:
- Take significant time to complete, fully occupying a Celery worker.
- Generate constant read/write load on the database.
- Increase database disk space usage (it's recommended to ensure at least 5GB of free disk space).
KOTS-Based Installation
The gitguardian_secret_key.sh script enables you to rotate the database encryption key.
Prerequisites:
kubectlandkotsCLI (refer to the installation documentation).- Access to the Kubernetes namespace where the GitGuardian application is installed.
Ensure these requirements are met before running the script.
Install the script using the following command:
curl -O https://raw.githubusercontent.com/GitGuardian/ggtools/refs/heads/main/secret-key-rotation/scripts/gitguardian_secret_key.sh
chmod +x gitguardian_secret_key.sh
The script has two actions, status and rotate. status will output current key(s) hashes, and rotate will update the configuration.
bash gitguardian_secret_key.sh rotate --namespace <namespace>
Specify the Kubernetes namespace with --namespace.
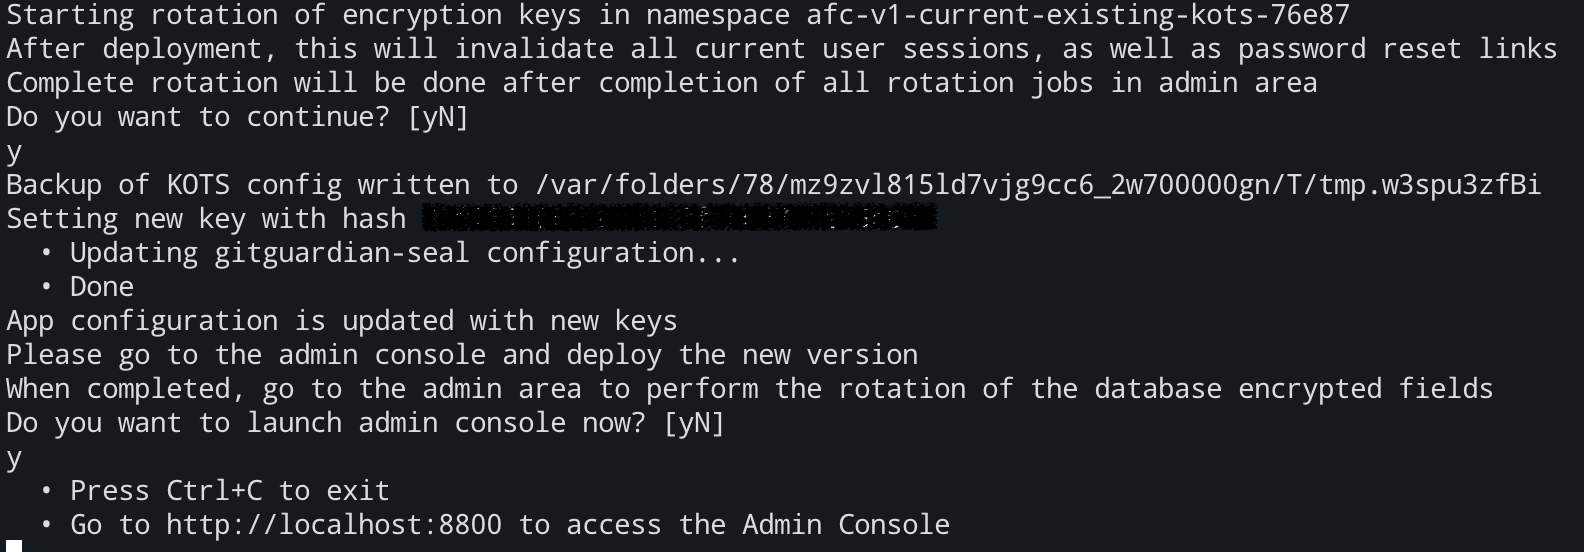
After configuration update, the script will launch the KOTS Admin Console where you will need to deploy the updated configuration.
Helm-Based Installation
Do not directly modify values within the Kubernetes secret gim-secrets, as such changes will be overridden by subsequent Helm upgrades.
- Generate a New Key: While any string is technically acceptable, we advise using a long (minimum 50 characters), high-entropy string for enhanced security.
Update the namespace gg_namespace as needed.
gg_namespace=<namespace>
new_django_key=$(LC_ALL=C tr -dc A-Za-z0-9 </dev/urandom | head -c 50 )
current_key=$(kubectl get secret -n $gg_namespace gim-secrets \
                  -o jsonpath='{.data.DJANGO_SECRET_KEY}' | base64 --decode)
current_encryption_keys=$(kubectl get secret -n $gg_namespace gim-secrets \
              -o jsonpath='{.data.ENCRYPTION_KEYS}' | base64 --decode)

# new encryption starts with new key, that will be used for re-encryption, then current key for fallback
if [ -n "$current_encryption_keys" ]; then
  new_encryption_keys=$(echo -n "$new_django_key,$current_encryption_keys,$current_key")
else
  new_encryption_keys=$(echo -n "$new_django_key,$current_key")
fi

echo "Please set djangoSecretKey with ${new_django_key}"
echo "Please set dbEncryptionKeys with ${new_encryption_keys}"
- For secrets management, ensure updates are made in the appropriate location based on your setup. Look at your values file under the
miscEncryptionsection to find how the password is stored. For further details, see Helm sensitive information management.
- If you use a secret manager, change the required values in it.
- If you use a secret inside the namespace, patch it:
kubectl patch secret -n $gg_namespace <secret-name> \
    -p "{\"data\":{\"DJANGO_SECRET_KEY\":\"${new_django_key}\"}}"
kubectl patch secret -n $gg_namespace <secret-name> \
    -p "{\"data\":{\"ENCRYPTION_KEYS\":\"${new_encryption_keys}\"}}"
- Once the new password is set you can redeploy the application:
helm upgrade <release-name> -n <namespace> -f local-values.yaml
Replace <release-name> with the release name you specified during the initial installation (use helm ls to find it). If needed, specify the Kubernetes namespace with -n (default namespace is used if not specified). Stick to the same version using the --version flag.
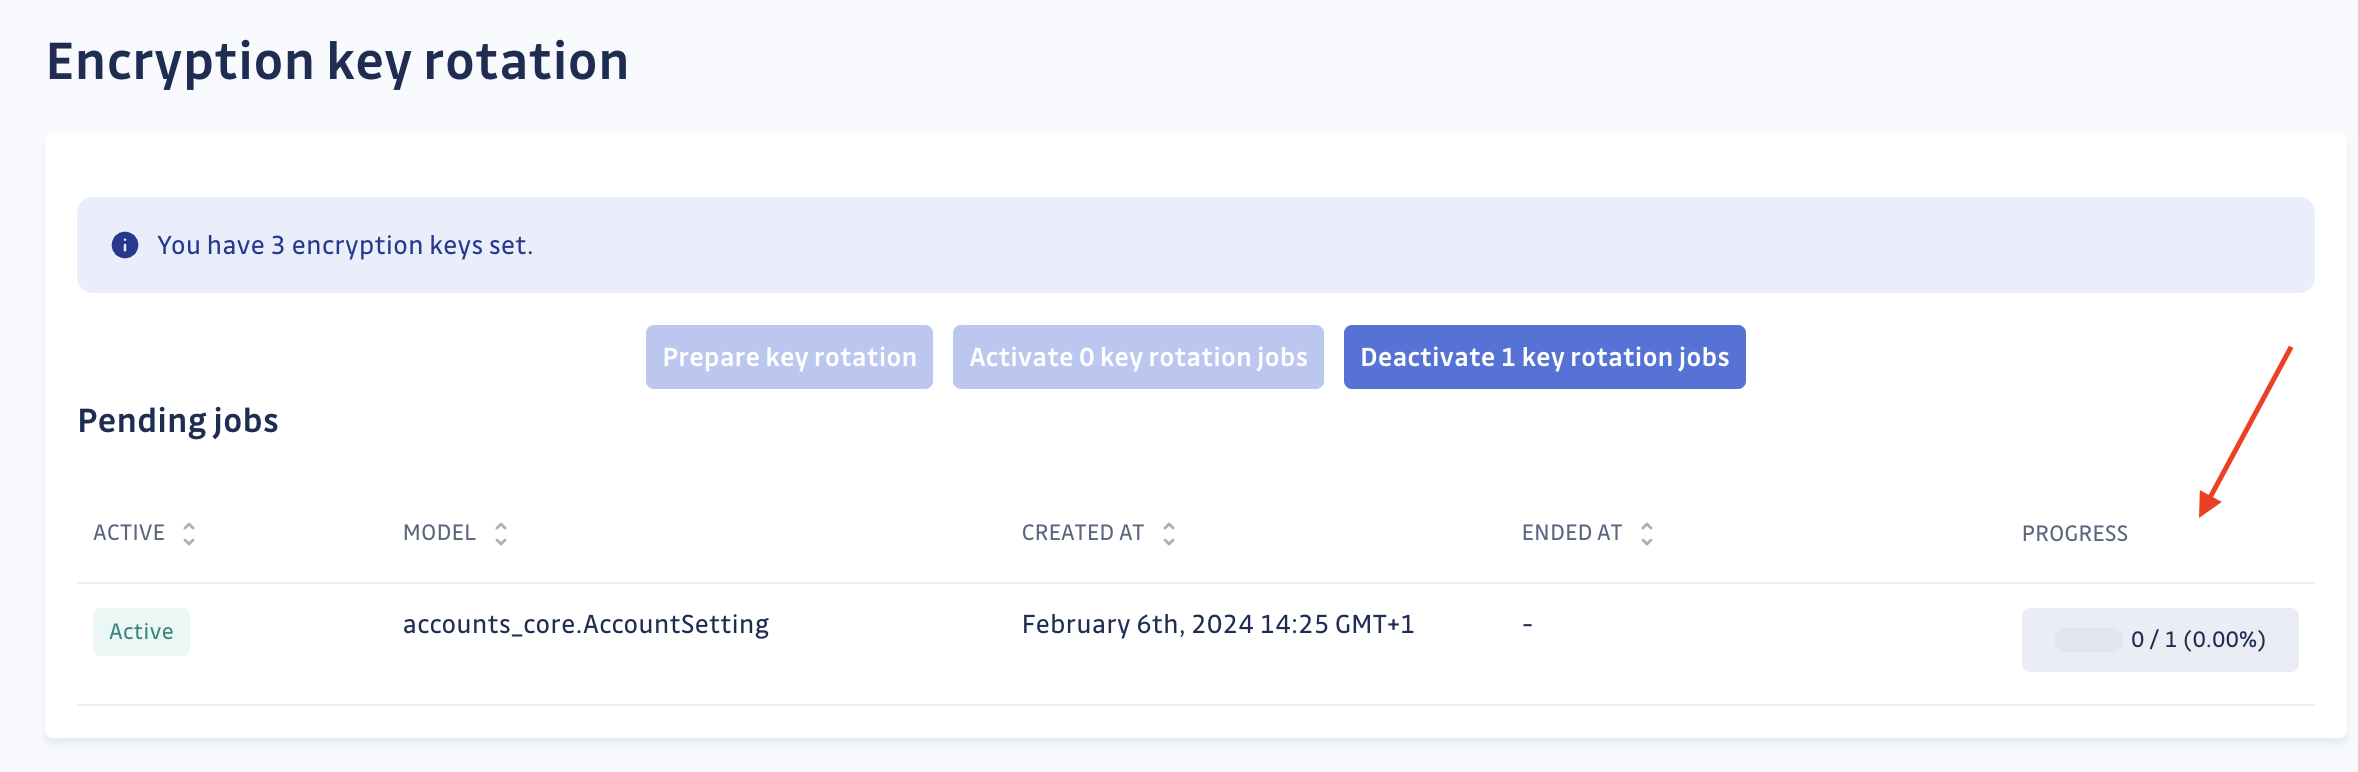
Initiating data encryption key rotation
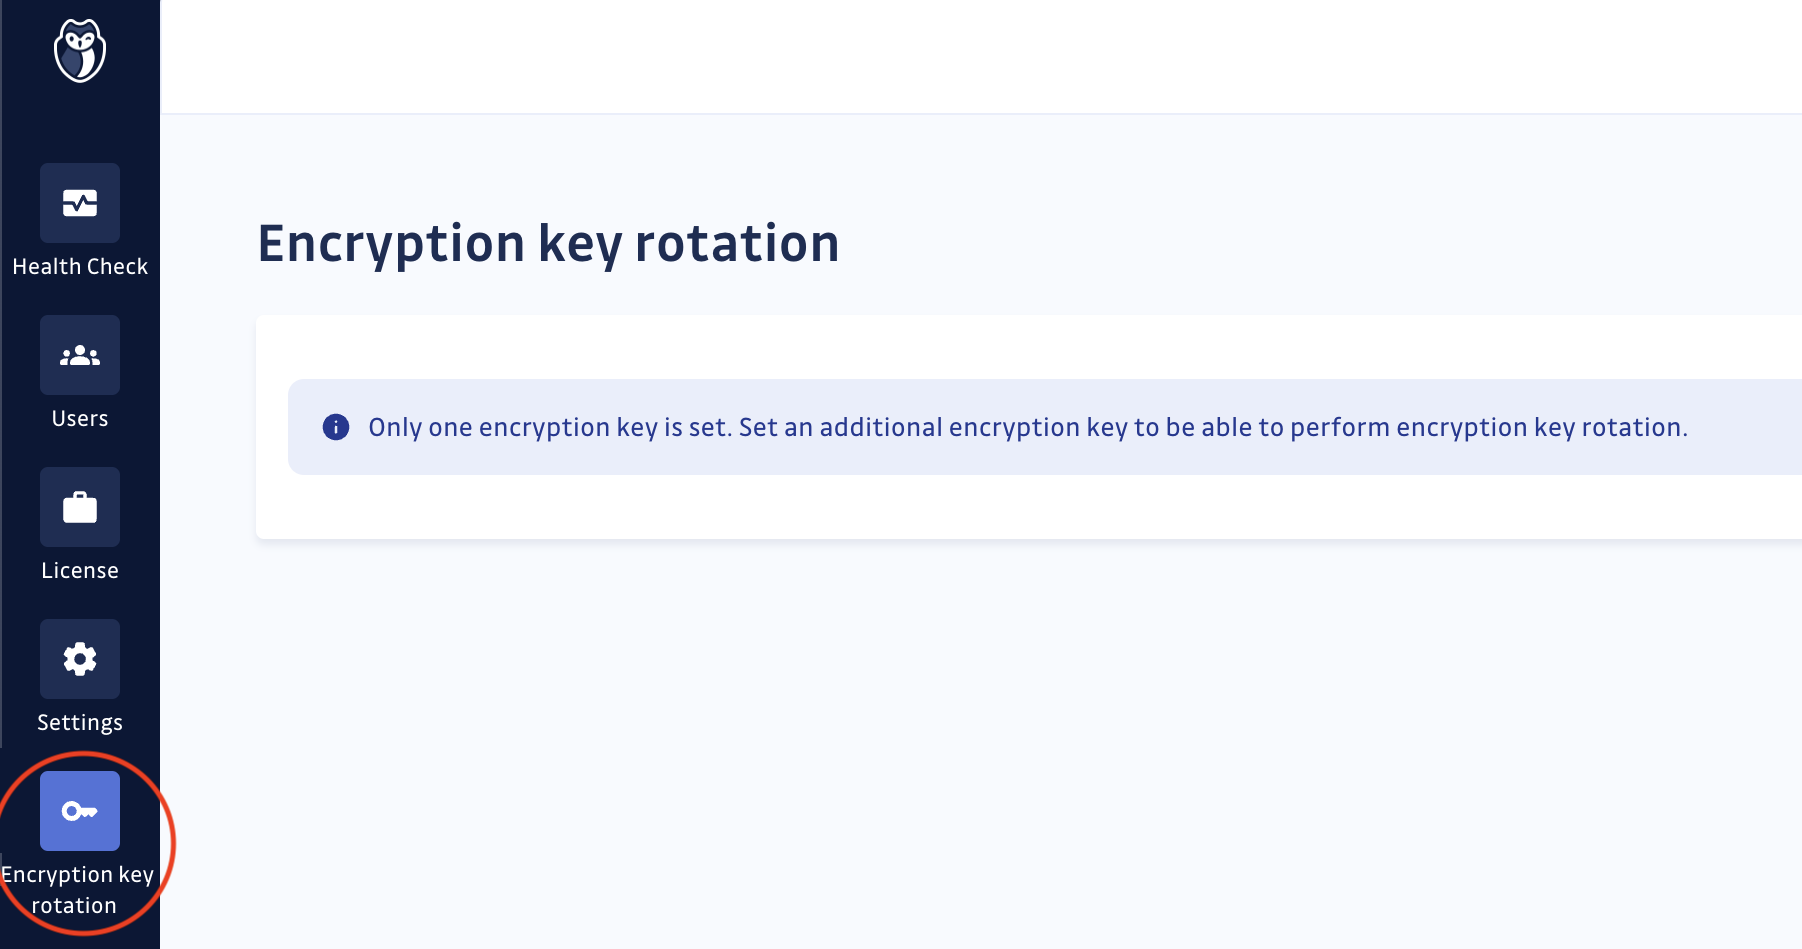
Once at least two encryption keys are set in your settings:
- Navigate to the Encryption Key Rotation page in the Admin area:
- If no rotation has been initiated for the recently added key, start by triggering the creation of rotation jobs. Click the “Prepare Key Rotation” button.

- Activate the key rotation jobs
Be aware that these jobs may take a long time and will fully occupy one Celery worker.
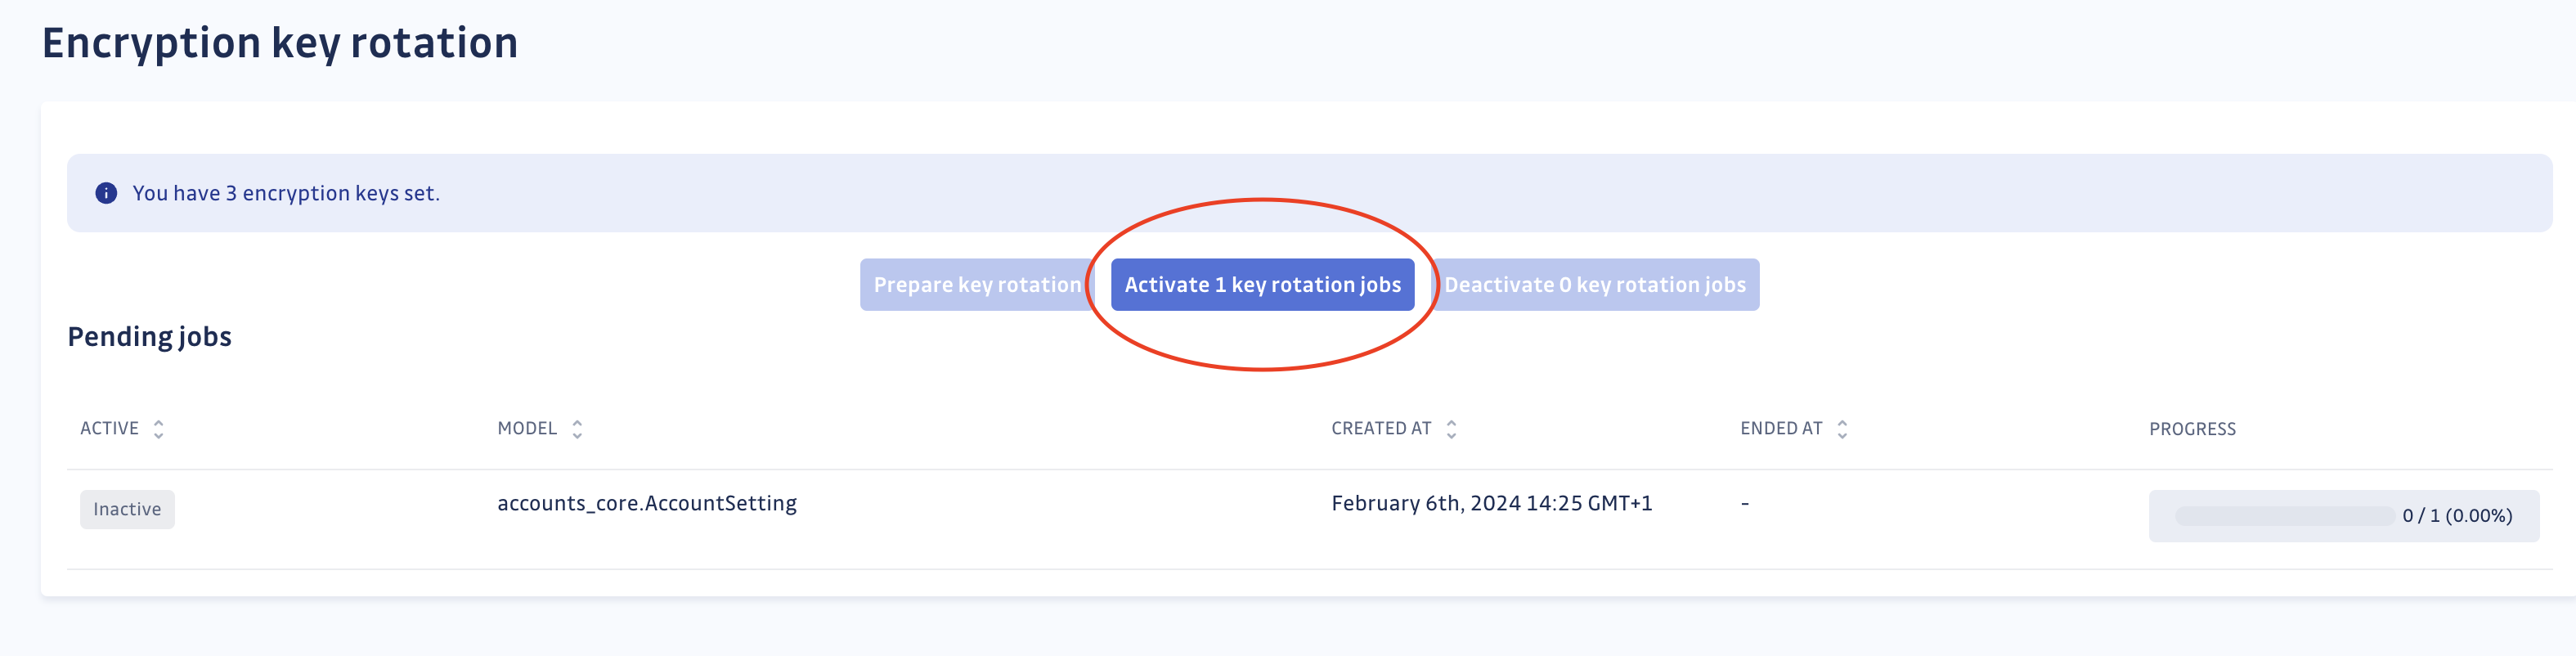
- The jobs will run automatically. All that's left is to wait for their completion. You have the option to stop or restart the jobs as needed.