TLS certificates
TLS certificates need to be defined so that the domain on referring to your GitGuardian instance is correctly authenticated and secured. The TLS certificate's Common Name must match the domain set for your GitGuardian instance hostname.
You can use self-signed certificates to test the deployment of the application, be aware that this may lead to integration issues with VCS and is not recommended beyond initial testing.
You need to configure TLS certificates for:
- KOTS Admin Console: used for the KOTS Admin Console user access.
- GitGuardian Application: used for the GitGuardian application user access (sometimes also referred to as NGINX).
- SAML SSO: used for Single Sign-On (or SSO) to manage your organization’s entire membership via a third-party provider.
We strongly recommend revoking any certificate being replaced, regardless of its expiration status, to maintain system security.
KOTS Admin Console
To update the TLS certificate for the KOTS Admin Console, follow these instructions.
Adding the acceptAnonymousUploads annotation temporarily creates a vulnerability for an attacker to maliciously upload TLS certificates. After TLS certificates have been uploaded, the vulnerability is closed again.
Short version:
NAMESPACE=kotsadm
kubectl --namespace "${NAMESPACE}" annotate secret kotsadm-tls acceptAnonymousUploads=1
kubectl --namespace "${NAMESPACE}" delete pod -l app=kurl-proxy-kotsadm
If needed, specify another Kubernetes namespace (default namespace is used if not specified).
After the pod has restarted, direct your browser to http://<ip>:30000/tls and go through the upload process in the user interface.
GitGuardian Application
When using self-signed or custom CA certificates, ensure to disable SSL verification for the GitHub webhook.
KOTS-based installation
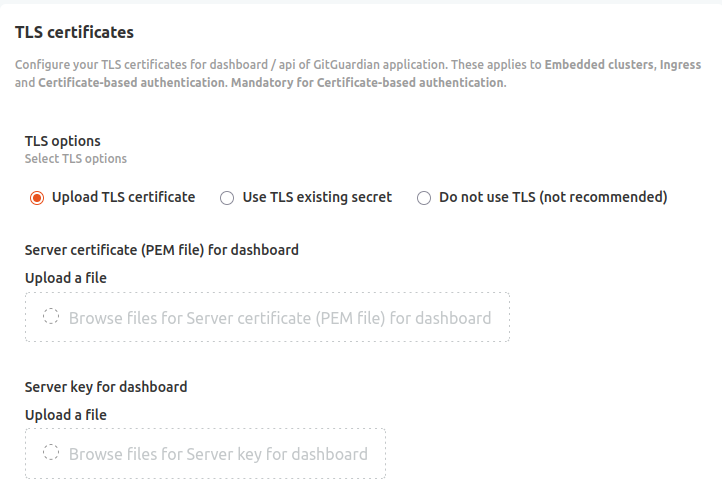
TLS Certificates are configured in the TLS certificates section.
You have the option to use the self signed TLS certificates, or you can provide your own certificates as shown below. The recommended method is to use an existing secret.
For existing clusters, in scenarios where the TLS certificate is managed by your cloud provider's infrastructure, you may reference it directly in your Ingress or Service annotations, depending on your specific cloud provider's requirements.
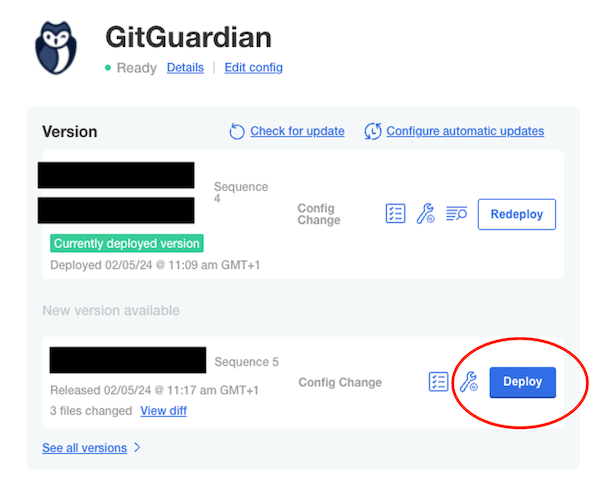
To upload new certificates, replace the previously uploaded files in the KOTS Admin Console.
After updating the configuration, deploy the new version which includes only the configuration changes:
Helm-based installation
In Helm installation, the certificate can be set in the front.ingress.tls section.
You may provide TLS certificates as existing secret (recommended) or raw certificate.
ingress:
  enabled: true
  ingressClassName: 'nginx'
  tls:
    enabled: true
    existingSecret: my-gitguardian-certificate
When using certificate-based authentication, the TLS configuration is located in tls.clientAuth.
Using cert-manager
In Helm installation, you can use cert-manager to issue the TLS certificates automatically. Cert-manager must be correctly installed and configured in your cluster, with an Issuer or a ClusterIssuer resource.
The certificates are created in a Kubernetes secret, and can be used by either Istio Ingress or a classic Ingress.
The private key is PKCS#1 with 2048 length.
The configuration is done in the local values file with the tls section:
tls:
  certManager:
    enabled: true
    issuer:
      kind: ClusterIssuer
      name: my-cluster-issuer
    certificatesSecret: my-gitguardian-certificate
If using a classic ingress with front.ingress values, the secret name of the certificate must be specified in front.ingress.tls.secretName.
SAML SSO
This guide outlines the steps to update the SSO X509 certificate used by GitGuardian for authentication with a third-party SSO provider. For more detailed information on configuring SAML SSO, refer to the Configure SAML SSO page.
If you install GitGuardian using Helm, generate a new SSO certificate, and then edit your Helm values file. For more details, refer to the Helm Sensitive Information Management page.
Generate a Self-Signed Certificate
To rotate the SSO certificate, start by generating a new self-signed certificate:
- Generate a new RSA private key:
Generate a new 2048-bit RSA private key using OpenSSL with the following command:
openssl genrsa -out gitguardian.key 2048
- Create a Certificate Signing Request (CSR):
Use the generated private key to create a CSR. Replace <hostname> with the Fully Qualified Domain Name of your self-hosted instance.
openssl req -new -subj '/CN=<hostname>' \
  -key gitguardian.key \
  -out gitguardian.csr
- Create a self-signed certificate:
Use the CSR to create a self-signed certificate valid for 365 days (or as required):
openssl x509 -req -days 365 -in gitguardian.csr \
  -signkey gitguardian.key -out gitguardian.crt
Preparing the KOTS Configuration File
Create or update your config.yaml to include the new certificate and key:
apiVersion: kots.io/v1beta1
kind: ConfigValues
spec:
  values:
    embedded_certificate:
      values: |
        <content_of_gitguardian.crt>

    embedded_key:
      values: |
        <content_of_gitguardian.key>
Update KOTS Configuration Values
Update the KOTS configuration with the new certificate and private key:
kubectl kots set config gitguardian --namespace <namespace> \
  --config-file config.yaml \
  --merge
If needed, specify the Kubernetes namespace with --namespace (default namespace is used if not specified).
Connect to the KOTS Admin Console
To apply the changes, connect to the KOTS admin console:
kubectl kots --namespace <namespace> admin-console
If needed, specify the Kubernetes namespace with --namespace (default namespace is used if not specified).
Deploy the New Version
After updating the configuration, deploy the new version which includes only the configuration changes:
If you encounter 403 errors after attempting to "Login with Okta," clearing your web browser's cache may resolve the issue.

