Autoscaling
Requirements for autoscaling
You can use either Kubernetes HPA (Horizontal Pod Autoscaler) or KEDA (Kubernetes Event-Driven Autoscaler) for autoscaling. Both rely on the same metrics but have different requirements.
- HPA: Kubernetes built-in, reads metrics from Metrics Server or external metrics pushed by Prometheus Adapter. A bit less responsive than KEDA. Cannot scale to zero replica.
- KEDA: Reads events from a variety of sources (here Prometheus). Faster scaling. Can scale to zero replica. Not available on KOTS-based installations.
Required components
Depending on your chosen autoscaling method, you will need different components installed in your cluster:
| Component | HPA | KEDA |
|---|---|---|
| Prometheus server | Required | Required |
| Prometheus adapter | Required | Not required |
| KEDA controller | Not required | Required |
HPA requires Prometheus adapter to expose these metrics to the Kubernetes metrics API, while KEDA can directly query Prometheus.
Installing Prometheus server
Both autoscaling methods need a Prometheus that scrapes the GitGuardian application metrics. Two setups are supported, depending on whether you run the Prometheus Operator in your cluster.
Whichever option you pick, the GitGuardian application must be configured to expose its metrics first, otherwise Prometheus scrapes empty endpoints. See Authorize metrics collection to activate the application export.
A standalone Prometheus server does not read ServiceMonitor resources — it only scrapes what its own configuration file lists. So the GitGuardian chart's built-in ServiceMonitor objects have no effect on a standalone server, and you must add a manual scrape configuration instead.
- Option A (recommended) — if you already run, or are willing to install,
kube-prometheus-stack(bundles the operator + a managed Prometheus). The GitGuardian chart ships theServiceMonitorobjects, so collection is just a matter of enabling them. - Option B — if you want a single self-contained Prometheus with no operator. You write the scrape configuration by hand.
Add the Prometheus Community Helm repository (used by both options):
helm repo add prometheus-community https://prometheus-community.github.io/helm-charts
helm repo update
Option A (recommended): kube-prometheus-stack with ServiceMonitors
For autoscaling you only need the operator (to process ServiceMonitor objects) and the Prometheus instance itself. Disable every other component to keep the install lightweight. Create a kube-prometheus-stack-values.yaml:
# Operator (prometheusOperator) and Prometheus stay enabled by default —
# everything below is cluster-wide monitoring that autoscaling does not need.
alertmanager:
  enabled: false
grafana:
  enabled: false
nodeExporter:
  enabled: false      # disables the prometheus-node-exporter subchart
kubeStateMetrics:
  enabled: false      # disables the kube-state-metrics subchart
defaultRules:
  create: false       # skip the bundled Kubernetes alerting/recording rules
# Skip scraping of Kubernetes control-plane and node components
kubeApiServer:
  enabled: false
kubelet:
  enabled: false
kubeControllerManager:
  enabled: false
coreDns:
  enabled: false
kubeDns:
  enabled: false
kubeEtcd:
  enabled: false
kubeScheduler:
  enabled: false
kubeProxy:
  enabled: false
helm install kube-prometheus-stack prometheus-community/kube-prometheus-stack \
  --namespace monitoring \
  --create-namespace \
  -f kube-prometheus-stack-values.yaml
The managed Prometheus is then reachable in-cluster at http://kube-prometheus-stack-prometheus.monitoring.svc.cluster.local:9090.
Enable the GitGuardian ServiceMonitor objects in your local-values.yaml:
observability:
  exporters:
    statefulAppExporter:
      enabled: true
  serviceMonitors:
    enabled: true
    labels:
      # Must match the Helm release name of your kube-prometheus-stack install.
      # The stack's Prometheus only selects ServiceMonitors carrying this label.
      release: kube-prometheus-stack
release label is mandatoryBy default, the stack's Prometheus has serviceMonitorSelector: {matchLabels: {release: <stack-release-name>}}. A ServiceMonitor without that exact label is silently ignored — no targets, no metrics, and the Prometheus Adapter ends up exposing nothing. Either set the label as shown above, or set prometheus.prometheusSpec.serviceMonitorSelectorNilUsesHelmValues=false on the stack to make it select every ServiceMonitor.
After helm upgrade of the GitGuardian chart, confirm the targets are picked up (state UP) in the Prometheus UI under Status > Targets, or:
kubectl -n monitoring port-forward svc/kube-prometheus-stack-prometheus 9090
# then browse http://localhost:9090/targets and look for serviceMonitor/<gim-namespace>/...
Option B: Standalone Prometheus with manual scrape config
Install the standalone server:
helm install prometheus prometheus-community/prometheus \
  --namespace monitoring \
  --create-namespace \
  --set alertmanager.enabled=false \
  --set prometheus-pushgateway.enabled=false
The server is then reachable in-cluster at http://prometheus-server.monitoring.svc.cluster.local:80.
Because the standalone server ignores ServiceMonitor objects, add a scrape job pointing at the GitGuardian metrics endpoints. The Celery queue-length metric (gim_celery_queue_length) is published by the app exporter, a single aggregating endpoint — so one static target is enough. Set this in the standalone Prometheus chart's values:
extraScrapeConfigs: |
  - job_name: "gim"
    static_configs:
      # Replace <gim-namespace> with the namespace your GitGuardian release is installed in
      - targets: ["app-exporter.<gim-namespace>.svc.cluster.local:9808"]
    metric_relabel_configs:
      # The adapter rule maps metrics to a namespace (overrides.namespace), so the
      # series must carry a `namespace` label. A static target has none, so derive
      # it from the instance hostname: app-exporter.<namespace>.svc... -> <namespace>
      - source_labels: [instance]
        regex: '.*\.([^.]+)\.svc.*'
        target_label: namespace
        action: replace
        replacement: '$1'
<gim-namespace> in app-exporter.<gim-namespace>.svc.cluster.local is the namespace of your GitGuardian release — substitute the namespace you installed into. The metric_relabel_configs block then derives the namespace label from whatever you set, so keep the two consistent.
The app-exporter service only exists when the aggregating exporter is enabled — set observability.exporters.statefulAppExporter.enabled: true in your GitGuardian values.
For Machine Learning Secret Engine autoscaling you also need bentoml_service_request_in_progress, which is served by the secret engine itself rather than the app exporter. Add a second static target for it (port 3000 is the secretEngine.port default — change it only if you overrode that value):
  - job_name: "gim-ml-secret-engine"
    metrics_path: /metrics
    static_configs:
      # Replace <gim-namespace> with your namespace, and 3000 if you changed secretEngine.port
      - targets: ["ml-secret-engine.<gim-namespace>.svc.cluster.local:3000"]
    metric_relabel_configs:
      - source_labels: [instance]
        regex: '.*\.([^.]+)\.svc.*'
        target_label: namespace
        action: replace
        replacement: '$1'
observability.serviceMonitorsKeep observability.serviceMonitors.enabled: false (the default) for this option. A standalone Prometheus install does not register the monitoring.coreos.com CRDs (those come with the Prometheus Operator). If you enable it, the GitGuardian chart tries to create ServiceMonitor objects whose CRD is absent and the helm install/helm upgrade fails with a no matches for kind "ServiceMonitor" error. The standalone server would ignore those objects anyway — collection here comes solely from the scrape config above.
Installing Prometheus adapter
If you choose HPA for autoscaling, install Prometheus Adapter to expose the Prometheus metrics to the Kubernetes metrics API. Point prometheus.url/prometheus.port at the Prometheus you installed above — this is the single most common misconfiguration.
For Option A (kube-prometheus-stack):
helm install prometheus-adapter prometheus-community/prometheus-adapter \
  --namespace monitoring \
  --set prometheus.url=http://kube-prometheus-stack-prometheus.monitoring.svc.cluster.local \
  --set prometheus.port=9090
For Option B (standalone server):
helm install prometheus-adapter prometheus-community/prometheus-adapter \
  --namespace monitoring \
  --set prometheus.url=http://prometheus-server.monitoring.svc.cluster.local \
  --set prometheus.port=80
If prometheus.url points at a service that does not exist (for example, you migrated from the standalone server to the stack but left the adapter on the old URL), the adapter stays AVAILABLE=True but exposes zero metrics. Verify with:
kubectl get --raw "/apis/custom.metrics.k8s.io/v1beta1" | jq '.resources[].name'
kubectl get --raw "/apis/external.metrics.k8s.io/v1beta1" | jq '.resources[].name'
An empty resources list means the adapter reaches no matching series — check the URL first, then the rules.
See the Prometheus Adapter configuration section below for the rules to add.
Installing KEDA controller
Install the KEDA controller to enable autoscaling. You can install it using the KEDA Helm chart with the following commands:
helm repo add kedacore https://kedacore.github.io/charts
helm install keda kedacore/keda \
  --namespace keda \
  --create-namespace
You must configure the Helm values of your GitGuardian chart to allow KEDA to connect to your Prometheus server:
autoscaling:
  keda:
    prometheus:
      metadata:
        # Use the Prometheus server address from your installation:
        #   Option A (kube-prometheus-stack): http://kube-prometheus-stack-prometheus.monitoring.svc.cluster.local:9090
        #   Option B (standalone server):     http://prometheus-server.monitoring.svc.cluster.local:80
        serverAddress: http://prometheus-server.monitoring.svc.cluster.local:80
        # Optional. Custom headers to include in query
        customHeaders: X-Client-Id=cid,X-Tenant-Id=tid,X-Organization-Id=oid
        # Optional. Specify authentication mode (basic, bearer, tls)
        authModes: bearer
      # Optional. Specify TriggerAuthentication resource to use when authModes is specified.
      authenticationRef:
        name: keda-prom-creds
A ScaledObject and an hpa will be created in the GitGuardian namespace.
Autoscaling workers
Autoscaling allows for dynamic scaling of worker pods based on Celery task queue length as an external metric for scaling decisions, improving efficiency and performance while optimizing resource costs.
To enable autoscaling based on Celery queue lengths, you need first to authorize metrics collection so the application exposes its metrics.
If you use KEDA, configuring the Prometheus adapter is not necessary.
Prometheus adapter configuration
Configure Prometheus adapter to expose Celery queue lengths as external metrics. This is done by setting up a custom rule in the Prometheus Adapter configuration.
The following rule should be added to your Prometheus Adapter Helm values to expose Celery queue lengths:
rules:
  external:
    - seriesQuery: '{__name__="gim_celery_queue_length",queue_name!=""}'
      metricsQuery: sum(<<.Series>>{<<.LabelMatchers>>}) by (queue_name)
      resources:
        namespaced: true
        overrides:
          namespace:
            resource: namespace
If you use Machine Learning, you will also need this rule:
rules:
  external:
    - seriesQuery: '{__name__="bentoml_service_request_in_progress",exported_endpoint!=""}'
      resources:
        namespaced: false
      metricsQuery: sum(<<.Series>>{<<.LabelMatchers>>}) by (<<.GroupBy>>)
Autoscaling Behavior
The following behavior will be applied:
- Scaling Up: If the length of a Celery queue exceeds 10 tasks per current worker replica, the number of replicas will be increased, provided the current number of replicas is below the specified maximum limit.
- Scaling Down: If the number of tasks per current worker replica remains below 10 for a continuous period of 5 minutes, the number of replicas will be decreased, provided the current number of replicas is above the specified minimum limit.
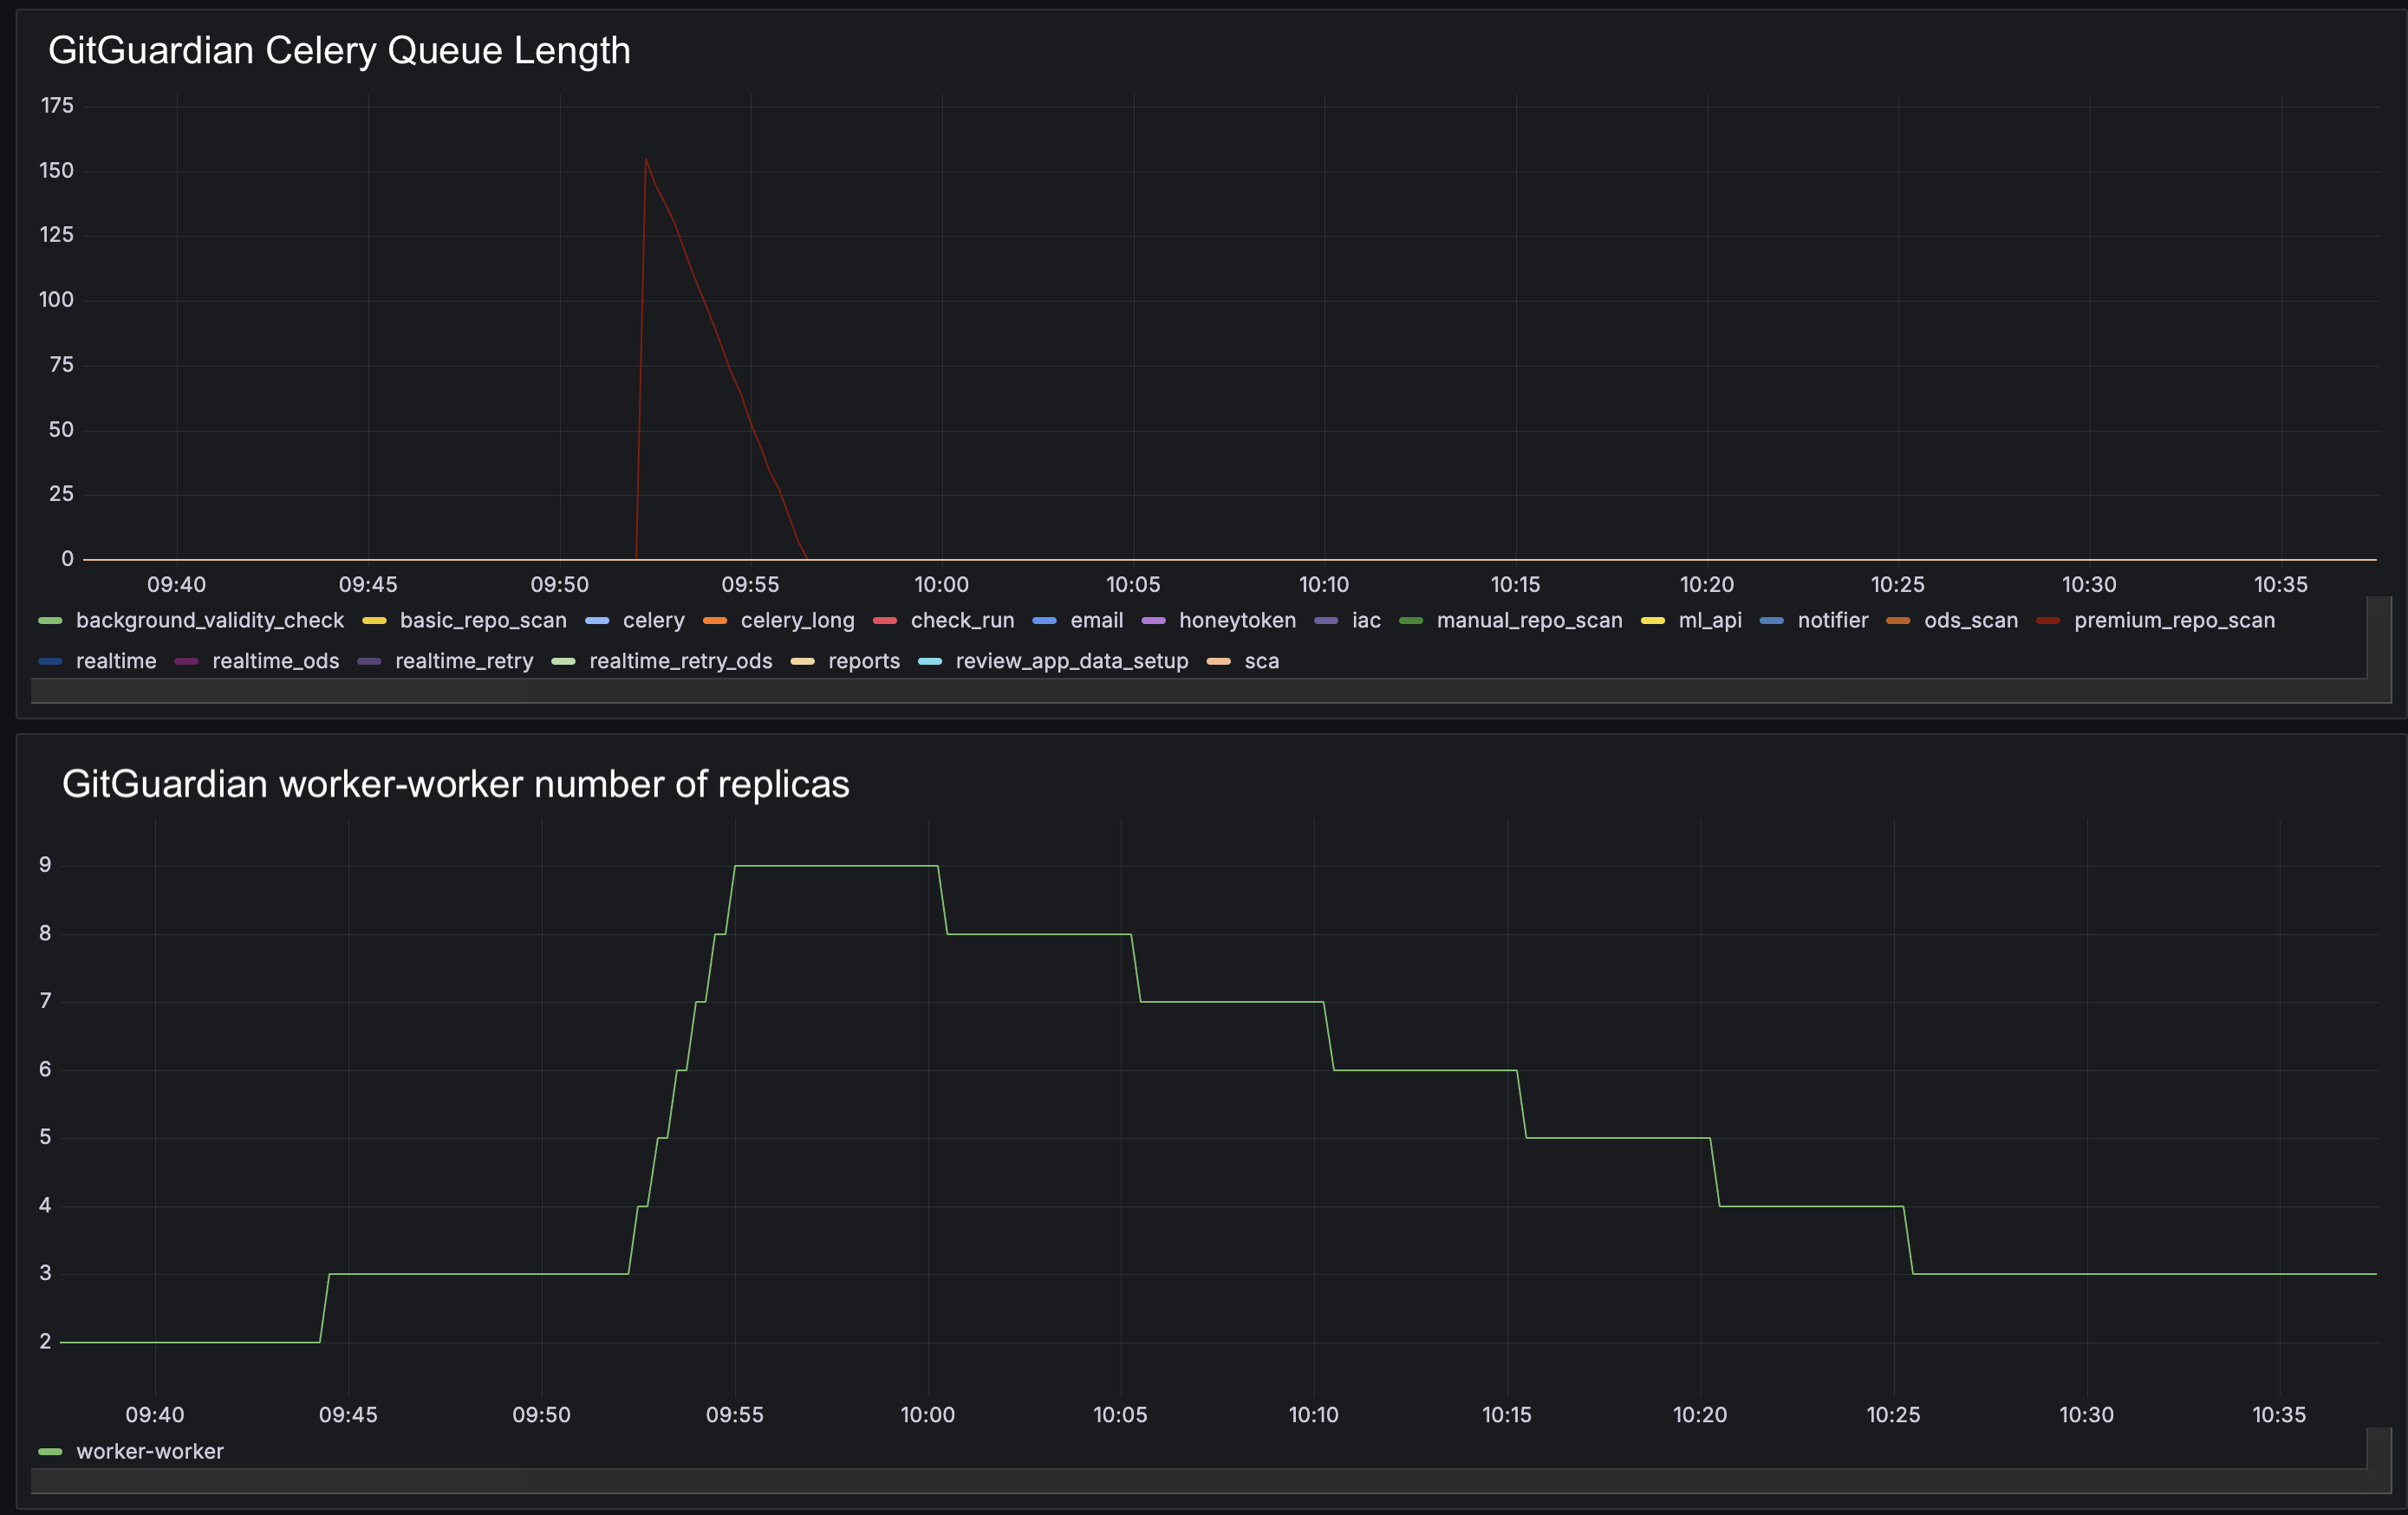
Using KEDA, when the Celery queue is empty, the worker will transition to an idle state, resulting in the number of replicas being scaled down to zero.
Autoscaling web applications
Web deployments (e.g. public_api, internal_api) scale on request latency, reading from your
ingress controller's Prometheus metrics. GitGuardian ships a built-in latency query for a set of
controllers; for any other controllers you provide your own KEDA trigger.
Webapp autoscaling requires Gateway API routing (routingApi: gateway-api) — the actively
developed mode that exposes the per-webapp metrics the autoscaler reads. It is not available with
the default built-in nginx routing (routingApi: ingress), which fronts all traffic through a single
in-chart nginx pod and exposes no per-webapp metrics.
Prerequisites
In addition to Prometheus and KEDA, the built-in query reads metrics emitted by your ingress controller, which GitGuardian does not install or scrape. You must therefore:
- Enable the controller's Prometheus metrics, on the controller's own chart — for example:
- traefik:
metrics.prometheus.serviceMonitor.enabled=true - istio / contour: their Envoy proxy metrics (no extra flag, but see the next point)
- traefik:
- Have Prometheus scrape them, via a
ServiceMonitor/PodMonitor(Prometheus Operator). Most controller charts ship one behind a flag (e.g. traefik…metrics.serviceMonitor.enabled=true); istio and Contour's Envoy are scraped with aPodMonitoron the proxy pods (path/stats/prometheus).
With the standard ServiceMonitor setup, Prometheus renames the controller's service label to
exported_service (label collision with the scrape target) — which is what the built-in queries match.
If the expected series are missing, autoscaling has no data: check in Prometheus that the controller's
request-duration metric exists before debugging the chart.
Supported controllers
The built-in latency query is selected by ingress.controller:
ingress.controller | Built-in latency query |
|---|---|
istio | ✅ |
traefik | ✅ |
contour | ✅ (requires the Gateway API experimental CRD channel — see below) |
nginx-gateway-fabric | ❌ (no per-route metrics in the OSS edition) |
other | ❌ (by design — bring your own trigger) |
The built-in query covers istio, traefik and contour. Contour additionally requires the Gateway
API experimental CRD channel (the upstream Kubernetes Gateway API SIG release channel). Any other
data plane (nginx-gateway-fabric, Kong, Cilium, Envoy Gateway, aws_alb, …) has no built-in query —
set controller: other and supply your own KEDA trigger like the one below.
Built-in latency autoscaling (supported controllers)
Set a latency threshold (in milliseconds); the chart builds the right Prometheus query for your controller automatically:
ingress:
  controller: istio        # one of: istio, traefik, contour
webapps:
  public_api:
    autoscaling:
      keda: { enabled: true }
      minReplicas: 1
      maxReplicas: 5
      metrics:
        targetLatency: 1000   # ms
Custom trigger for an unlisted controller (e.g. Gateway API with Kong / Cilium / Envoy Gateway)
When your data plane has no built-in query, set ingress.controller: other, disable the built-in
query with targetLatency: null, and provide your own KEDA trigger. Routing is unaffected —
other renders standard Gateway API HTTPRoutes (or a plain Ingress with your ingressClassName).
ingress:
  routingApi: gateway-api
  controller: other
  gatewayApi:
    gatewayClassName: kong   # your Gateway API controller
webapps:
  public_api:
    autoscaling:
      keda:
        enabled: true
        triggers:
          - type: prometheus
            metricType: Value
            metadata:
              serverAddress: http://prometheus-server.monitoring.svc.cluster.local:80
              query: 'sum(rate(kong_http_requests_total{service="gim.public-api.pnum-5051"}[1m]))'
              threshold: "20"
      minReplicas: 1
      maxReplicas: 5
      metrics:
        targetLatency: null   # disables the built-in query
Overriding the built-in query
You can also replace the built-in query with your own (e.g. scale on a different metric, percentile, or
window): set targetLatency: null to drop the built-in query and define your trigger. Once
targetLatency is null the controller value no longer affects autoscaling, so you can keep your real
controller (e.g. istio) or set controller: other — both behave the same with a custom trigger.
ingress:
  controller: istio          # or "other" — irrelevant for autoscaling once targetLatency is null
webapps:
  public_api:
    autoscaling:
      keda:
        enabled: true
        triggers:
          - type: prometheus
            metricType: Value
            metadata:
              serverAddress: http://prometheus-server.monitoring.svc.cluster.local:80
              # e.g. p99 instead of the default p95 latency
              query: 'histogram_quantile(0.99, sum(rate(istio_request_duration_milliseconds_bucket{destination_service_name="public-api"}[2m])) by (destination_service_name, le))'
              threshold: "800"
      minReplicas: 1
      maxReplicas: 5
      metrics:
        targetLatency: null
autoscaling.keda.triggers are passed to KEDA as-is, so you are not limited to Prometheus — any
KEDA scaler (CPU, memory, Kafka, SQS, …) can be used.
KOTS-based installation
KOTS-based installation only allows HPA autoscaling.
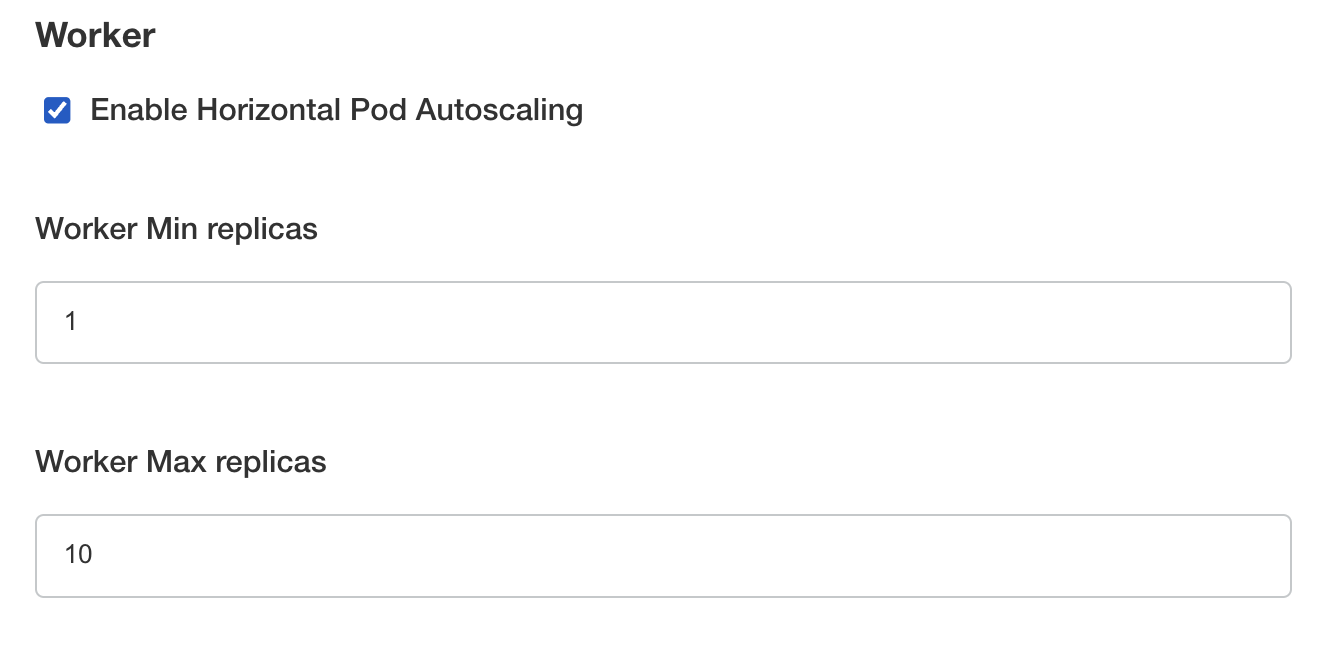
Navigate under Config > Scaling in the KOTS Admin Console, you will have access to the worker scaling options.
For each worker, you can enable autoscaling by ticking the option Enable Horizontal Pod Autoscaling, then you will be able to specify the minimum and the maximum replicas.
Helm-based installation
Customize Helm applications using your local-values.yaml file, submitted with the helm command.
Autoscaling Workers
You can enable worker autoscaling by setting the following Helm values (here, we enable HPA for the "worker" worker):
celeryWorkers:
  worker:
    autoscaling:
      hpa:
        enabled: true
      keda:
        enabled: false
      minReplicas: 1
      maxReplicas: 10
Autoscaling the Machine Learning Secret Engine
For effective autoscaling of the Machine Learning Secret Engine, you must enable autoscaling for both:
-
The ML Worker processing the Celery queue (
ml-api-priority): this worker is responsible for queuing and dispatching ML-related tasks. Without autoscaling, it could become a bottleneck, leading to delays in processing requests. -
The Secret Engine handling the computation (
secretEngine): enabling autoscaling for the Secret Engine ensures that it can scale in response to the demand for ML computations.
To enable autoscaling, configure the following Helm values:
# ML Secret Engine
secretEngine:
  autoscaling:
      hpa:
        enabled: true
      keda:
        enabled: false
      minReplicas: 1
      maxReplicas: 2

celeryWorkers:
  # ML Worker
  ml-api-priority:
    autoscaling:
      hpa:
        enabled: true
      keda:
        enabled: false
      minReplicas: 1
      maxReplicas: 2
See the values reference documentation for further details.
autoscaling.hpa.enabled and autoscaling.keda.enabled Helm parameters are mutually exclusive, you must choose between hpa (using Prometheus adapter) and KEDA controller.

